Turning a £7 worth webcam into a simple home surveilance system.
Install Zoneminder
We’ll be using a 32bit Debian Wheezy VM. Update the system and install Zoneminder:
# apt-get update && apt-get upgrade -uV
# apt-get install zoneminder
Install Apache web server:
# apt-get install apache2
Add Apache User to the Video Group
This is needed for the webserver to be able to access the webcam:
# ls -l /dev/video0
crw-rw---T 1 root video 81, 0 Dec 19 20:36 /dev/video0
Add user to supplementary group:
# usermod -aG video www-data
Link Apache to Zoneminder
Open:
# vim /etc/zm/apache.conf
Check the file to look as below:
Alias /zm /usr/share/zoneminder
ScriptAlias /cgi-bin /usr/share/zoneminder/cgi-bin
<Directory /usr/share/zoneminder>
php_flag register_globals off
Options FollowSymLinks
<IfModule mod_dir.c>
DirectoryIndex index.php
</IfModule>
</Directory>
Link Apache file:
# ln -s /etc/zm/apache.conf /etc/apache2/conf.d/zoneminder.conf
Optional: Install Cambozola Java Plugin
Cambozola is a Java plugin that decodes multipart JPEG streams. Mozilla-based browser have native support. This plugin is for browsers like Internet Explorer that lack that support.
# cd /usr/src
# wget http://www.andywilcock.com/code/cambozola/cambozola-latest.tar.gz
# tar xzvf cambozola-latest.tar.gz
# cp ./cambozola-0.935/dist/cambozola.jar /usr/share/zoneminder
Find Out Logitech QuickCam Pro 5000 Capabilities
Find the device number:
# lsusb
Bus 001 Device 001: ID 1d6b:0002 Linux Foundation 2.0 root hub
Bus 002 Device 001: ID 1d6b:0001 Linux Foundation 1.1 root hub
Bus 003 Device 001: ID 1d6b:0001 Linux Foundation 1.1 root hub
Bus 004 Device 001: ID 1d6b:0001 Linux Foundation 1.1 root hub
Bus 005 Device 001: ID 1d6b:0001 Linux Foundation 1.1 root hub
Bus 001 Device 004: ID 046d:08c5 Logitech, Inc. QuickCam Pro 5000
Get vendor and product codes (may also be seen from the output above):
# lsusb -s 004 -v | grep id
  idVendor           0x046d Logitech, Inc.
  idProduct          0x08c5 QuickCam Pro 5000
Get formats and resolution supported:
# zmu -d /dev/video0 -vqV2
Video Device: /dev/video0
General Capabilities
  Driver: uvcvideo
  Card: UVC Camera (046d:08c5)
  Bus: usb-0000:00:1d.7-3
  Version: 3.2.51
  Type: 0x4000001
    Supports video capture (X)
    Does not support video output
    Does not support frame buffer overlay
    Does not support VBI capture
    Does not support VBI output
    Does not support sliced VBI capture
    Does not support sliced VBI output
    Does not support video output overlay
    Does not have tuner
    Does not have audio in and/or out
    Does not have radio
    Does not support read/write i/o (X)
    Does not support async i/o
    Supports streaming i/o (X)
    Standards:
  Formats:
    MJPEG (MJPG)
    YUV 4:2:2 (YUYV) (YUYV)
Crop Capabilities
  Bounds: 640 x 480
  Default: 640 x 480
Inputs: 1
  Input 0
    Name: Camera 1
    Type: Camera
    Audioset: 00000000
    Standards: 0x0
    Power on  (X)
    Signal detected  (X)
    Colour Signal detected
    Horizontal Lock detected
Set Shared Memory Configuration
We’ve only got 1 GB or RAM installed on our machine:
# cat /proc/meminfo | grep -i memtotal
MemTotal: 1022744 kB
Therefore we’ll set the SHMMAX to not exceed a half or our physical memory, 512MB. SHMMAX is the maximum size of a single shared memory segment set in bytes. To change the value on a running system:
# echo 536870912 > /proc/sys/kernel/shmmax
To make a change permanent:
# echo "kernel.shmmax = 536870912" >> /etc/sysctl.conf
SHMALL is not causing any problems, therefore won’t be changed:
# cat /proc/sys/kernel/shmall
2097152
Restart Daemons
# service apache2 restart
# service zoneminder restart
Add WebCam to Zoneminder WebUI
Navigate a web browser to http://localhost/zm.
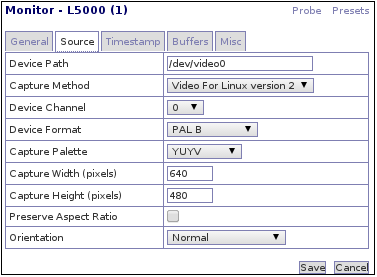
Click “Add New Monitor”. Settings for Logitech QuickCam Pro 5000 are shown below.
Optional
Under “System” tab, tick the box for “Authenticate user logins to ZoneMinder” to enable creation of user accounts with varying sets of permissions.
Under “Images” tab, check “Is the (optional) cambozola java streaming client installed” if chose to install earlier. Path to cambozola java streaming client should be “cambozola.jar”.
Under “Images” tab, add /usr/bin/ffmpeg to “Path to (optional) ffmpeg mpeg encoder (?)”.
Troubleshooting
# tail /var/log/messages
# tail /var/log/syslog
Also check Log section on Zoneminder WebUI.
Some Fixes
I’ve noticed that syslog is being spammed with the following:
ERR [Shared data size conflict in shared_data for monitor L5000, expected 328, got 316]
Open /usr/share/perl5/ZoneMinder/Memory.pm and change the following:
#our $arch = int(3.2*length(~0));
our $arch = 32;
Another one:
ERR [Can't make events/1: Permission denied]
And the fix:
# chown -R www-data:www-data /var/cache/zoneminder/events
# chown -R www-data:www-data /var/cache/zoneminder/images
I enjoyed reading you research above. If you elaborate on this at some point would you consider developing for Mint?
Thanks
Hi Paul. I’m glad you found it enjoyable to read.
However, I’m not sure I understand your meaning regards further elaboration and development for Mint. You may want to be a bit more specific.
I guess he meant you could do something (tutorial or even a porting) focused on Linux Mint Distro.
I don’t use Linux Mint myself, but as far as I’m aware, Linux Mint is based on Debian and Ubuntu. Therefore I don’t see why this article would not fit for any Debian based distribution, including Linux Mint.
Yep agreed… as I don´t use either I really dont know… anyway, nice tutorial tho.. Thanks for it.