VoIPmonitor is one of those open source tool for SIP VoIP calls monitoring and troubleshooting which you turn to when running into esoteric VoIP problems. What we like about it the most is that calls can be saved to a PCAP file and then further debugged with WireShark.
Software
Software used in this article:
- Ubuntu 12.04 LTS
- Nginx 1.1.19
- MySQL 5.5.35
- PHP 5.3.10
- Tshark 1.6
- VoIPmonitor (with GUI 7.17)
We’re using a quad-core Inter Xeon CPU:
$ grep name /proc/cpuinfo
model name	: Intel(R) Xeon(TM) CPU 2.66GHz
model name	: Intel(R) Xeon(TM) CPU 2.66GHz
model name	: Intel(R) Xeon(TM) CPU 2.66GHz
model name	: Intel(R) Xeon(TM) CPU 2.66GHz
Install Mandatory Packages
We use Asterisk PBX system with Nginx-light for our tests. Installation and configuration of either of these software packages is beyond the scope of this article.
Assuming you have Asterisk setup and working, you can install Nginx by doing (feel free to go for Apache2 if necessary):
# apt-get update && apt-get install nginx-light nginx-common
Install PHP, MySQL, terminal-based wireshark and other packages:
# apt-get install build-essential git gsfonts libvorbis-dev libpcap-dev php5 php5-cli \
php5-mysql php5-gd php5-mcrypt mysql-server unixodbc-dev tshark libmysqlclient-dev \
zlib1g-dev librsvg2-bin
Install VoIPmonitor WEB GUI (for PHP 5.3)
VoIPmonitor WEB GUI is a commercial frontend, but a free-of-charge 30 days licence key can be obtained by creating a new account on http://www.voipmonitor.org/download-gui?version=license.
VoIPmonitor WEB GUI Package
Download VoIPmonitor WEB GUI archive file:
# wget http://www.voipmonitor.org/download-gui?version=latest&phpver=53&festry \
-O gui.tgz
Untar and move to webserver’s root /var/www/:
# tar xvfz gui.tgz
# mv ./voipmonitor-gui-7.17-SVN ./voipmonitor
# mv ./voipmonitor /var/www/
# chown -R asterisk /var/www/voipmonitor
HTML/PDF Package
Download HTML/PDF wkhtml binary:
# wget http://sourceforge.net/projects/voipmonitor/files/wkhtml/0.10.0_rc2/wkhtmltopdf-i686 -O /var/www/voipmonitor/bin/wkhtmltopdf-i686
Make it world executable:
# chmod +x /var/www/voipmonitor/bin/wkhtmltopdf-i686
HTML/Image Package
Download HTML/Image wkhtml binary:
# wget http://sourceforge.net/projects/voipmonitor/files/wkhtml/0.10.0_rc2/wkhtmltoimage-i686 -O /var/www/voipmonitor/bin/wkhtmltoimage-i686
Make it world executable:
# chmod +x /var/www/voipmonitor/bin/wkhtmltoimage-i686
IonCube Package
Download and set up IonCube loader:
# wget http://www.voipmonitor.org/ioncube/i686/ioncube_loader_lin_5.3.so \
-O /usr/lib/php5/20090626+lfs/ioncube_loader_lin_5.3.so
# echo "zend_extension = /usr/lib/php5/20090626+lfs/ioncube_loader_lin_5.3.so" > /etc/php5/fpm/conf.d/ioncube.ini
At this point, PHP should be configured with IonCude:
$ php5 -v
PHP 5.3.10-1ubuntu3.11 with Suhosin-Patch (cli) (built: Apr  4 2014 01:27:23)
Copyright (c) 1997-2012 The PHP Group
Zend Engine v2.3.0, Copyright (c) 1998-2012 Zend Technologies
    with the ionCube PHP Loader v4.5.2, Copyright (c) 2002-2014, by ionCube Ltd.
Add PHP script for alerts processing to crontab to be run every 5 minutes:
# echo "/5 * * * * root php /var/www/voipmonitor/php/run.php cron" >> /etc/crontab
Licence Key
Once you have obtained a licence key, don’t forget to copy it under /var/www/voipmonitor/key.php.
Restart FastCGI process manager:
# service php5-fpm restart
Restart Nginx:
# service nginx restart
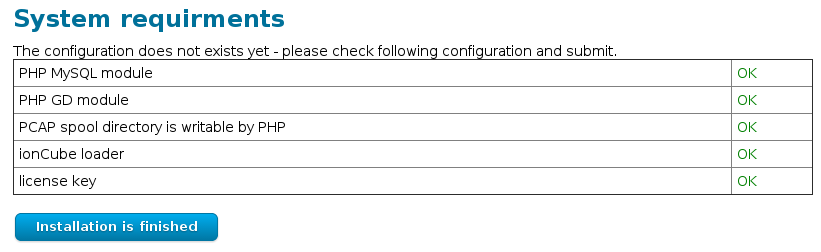
To finish the GUI installation, open a web browser and navigate to http://localhost/voipmonitor. You should see a similar view as below. Click the blue button.
Compile from Source and Install GNU/GPL Sniffer
Install snappy and curl libraries:
# apt-get install libsnappy1 libsnappy-dev libcurl4-openssl-dev
Checkout the sniffer’s source code from git:
# cd /usr/src && git clone git://git.code.sf.net/p/voipmonitor/git voipmonitor-git
# cd ./voipmonitor-git
Configure, compile and install:
# ./configure
# make
# make install
Create a new VoIPmonitor database:
# mysqladmin -uroot -p create voipmonitor
Create a new directory to store data files (for RTP, SIP, audio etc):
# mkdir /var/spool/voipmonitor
# chown asterisk /var/spool/voipmonitor
Copy default configuration file:
# cp ./config/voipmonitor.conf /etc/
# cp ./config/init.d/voipmonitor /etc/init.d/
Make links to start VoIPmonitor service in runlevels 2345:
# update-rc.d voipmonitor defaults
 /etc/rc0.d/K20voipmonitor -> ../init.d/voipmonitor
 /etc/rc1.d/K20voipmonitor -> ../init.d/voipmonitor
 /etc/rc6.d/K20voipmonitor -> ../init.d/voipmonitor
 /etc/rc2.d/S20voipmonitor -> ../init.d/voipmonitor
 /etc/rc3.d/S20voipmonitor -> ../init.d/voipmonitor
 /etc/rc4.d/S20voipmonitor -> ../init.d/voipmonitor
 /etc/rc5.d/S20voipmonitor -> ../init.d/voipmonitor
Now modify /etc/voipmonitor.conf providing MySQL database credentials, interfaces to listen on etc. Some configuration details below:
mysqlhost = 127.0.0.1
mysqlport = 3306
mysqlusername =
mysqlpassword =
mysqldb = voipmonitor
interface = eth0
managerport = 5029
sipport = 5060
packetbuffer_enable             = yes
packetbuffer_total_maxheap      = 1000 #in MB
packetbuffer_compress           = yes
spooldir = /var/spool/voipmonitor
maxpoolsize             = 10240
maxpooldays             = 21
promisc = yes
Start VoIPmonitor service:
# /etc/init.d/voipmonitor start
Starting voipmonitor: voipmonitor version 9.4beta21
Loading configuration from file /etc/voipmonitor.conf
SQL DRIVER: mysql
voipmonitor[17588]: connect - db version 5.5
voipmonitor[17588]: creating and upgrading MySQL schema...
voipmonitor[17588]: create procedure create_partition
voipmonitor[17588]: create procedure create_partitions_cdr
voipmonitor[17588]: create function getIdOrInsertUA
voipmonitor[17588]: create function getIdOrInsertSIPRES
voipmonitor[17588]: create function getIdOrInsertCONTENTTYPE
voipmonitor[17588]: create procedure PROCESS_SIP_REGISTER
voipmonitor[17588]: done
Make sure it’s running:
# netstat -nltp | grep voip
tcp   0  0 127.0.0.1:5029  0.0.0.0:*    LISTEN  17594/voipmonitor
Troubleshooting
Check syslog first if any problems arise:
$ tail /var/log/syslog
configure: error: Unable to find snappy library
To fix it, do:
# apt-get install libsnappy1 libsnappy-dev
configure: error: Unable to find curl library
To fix it, do:
# apt-get install libcurl4-openssl-dev
local – 127.0.0.1 : 5029 – Connection refused (111) – trying again
Make sure that VoIPmonitor is running, and that you can telnet:
# telnet localhost 5029
Trying 127.0.0.1...
Connected to localhost.
Escape character is '^]'.
]
voipmonitor[]: Got signal 0x04 (SIGILL): Illegal instruction (ANSI)
This can occur when installing a pre-built sniffer package. You need to compile it for your CPU from source.
VoIPMonitor is really nice. Thank you for the tutorial.