We have a Switchvox image that we want to import into AWS EC2. The plan is to install Switchvox on a Virtualbox locally, then convert the image to a raw image, upload it to AWS EC2, chroot and install Xen kernel 2.6.18-371.9.1.el5xen, modify the image appropriately making it Xen visualisation compatible, and register as an AMI.
Switchvox (CentOS 5) Image Details
Below are the details of the Switchvox 64078 (release 5.8.5) image we will be working with. The image is 32-bit RHEL/CentOS v5 with a 2.6.18 kernel that is not Xen compatible. PV-GRUB understands standard grub.conf or menu.lst commands, which allows it to work with all currently supported Linux distributions. Older distributions such as Ubuntu 10.04 LTS, Oracle Enterprise Linux or CentOS 5.x require a special “ec2” or “xen” kernel package, while newer distributions include the required drivers in the default kernel package.
We will therefore have to install a Xen kernel (a bit later). Switchvox image has a separate boot partition with the root partition on LVM.
# uname -rvm; arch
2.6.18-274.18.1.el5PAE #1 SMP Thu Feb 9 13:25:50 EST 2012 i686
i686
# cat /proc/version
Linux version 2.6.18-274.18.1.el5PAE ([email protected]) (gcc version 4.1.2 20080704 (Red Hat 4.1.2-51)) #1 SMP Thu Feb 9 13:25:50 EST 201
# cat /etc/issue
PBX build 64078
Kernel \r on an \m
# cat /etc/redhat-release
PBX build 64078
# rpm -qa | grep glibc
glibc-common-2.5-49.el5_5.7
glibc-2.5-49.el5_5.7
# rpm -qa | grep kernel
kernel-headers-2.6.18-274.18.1.el5
kernel-PAE-2.6.18-274.18.1.el5
kernel-2.6.18-274.18.1.el5
# grep XEN /boot/config-2.6.18-274.18.1.el5PAE
# CONFIG_X86_XEN is not set
# CONFIG_PCI_GOXEN_FE is not set
CONFIG_NETXEN_NIC=m
CONFIG_XEN_BLKDEV_FRONTEND=m
CONFIG_XEN_NETDEV_FRONTEND=m
CONFIG_XEN_PV_ON_HVM=y
# cat /etc/fstab
/dev/VolGroup00/LogVol00 /               ext3    defaults       1 1
LABEL=/boot              /boot           ext3    defaults       1 2
tmpfs                    /dev/shm        tmpfs   defaults       0 0
devpts                   /dev/pts        devpts  gid=5,mode=620 0 0
sysfs                    /sys            sysfs   defaults       0 0
proc                     /proc           proc    defaults       0 0
/dev/VolGroup00/LogVol01 swap            swap    defaults       0 0
# yum repolist all
Loaded plugins: fastestmirror
Determining fastest mirrors
repolist: 0
# cat /etc/sysconfig/network
NETWORKING=yes
NETWORKING_IPV6=yes
HOSTNAME=localhost.localdomain
# cat /etc/modprobe.conf
alias eth0 e1000
alias scsi_hostadapter ata_piix
alias scsi_hostadapter1 ahci
# cat /boot/grub/menu.lst
# grub.conf generated by anaconda
default=0
timeout=5
splashimage=(hd0,0)/grub/splash.xpm.gz
hiddenmenu
title PBX (2.6.18-274.18.1.el5PAE)
   root (hd0,0)
   kernel /vmlinuz-2.6.18-274.18.1.el5PAE ro root=/dev/VolGroup00/LogVol00 pci=nommconf
   initrd /initrd-2.6.18-274.18.1.el5PAE.img
title PBX-base (2.6.18-274.18.1.el5)
   root (hd0,0)
   kernel /vmlinuz-2.6.18-274.18.1.el5 ro root=/dev/VolGroup00/LogVol00 pci=nommconf
   initrd /initrd-2.6.18-274.18.1.el5.img
1. Create a VirtualBox Image
Install Switchvox on VirtualBox and configure it to use DHCP when asked.
We use VirtualBox 4.1.18 on Linux with dynamically allocated 20GB VirtualBox Disk Image for Switchvox.
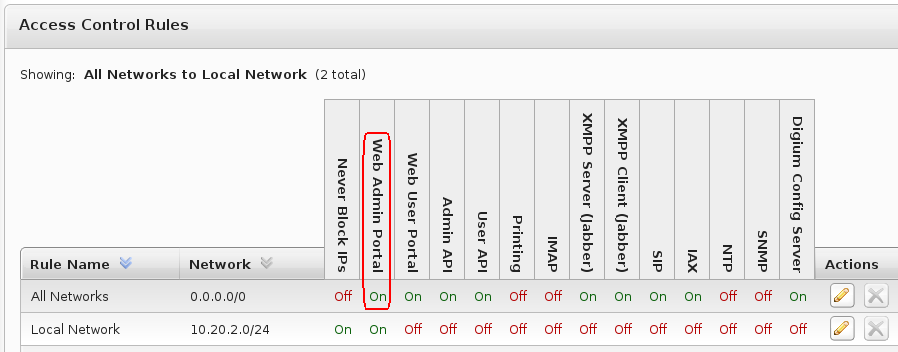
You may want to login into the Switchvox WebUI and enable Web Admin Portal for all networks if you’re planning to connect from outside (i.e. not using VPN).
2. Convert VirtualBox Image to Raw Image
$ vboxmanage internalcommands converttoraw /vb/Switchvox.vdi /tmp/switchvox.img
Converting image "Switchvox.vdi" with size 21474836480 bytes (20480MB) to raw...
Check the partition table:
# fdisk -lu /tmp/switchvox.img | grep switch
Disk switchvox.img: 21.5 GB, 21474836480 bytes
/tmp/switchvox.img1   *          63      208844      104391   83  Linux
/tmp/switchvox.img2          208845    41929649    20860402+  8e  Linux LVM
Compress the image file before uploading to AWS EC2:
$ cd /tmp && tar cvfj ./switchvox.img.tbz2 ./switchvox.img
We use bzip2 for better compression, feel free to use gzip etc.
Check the size:
$ du -sh /tmp/switchvox.img.tbz2
1.6G	/tmp/switchvox.img.tbz2
Calculate md5sum for integrity check:
$ md5sum /tmp/switchvox.img.tbz2
d744da50ea51aa1d02940d88c2f9b561  tmp/switchvox.img.tbz2
3. Upload a Raw Image to AWS EC2 (We Use EU West Region)
You can use EC2 CLI tools or AWS web interface to do all the AWS related stuff, up to you. Pick you preferred method and start a temporary Linux EC2 instance (we use RHEL-6.5-i368), then transfer the image, i.e. via SCP:
$ scp /tmp/switchvox.img.tbz2 [email protected]:
When the transfer is done, create an EBS volume of the correct size (20GB) and attach it to the instance. In our case the volume is attached to /dev/xvdj. Check the md5sum of the image to verify it was not corrupted:
$ md5sum switchvox.img.tbz2
d744da50ea51aa1d02940d88c2f9b561  switchvox.img.tbz2
SSH into the instance and untar the file (ensuring you have at least 20GB of free space on the disk):
$ cd ~ && tar xvfj ./switchvox.img.tbz2
Transfer the image to the 20GB volume /dev/xvdj that was attached previously:
$ dd if=./switchvox.img of=/dev/xvdj bs=10M
Check the content of the volume, should be as below:
# fdisk -l 2>/dev/null | grep xvdj
Disk /dev/xvdj: 21.5 GB, 21474836480 bytes
/dev/xvdj1   *          63      208844      104391   83  Linux
/dev/xvdj2          208845    41929649    20860402+  8e  Linux LVM
It’s not a bad idea to create a snapshot of the /dev/xvdj volume at this point so in case something goes wrong, we don’t have to re-do things.
4. Prepare and Chroot Into Switchvox Environment
Check physical volumes:
# pvs
  PV         VG         Fmt  Attr PSize  PFree
  /dev/xvdj2 VolGroup00 lvm2 a-   19.88g    0
# vgscan
  Reading all physical volumes.  This may take a while...
  Found volume group "VolGroup00" using metadata type lvm2
Make the volume group VolGroup00 active to be able to mount logical volumes:
# vgchange VolGroup00 -ay
  2 logical volume(s) in volume group "VolGroup00" now active
# lvscan
  ACTIVE            '/dev/VolGroup00/LogVol00' [17.88 GiB] inherit
  ACTIVE            '/dev/VolGroup00/LogVol01' [2.00 GiB] inherit
Mount the logical root volume:
# mount /dev/VolGroup00/LogVol00 /mnt
Mount the /boot partition:
# mount /dev/xvdj1 /mnt/boot
Mount /sys, /proc and /dev directories:
# mount -o bind /sys /mnt/sys;mount -o bind /proc /mnt/proc;mount -o bind /dev /mnt/dev
Chroot into the Switchvox environment:
# chroot /mnt /bin/bash
5. Configure SSH Access and Install Xen Kernel
We run the switchvox-xen-script.sh to do all the job. The script does the following:
- Configures OpenSSH server.
- Enabled sshd on boot plus disables avahi, iptables and openvpn.
- Generates SSH keypair for root.
- Adds CentOS 5 repositories (base, updates, extra).
- Adds modprobe aliases for eth0 and SCSI.
- Installs CentOS Xen kernel.
- Creates an initrd file with xennet and xenblk preloaded.
- Configures ifcfg-eth0 with DHCP and enables on boot.
- Enables networking and disables IPv6.
If you check the script, you will notice us using mkinitrd with –preload=xennet and –preload=xenblk. We checked the init config straight after the Xen kernel installation, and xenblk module was already there. Only the xennet was missing thus preventing us to connect to the VM. We passed xennet together with xenblk to mkinitrd to stress that both modules are mandatory.
That’s how the menu.lst file looks like after manual modification:
# cat /boot/grub/menu.lst
default=0
timeout=1
hiddenmenu
title PBX-2.6.18-371.9.1.el5xen
   root (hd0,0)
   kernel /vmlinuz-2.6.18-371.9.1.el5xen ro root=/dev/VolGroup00/LogVol00 selinux=0
   initrd /initrd-2.6.18-371.9.1.el5xen-xennet.img
Exit the chroot environment:
# exit
Copy the SSH private key:
# cp /mnt/root/.ssh/key.pem ~
Unmount everything and deactivate the volume group:
# umount /mnt/boot && umount /mnt/{proc,sys,dev} && umount /mnt
# vgchange VolGroup00 -an
6. Create and Register a New Amazon Machine Image (AMI)
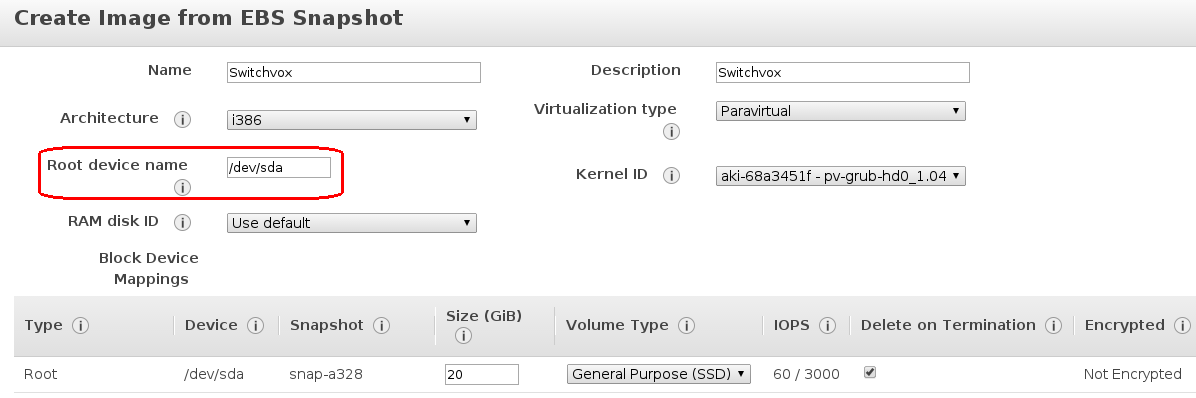
Create a snapshot of the volume and register it as an AMI by using the kernel ID of aki-68a3451f. Note that this kernel ID applies to the eu-west region in particular (see below).
$ export EC2_URL=https://ec2.eu-west-1.amazonaws.com
$ ec2-describe-images -o amazon --filter "name=pv-grub-*.gz" | awk '{print $2 " " $3}'
aki-5ea34529 amazon/pv-grub-hd00_1.04-i386.gz
aki-58a3452f amazon/pv-grub-hd00_1.04-x86_64.gz
aki-68a3451f amazon/pv-grub-hd0_1.04-i386.gz
aki-52a34525 amazon/pv-grub-hd0_1.04-x86_64.gz
aki-89655dfd amazon/pv-grub-hd00_1.03-i386.gz
aki-8b655dff amazon/pv-grub-hd00_1.03-x86_64.gz
aki-75665e01 amazon/pv-grub-hd0_1.03-i386.gz
aki-71665e05 amazon/pv-grub-hd0_1.03-x86_64.gz
According to this page http://docs.aws.amazon.com/AWSEC2/latest/UserGuide/UserProvidedKernels.html, there is no longer any difference between the hd0 and the hd00 AKIs, though Amazon continue to provide both naming schemes for backward compatibility. You should register new AMIs using the hd0 AKI.
Launch a new instance when the AMI is ready. It should boot up without problems.
7. Remove CentOS 5 Yum Repositories
When you have the VM running, SSH into it and remove CentOS 5 Yum repositories that were added previously.
# > /etc/yum.repos.d/file.repo
Or you can alternatively set “enabled=0” if you prefer to. I recommend to install updates that are supplied by Digium only, in order to protect the VoIP system from breaking.
You can check for available Digium updates and install them by using the following commands:
# yum check-update
# yum update
You may receive yum errors saying that some package is not signed:
Package asterisk.i386.rpm is not signed
To ignore GPG checks and workaround the problem, edit /etc/yum.conf and change the value of gpgcheck from 1 to 0.
Logs and References
Mkinitrd and System Logs
For anyone who might come across this page looking for any hints or solutions, we attached some logs for the fully running Switchvox EC2 AMI:
mkinitrd-console-output.txt
initrd-init-nash.txt
full-ec2-boot-log.txt
References
http://www.digium.com/en/products/switchvox/support/switchvox-release-notes
There were dozens of web articles, blogs and forums I went through to get it working, and the ones below deserved to be credited.
VirtualBox image to raw plus CentOS 5.5 on EC2.
http://www.ioncannon.net/system-administration/1246/converting-from-virtualbox-or-vmware-to-ec2-now-easier-than-ever/
http://www.ioncannon.net/system-administration/1205/installing-cent-os-5-5-on-ec2-with-the-cent-os-5-5-kernel/
Thanks for /etc/yum.repos.d/ repository list.
http://notdeadhead.wordpress.com/2011/11/20/using-amazon-ec2-basics-about-custom-amis/
Thanks for grub.conf hint.
http://www.virtuatopia.com/index.php/Xen_domainU_Boot_Fails_with_Invalid_kernel_/_ERROR:_Not_a_Xen-ELF_image_Message
Thanks for “/sbin/lvm.static -> /tmp/initrd.125242/bin/lvm” – I had it missing at one point.
http://realtechtalk.com/kvm_cannot_boot_xen_guest_using_lvm-1309-articles
Thanks for Xen /etc/modprobe.conf aliases.
http://backdrift.org/xen-pvgrub-howto
Should the IP address configuration in Switchvox be set to “Allow Nat Port Forwarding” with the External IP Address set to the EIP? It seems that some providers don’t send SIP packets to the Switchvox as is configured on EC2 and I’m wondering whether I have my IP configuration set properly. Are you using this Switchvox on EC2 in production?
Correct, Switchvox should be configured to “Allow Nat Port Forwarding” with the external IP address set to the EIP. I have not heard of any SIP providers not sending packets to AWS EC2. Do you have any examples?
Yes, I’m using Switchvox on EC2 in production. The only disadvantage is that you cannot go anywhere above “m1.medium” instance type as Switchvox is a 32-bit OS.
I think the issue I’m experiencing might be related to Iptables. I’m looking into that right now. I agree about the 32-bit limitation. We have deployed Asterisk/FreePBX on EC2 in 64bit versions and have had a good experience. But we have a few customers who are Switchvox driven so this is a necessary learning curve for our business. Thank you so much for all the effort you put into writing this blog entry – the steps were both helpful and accurate. Also, I note that Switchvox must be left with ‘Technical Support Access’ enabled for SSH to work.
I’m sure you realise you don’t really need iptables on EC2 – Amazon firewall does all the job. It’s a bit annoying that every time (even if you flush iptables configuration) you modify Switchvox access control rules (Server –> Networking –> Access Control), it re-generates and restores iptables rules. You can use a cronjob to flush iptables rules regularly, but I’d just prefer to have them off.
In terms of Asterisk/FreePBX, we used this combo for quite a while, but found FreePBX adding a big layer of extra complexity on top of Asterisk. It was also difficult to get a management API to work. I cannot say that Switchvox WebUI is in any way superior compared to FreePBX, but it does the job for us. Switchvox API, on the other hand, turned out to be a big disappointment. You cannot share personal phonebooks between users, you cannot even delete a phonebook entry! Subadmins have access to any Admin APIs, but anything in the switchvox.users API list does not function for subadmins. Moreover, while you can reboot a non-Digium phone via API, you cannot reboot a Digium phone.
You’re right, “Technical Support Access” must be left enabled for SSH to work, otherwise SSH port is closed on iptables. Thanks for your feedback, I’m glad you found this article useful.
Do you have this Switchvox fresh image on Amazon ready to be fired?
The AMI that I built originally should still be on AWS, although it’s horribly out of date by now.