Setting up an OpenLDAP server on Debian Wheezy.
Software
Software used in this article:
- Debian Wheezy
- OpenLDAP 2.4.31
- Gnutls-bin 3.0.22
- JXplorer 3.2.2
Installation
Install the slapd package answering the prompt to set an admin user password:
# apt-get update && apt-get install slapd ldap-utils
The ldap-utils package contains the following tools:
- ldapsearch – search for and display entries.
- ldapmodify – modify an entry.
- ldapadd – add a new entry.
- ldapdelete – remove and entry.
- ldapmodrdn – rename an entry.
- ldappasswd – change a password.
The latest version of slapd (v2.4.31 on Debian) only asks for an admin user password and none of the configuration details. To configure slapd, do:
# dpkg-reconfigure -p low slapd
Our answers:
- Omit OpenLDAP server configuration? No
- DNS domain name: top
- Organization name: top
- Administrator password: passwd
- Confirm password: passwd
- Database backend to use: HDB
- Do you want the database to be removed when slapd is purged? No
- Move old database? Yes
- Allow LDAPv2 protocol? No
Open /etc/default/slapd and make sure the following line exists (feel free to listen on IPv6 if needed):
SLAPD_SERVICES="ldap://0.0.0.0:389/ ldaps://0.0.0.0:636/ ldapi:///"
Here’s how our /etc/default/slapd looks like:
# grep -ve "^#" -ve "^$" /etc/default/slapd
SLAPD_CONF=
SLAPD_USER="openldap"
SLAPD_GROUP="openldap"
SLAPD_PIDFILE=
SLAPD_SERVICES="ldap://0.0.0.0:389/ ldaps://0.0.0.0:636/ ldapi:///"
SLAPD_SENTINEL_FILE=/etc/ldap/noslapd
SLAPD_OPTIONS=""
Check initial configuration:
# slapcat
dn: dc=top
objectClass: top
objectClass: dcObject
objectClass: organization
o: top
dc: top
structuralObjectClass: organization
entryUUID: 7953d532-d04f-1033-8bc6-e18a672615bb
creatorsName: cn=admin,dc=top
createTimestamp: 20140914113904Z
entryCSN: 20140914113904.377393Z#000000#000#000000
modifiersName: cn=admin,dc=top
modifyTimestamp: 20140914113904Z

dn: cn=admin,dc=top
objectClass: simpleSecurityObject
objectClass: organizationalRole
cn: admin
description: LDAP administrator
userPassword:: e1AAAAAAQnZSS3JOTnVBbGpmd0VTZ0l3MjVDays=
structuralObjectClass: organizationalRole
entryUUID: 796778b2-d04f-1033-8bc7-e18a672615bb
creatorsName: cn=admin,dc=top
createTimestamp: 20140914113904Z
entryCSN: 20140914113904.506110Z#000000#000#000000
modifiersName: cn=admin,dc=top
modifyTimestamp: 20140914113904Z
Create a new directory to store custom configuration files:
# mkdir /etc/ldap/ldifconfigs
# cd /etc/ldap/ldifconfigs
OpenLDAP Configuration
Configure LDAPS
Debian wiki recommends backuping LDAP server configuration before trying to configure LDAPS, because breaking the configuration with the “cn=config” style would prevent the LDAP server to restart. We just started from scratch, so there is nothing much we can actually backup.
Open /etc/default/slapd and enable LDAPS (if not yet done already):
SLAPD_SERVICES="ldap://0.0.0.0:389/ ldaps://0.0.0.0:636/ ldapi:///"
Our SSL certificates and permissions:
# ls -ld /etc/ssl/webserver/
drwxr-x--- 2 root openldap 4096 Jul 24 12:20 /etc/ssl/webserver/
# ls -l /etc/ssl/webserver/*
-rw-r--r-- 1 root root     1265 Jul 24 13:05 /etc/ssl/webserver/server-ca.crt
-rw-r--r-- 1 root root     1265 Jul 24 13:05 /etc/ssl/webserver/server.crt
-rw-r----- 1 root openldap 1675 Jul 24 13:05 /etc/ssl/webserver/server.key
If you generated your certificates using OpenSSL, you’re going to run into problems. Debian switched over to using gnutls a while ago, and it doesn’t play nice with OpenSSL certificates.
You can generate your own self-signed certificates with a certtool. Install gnutls-bin package:
# apt-get install gnutls-bin
Generate a new self-signed key:
# certtool --generate-privkey --outfile server.key
# certtool --generate-self-signed --load-privkey server.key --outfile server.crt
Create an ldif file to add the certificate sections to the OpenLDAP server. You may want to comment out TLSCACertificateFile if using a self-signed certificate.
# cat > ./ldaps.ldif << EOF
dn: cn=config
add: olcTLSCACertificateFile
olcTLSCACertificateFile: /etc/ssl/webserver/server-ca.crt
-
add: olcTLSCertificateFile
olcTLSCertificateFile: /etc/ssl/webserver/server.crt
-
add: olcTLSCertificateKeyFile
olcTLSCertificateKeyFile: /etc/ssl/webserver/server.key
EOF
Add attributes to “cn=config”:
# ldapmodify -Y EXTERNAL -H ldapi:/// -f ./ldaps.ldif
Verify:
# ldapsearch -Y EXTERNAL -H ldapi:/// -b cn=config -s base|grep TLS
SASL/EXTERNAL authentication started
SASL username: gidNumber=0+uidNumber=0,cn=peercred,cn=external,cn=auth
SASL SSF: 0
olcTLSCACertificateFile: /etc/ssl/webserver/server-ca.crt
olcTLSCertificateFile: /etc/ssl/webserver/server.crt
olcTLSCertificateKeyFile: /etc/ssl/webserver/server.key
In case you’re stuck with a broken OpenLDAP service, you may need to start from scratch:
# dpkg-reconfigure slapd
Disable SSLv3
Create an ldif with the following content:
# cat > ./nosslv3.ldif << EOF
dn: cn=config
add: olcTLSCipherSuite
olcTLSCipherSuite: SECURE256:-VERS-SSL3.0
EOF
Modify OpenLDAP configuration:
# ldapmodify -Y EXTERNAL -H ldapi:/// -f ./nosslv3.ldif
Verify. You need to have a gnutls-bin package installed.
$ gnutls-cli-debug -p 636 localhost | head
Resolving 'localhost'...
Connecting to '::1:636'...
Checking for SSL 3.0 support... no
Checking whether %COMPAT is required... no
Checking for TLS 1.0 support... yes
Checking for TLS 1.1 support... yes
Checking fallback from TLS 1.1 to... N/A
Checking for TLS 1.2 support... yes
Checking whether we need to disable TLS 1.0... N/A
Checking for Safe renegotiation support... yes
You can also use Nmap to check for supported ciphers:
$ nmap -Pn -p T:636 --script ssl-enum-ciphers localhost

Starting Nmap 6.00 ( http://nmap.org ) at 2014-10-18 19:41 GMT
Nmap scan report for localhost (127.0.0.1)
Host is up (0.00029s latency).
Other addresses for localhost (not scanned): 127.0.0.1
PORT    STATE SERVICE
636/tcp open  ldapssl
| ssl-enum-ciphers:
|   TLSv1.0
|     Ciphers (6)
|       TLS_RSA_WITH_3DES_EDE_CBC_SHA - strong
|       TLS_RSA_WITH_AES_128_CBC_SHA - strong
|       TLS_RSA_WITH_AES_256_CBC_SHA - unknown strength
|       TLS_RSA_WITH_CAMELLIA_128_CBC_SHA - unknown strength
|       TLS_RSA_WITH_CAMELLIA_256_CBC_SHA - unknown strength
|       TLS_RSA_WITH_RC4_128_SHA - strong
|     Compressors (1)
|       NULL
|   TLSv1.1
|     Ciphers (6)
|       TLS_RSA_WITH_3DES_EDE_CBC_SHA - strong
|       TLS_RSA_WITH_AES_128_CBC_SHA - strong
|       TLS_RSA_WITH_AES_256_CBC_SHA - unknown strength
|       TLS_RSA_WITH_CAMELLIA_128_CBC_SHA - unknown strength
|       TLS_RSA_WITH_CAMELLIA_256_CBC_SHA - unknown strength
|       TLS_RSA_WITH_RC4_128_SHA - strong
|     Compressors (1)
|       NULL
|   TLSv1.2
|     Ciphers (8)
|       TLS_RSA_WITH_3DES_EDE_CBC_SHA - strong
|       TLS_RSA_WITH_AES_128_CBC_SHA - strong
|       TLS_RSA_WITH_AES_128_CBC_SHA256 - strong
|       TLS_RSA_WITH_AES_256_CBC_SHA - unknown strength
|       TLS_RSA_WITH_AES_256_CBC_SHA256 - unknown strength
|       TLS_RSA_WITH_CAMELLIA_128_CBC_SHA - unknown strength
|       TLS_RSA_WITH_CAMELLIA_256_CBC_SHA - unknown strength
|       TLS_RSA_WITH_RC4_128_SHA - strong
|     Compressors (1)
|       NULL
|_  Least strength = unknown strength

Nmap done: 1 IP address (1 host up) scanned in 2.55 seconds
Set Password Hash to SSHA
Create an ldif file with the following content:
# cat > ./passwordhash.ldif << EOL
dn: cn=config
add: olcPasswordHash
olcPasswordHash: {SSHA}
EOL
Modify OpenLDAP configuration:
# ldapmodify -Y EXTERNAL -H ldapi:/// -f ./passwordhash.ldif
Verify:
# ldapsearch -Y EXTERNAL -H ldapi:/// -b cn=config|grep SSHA
SASL/EXTERNAL authentication started
SASL username: gidNumber=0+uidNumber=0,cn=peercred,cn=external,cn=auth
SASL SSF: 0
olcPasswordHash: {SSHA}
olcRootPW: {SSHA}NRBAhLr9Ae0SveMOD8MdiOb1sOmEteSt
Enable All Logging (Optional)
To enable all (verbose) logging, which is useful for troubleshooting problems, create an ldif file with the following content:
# cat > ./logging.ldif << EOF
dn: cn=config
replace: olcLogLevel
olcLogLevel: -1
EOF
Modify OpenLDAP configuration:
# ldapmodify -Y EXTERNAL -H ldapi:/// -f ./logging.ldif
Verify:
# ldapsearch -Y EXTERNAL -H ldapi:/// -b cn=config -s base|grep -i LOG
SASL/EXTERNAL authentication started
SASL username: gidNumber=0+uidNumber=0,cn=peercred,cn=external,cn=auth
SASL SSF: 0
olcLogLevel: -1
To disable logging, change the “olcLogLevel” value to “0” and run the ldapmodify command again:
dn: cn=config
replace: olcLogLevel
olcLogLevel: 0
Feel free to check OpenLDAP documentation for other available log levels: http://www.openldap.org/doc/admin24/slapdconfig.html.
Add a Guest Account for Read-only Access
Create an ldif file to add a new guest account to the OpenLDAP server:
# cat > ./guest.ldif << EOF
dn: cn=guest,dc=top
objectClass: simpleSecurityObject
objectclass: organizationalRole
description: LDAP Read-only Access
userPassword:
EOF
See what would be done:
# ldapadd -nx -f ./guest.ldif
!adding new entry "cn=guest,dc=top"
Add a new guest account:
# ldapadd -x -D cn=admin,dc=top -W -f ./guest.ldif
Create a password for the guest account:
# ldappasswd -x -D cn=admin,dc=top -W -S cn=guest,dc=top
New password:
Re-enter new password:
Enter LDAP Password:
Add a New Domain
Create an ldif file to add a new lisenet.com domain to the OpenLDAP server:
# cat > ./lisenet.com.ldif << EOF
dn: dc=lisenet.com,dc=top
o: lisenet.com
dc: lisenet.com
objectClass: dcObject
objectClass: organization

dn: ou=Users,dc=lisenet.com,dc=top
objectClass: organizationalUnit
ou: Users

dn: ou=Groups,dc=lisenet.com,dc=top
objectClass: organizationalUnit
ou: Groups

dn: cn=sysadmins,ou=Groups,dc=lisenet.com,dc=top
gidNumber: 1000
objectClass: posixGroup
cn: sysadmins
EOF
Test to see what would be done:
# ldapadd -nx -f ./lisenet.com.ldif
!adding new entry "dc=lisenet.com,dc=top"

!adding new entry "ou=Users,dc=lisenet.com,dc=top"

!adding new entry "ou=Groups,dc=lisenet.com,dc=top"

!adding new entry "cn=sysadmins,ou=Groups,dc=lisenet.com,dc=top"
Add a new domain:
# ldapadd -x -D cn=admin,dc=top -W -f ./lisenet.com.ldif
Add a New User to Domain
Create an ldif file to add a new “alc” user account to the OpenLDAP server:
# cat > ./user.ldif << EOF
dn: uid=alc,ou=Users,dc=lisenet.com,dc=top
uid: alc
uidNumber: 1000
gidNumber: 1000
cn: Alice
sn: E
objectClass: posixAccount
objectclass: organizationalPerson
loginShell: /sbin/nologin
homeDirectory: /home/alc
EOF
Test to see what would be done:
# ldapadd -nx -f ./user.ldif
!adding new entry "uid=alc,ou=Users,dc=lisenet.com,dc=top"
Add a new user “alc” to the lisenet.com domain:
# ldapadd -x -D cn=admin,dc=top -W -f ./user.ldif
Create user’s password:
# ldappasswd -x -D cn=admin,dc=top -W -S uid=alc,ou=users,dc=lisenet.com,dc=top
New password:
Re-enter new password:
Enter LDAP Password:
Limit Access to the OpenLDAP Database
The first ACL determines who can authenticate against the OpenLDAP server and change password (shadowLastChange).
- Admin account (rootDN) has complete access.
- Guest account can read-only.
- Anonymous users are provided access to the userPassword attribute for the initial connection to occur.
- All users have read access to their passwords due to “by self write” permissions.
Create an ldif file with the following content:
# cat > ./acl.ldif << EOL
dn: olcDatabase={1}hdb,cn=config
changetype: modify
replace: olcAccess
olcAccess: {0}to attrs=userPassword,shadowLastChange
  by dn="cn=admin,dc=top" write
  by dn="cn=guest,dc=top" read
  by self write
  by anonymous auth
  by * none
olcAccess: {1}to dn.base="" by * read
olcAccess: {2}to *
  by dn="cn=admin,dc=top" write
  by dn="cn=guest,dc=top" read
  by self write
  by users read
  by anonymous auth
  by * none
EOL
And modify OpenLDAP configuration:
# ldapadd -Y EXTERNAL -H ldapi:/// -f ./acl.ldif
SASL/EXTERNAL authentication started
SASL username: gidNumber=0+uidNumber=0,cn=peercred,cn=external,cn=auth
SASL SSF: 0
modifying entry "olcDatabase={1}hdb,cn=config"
Verify:
# ldapsearch -Q -LLL -Y EXTERNAL -H ldapi:/// -b \
> cn=config '(olcDatabase={1}hdb)' olcAccess
dn: olcDatabase={1}hdb,cn=config
olcAccess: {0}to attrs=userPassword,shadowLastChange by dn="cn=guest,dc=top" w
 rite by dn="cn=guest,dc=top" read by self write by anonymous auth by * none
olcAccess: {1}to dn.base="" by * read
olcAccess: {2}to *  by dn="cn=admin,dc=top" write by dn="cn=guest,dc=top" read
  by self write by users read by anonymous auth by * none
Search for LDAP User
$ ldapsearch -D "cn=guest,dc=top" -x -W -b "uid=alc,ou=Users,dc=lisenet.com,dc=top" -P 3 -h localhost
# extended LDIF
#
# LDAPv3
# base  with scope subtree
# filter: (objectclass=*)
# requesting: ALL
#

# alc, Users, lisenet.com.top
dn: uid=alc,ou=Users,dc=lisenet.com,dc=top
uid: alc
uidNumber: 1000
gidNumber: 1000
cn: Alice
sn: E
objectClass: posixAccount
objectClass: organizationalPerson
loginShell: /sbin/nologin
homeDirectory: /home/alc
userPassword:: e1NTSEF9NDg0NFhiVGZuOG[...]=

# search result
search: 2
result: 0 Success

# numResponses: 2
# numEntries: 1
LDAP Client: JXplorer
JXplorer is an open source LDAP browser. It should run on any java supporting operating system.
# apt-cache depends jxplorer
jxplorer
 |Depends: openjdk-6-jre
  Depends: sun-java6-jre
  Depends: javahelp2
  Depends: junit
  Depends: java-wrappers
Install JXplorer:
# apt-get install jxplorer
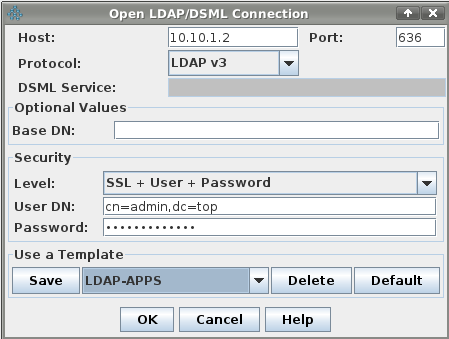
Connect to the OpenLDAP server via SSL protocol:
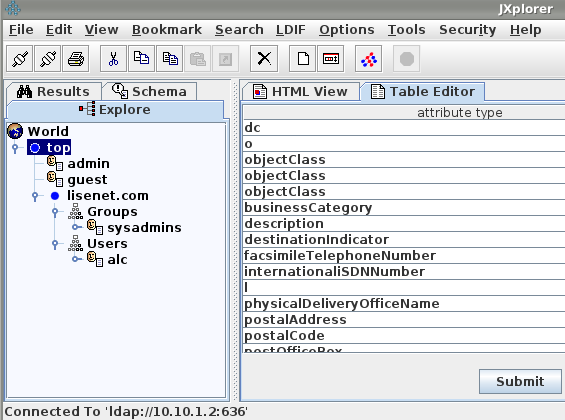
You show now be able to see an LDAP tree:
Configure Simple LDAP Plugin for WordPress
Install php5-ldap package:
# apt-get install php5-ldap
Plugin settings:
- BaseDN: ou=Users,dc=lisenet.com,dc=top
- Domain Controller: localhost
- Ldap Login Attribute: uid
- LDAP Port: 389
- LDAP Version: 3
Squid OpenLDAP Authentication
The following lines do the job on the /etc/squid3/squid.conf file:
# the below is one long line
auth_param basic program /usr/lib/squid3/squid_ldap_auth -v 3 -b "ou=Users,dc=lisenet.com,dc=top" -D "cn=guest,dc=top" -w passwd localhost

acl ldap-auth proxy_auth REQUIRED

http_access allow ldap-auth
http_access deny all
Related Posts
Convert OpenLDAP Schema to LDIF
Configure Squid for OpenLDAP Authentication
Setting Up ProFTPd with OpenLDAP Authentication on Debian Wheezy
References
https://wiki.debian.org/LDAP/OpenLDAPSetup
https://ezunix.org/index.php?title=Set_up_LDAP_Server_on_Debian_Linux
http://www.linuxlasse.net/linux/howtos/OpenLDAP_Server,_authenticate_linux_users
http://labs.opinsys.com/blog/2010/01/27/setting-up-openldap-on-ubuntu-10-04-alpha2/