We will be setting up a load balancer using two main technologies to monitor cluster members and cluster services: Keepalived and HAProxy. Keepalived uses LVS to perform load balancing and failover tasks on active and passive LVS routers, while HAProxy performs load balancing and high-availability services to TCP and HTTP applications.
Software
Software used in this article:
- CentOS 6
- HAProxy 1.5.4
- Keepalived 1.2.13
Networking and IP Addresses
Our network is set up as follows:
- 10.8.8.0/24 – LAN with access to the Internet.
Hostnames and roles of the virtual machines we are going to use:
- lvs-hap01 – the active HAProxy router with keepalived,
- lvs-hap02 – the backup HAProxy router with keepalived,
- lvs-hap03/lvs-hap04 – real servers, both running a pre-configured Apache webserver with SSL.
See the schema below for more information.
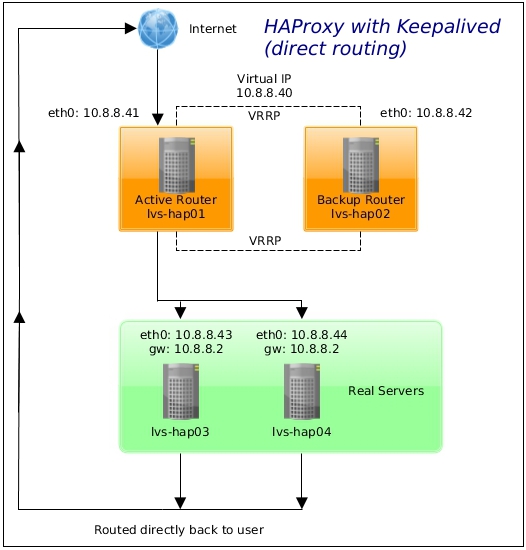
Two HAProxy load balancers are deployed as a failover cluster to protect the load balancer against outages.
Multi-Port Services and Firewall Marks
We are going to use multi-port services (HTTP and HTTPS), therefore firewall marks to bundle together different, but related protocols, are required.
Assigning firewall marks on both routers, the lvs-hap01 and the lvs-hap02:
# iptables -t mangle -A PREROUTING -p tcp -d 10.8.8.40/32 -m multiport --dport 80,443 -j MARK --set-mark 80
Where 10.8.8.40 is our virtual IP address. Save iptables rules so that they get restored after a reboot:
# service iptables save
HAProxy with Direct Routing
We are going to user direct routing with HAProxy.
Building a load balancer setup that uses direct routing provides increased performance benefits as direct routing allows the real servers to process and route packets directly to a requesting user rather than passing all outgoing packets through the LVS router. Direct routing reduces the possibility of network performance issues by relegating the job of the LVS router to processing incoming packets only.
On the lvs-hap01 router, allow Virtual Redundancy Routing Protocol (VRRP) traffic and save firewall rules:
# iptables -I INPUT -p vrrp -m comment --comment "VRRP" -j ACCEPT
# service iptables save
In order for the Keepalived service to forward network packets properly to the real servers, each router node must have IP forwarding turned on in the kernel:
# sed -i 's/net.ipv4.ip_forward = 0/net.ipv4.ip_forward = 1/' /etc/sysctl.conf
# sysctl -p
Load balancing in HAProxy also requires the ability to bind to an IP address that is nonlocal, meaning that it is not assigned to a device on the local system. This allows a running load balancer instance to bind to a an IP that is not local for failover.
# echo "net.ipv4.ip_nonlocal_bind=1" >>/etc/sysctl.conf
# sysctl -p
Copy firewall and sysctl configuration to the backup lvs-hap02 router:
# scp /etc/sysconfig/iptables root@lvs-hap02:/etc/sysconfig/
# scp /etc/sysctl.conf root@lvs-hap02:/etc/
HAProxy Setup
HAProxy performs load-balancing management on layer 7 (application layer). It is a common use case to deploy an HAProxy for HTTP-based load balancing.
Installation
Install packages on both router nodes, the lvs-hap01 and the lvs-hap02:
# yum install -y haproxy
Enable on boot:
# chkconfig haproxy on
Configuration
We are going to configure HAProxy on the master router node, the lvs-hap01.
Backup the configuration file before editing:
# cp /etc/haproxy/haproxy.cfg /etc/haproxy/haproxy.cfg.org
Our HAProxy /etc/haproxy/haproxy.cfg configuration is below.
The 10.8.8.40.pem file contains our self-signed SSL certificate together with the private key.
#---------------------------------------------------------------------
# Global settings
#---------------------------------------------------------------------
global
    log         127.0.0.1 local2

    chroot      /var/lib/haproxy
    pidfile     /var/run/haproxy.pid
    maxconn     4096
    user        haproxy
    group       haproxy
    daemon

    ssl-default-bind-ciphers kEECDH+aRSA+AES:kRSA+AES:+AES256:RC4-SHA:!kEDH:!LOW:!EXP:!MD5:!aNULL:!eNULL

#---------------------------------------------------------------------
# Common defaults that all the 'listen' and 'backend' sections will
# use if not designated in their block.
#---------------------------------------------------------------------
defaults
    #mode                   tcp|http
    mode                    http
    log                     global
    option                  httplog
    option                  dontlognull
    option 		    http-server-close

    # Since HAProxy works in reverse-proxy mode, the servers see its IP address as
    # their client address. This is sometimes annoying when the client's IP address
    # is expected in server logs. To solve this problem, the well-known HTTP header
    # "X-Forwarded-For" may be added by HAProxy to all requests sent to the server.
    # This header contains a value representing the client's IP address.
    option forwardfor       except 127.0.0.0/8

    option                  redispatch
    retries                 3
    timeout http-request    10s
    timeout queue           1m
    timeout connect         10s
    timeout client          1m
    timeout server          1m
    timeout http-keep-alive 10s
    timeout check           10s
    maxconn                 2048

#---------------------------------------------------------------------
# Main frontend which proxys to the backends.
#---------------------------------------------------------------------
frontend lb-http
    bind 10.8.8.40:80
    reqadd X-Forwarded-Proto:\ http
    default_backend http-nodes

frontend lb-https
   bind 10.8.8.40:443 ssl crt /etc/ssl/certs/10.8.8.40.pem
   reqadd X-Forwarded-Proto:\ https
   default_backend http-nodes

#---------------------------------------------------------------------
# Round robin balancing between the various backends.
#---------------------------------------------------------------------
backend http-nodes
    balance roundrobin
    server  lvs-hap03 10.8.8.43:80 check
    server  lvs-hap04 10.8.8.44:80 check

#---------------------------------------------------------------------
# Stats.
#---------------------------------------------------------------------
listen stats 10.8.8.40:8080
    mode http
    stats enable
    stats uri /
    #stats hide-version
    stats realm HAProxy\ Statistics
    stats auth admin:passwd
A few of commonly used HAProxy load balancing algorithms are as follows:
roundrobin: round robin selects servers in turns. This is the default algorithm.
leastconn: selects the server with the least number of connections, it is recommended for longer sessions. Servers in the same backend are also rotated in a round-robin fashion.
source: this selects which server to use based on a hash of the source IP i.e. your user’s IP address. This is one method to ensure that a user will connect to the same server.
Start the HAProxy sevice:
# service haproxy start
Copy configuration to the backup lvs-hap02 router:
# scp /etc/haproxy/haproxy.cfg root@lvs-hap02:/etc/haproxy/
Do not forget to start the HAProxy service on the backup node.
Keepalived Setup
The keepalived daemon runs on both the active and the passive LVS routers. Both routers running keepalived use the Virtual Redundancy Routing Protocol (VRRP). The active router sends VRRP advertisements at periodic intervals, and if the backup routers fail to receive these advertisements, a new active router is elected.
Keepalived performs failover on layer 4 (transport layer), upon which TCP conducts connection-based data transmissions. When a real server fails to reply to simple timeout TCP connection, keepalived detects that the server has failed and removes it from the server pool.
Installation
Install packages on both router nodes, the lvs-hap01 and the lvs-hap02:
# yum install -y keepalived
Enable on boot:
# chkconfig keepalived on
Configuration
Backup the config file before editing.
# cp /etc/keepalived/keepalived.conf /etc/keepalived/keepalived.conf.org
Configuration for the master lvs-hap01 node:
global_defs {
    notification_email {
        root@localhost
    }
    #notification_email_from keepalived@localhost
    #smtp_server 127.0.0.1
    #smtp_connect_timeout 30
}

# Script used to check if HAProxy is running
vrrp_script check_haproxy {
    script "killall -0 haproxy"
    interval 2
    weight 2
}

vrrp_instance LVS_HAP {
    #state MASTER|BACKUP
    state MASTER
    interface eth0
    virtual_router_id 51

    # 5 on master, 4 on backup
    # Note that priority is set in the VRRP router and defines the master
    priority 5
    advert_int 1
    authentication {
        #auth_type PASS|AH
        auth_type PASS
        auth_pass changeme
    }
    virtual_ipaddress {
        10.8.8.40
    }
    track_script {
        check_haproxy
    }
}
Configuration for the backup lvs-hap02 node:
global_defs {
    notification_email {
        #root@localhost
    }
    #notification_email_from keepalived@localhost
    #smtp_server 127.0.0.1
    #smtp_connect_timeout 30
}

# Script used to check if HAProxy is running
vrrp_script check_haproxy {
    script "killall -0 haproxy"
    interval 2
    weight 2
}

vrrp_instance LVS_HAP {
    state SLAVE
    interface eth0
    virtual_router_id 51

    # 5 on master, 4 on backup
    priority 4
    advert_int 1
    authentication {
        auth_type PASS
        auth_pass changeme
    }
    virtual_ipaddress {
        10.8.8.40
    }
    track_script {
        check_haproxy
    }
}
Start the Keeplived service:
# /etc/init.d/keepalived start
At this point we should see the virtual IP address 10.8.8.40 attached to the eth0 interface:
# ip ad sh eth0
2: eth0:  mtu 1500 qdisc pfifo_fast state UP qlen 1000
    link/ether 08:00:27:ff:41:00 brd ff:ff:ff:ff:ff:ff
    inet 10.8.8.41/24 brd 10.10.1.255 scope global eth0
    inet 10.8.8.40/32 scope global eth0
    inet6 fe80::a00:27ff:feff:4100/64 scope link
       valid_lft forever preferred_lft forever
Real Servers
On each real server node (lvs-hap03 and lvs-hap04), run the following command for the VIP 10.8.8.40 and protocol combination intended to be serviced for the real server:
# iptables -t nat -A PREROUTING -p tcp -d 10.8.8.40 -m multiport --dport 80,443 -j REDIRECT
The command above will cause the real servers to process packets destined for the VIP and port that they are given. Make sure that firewall changes are saved and restored after a restart:
# service iptables save
References
http://www.keepalived.org/pdf/UserGuide.pdf
https://access.redhat.com/documentation/en-US/Red_Hat_Enterprise_Linux/7/html-single/Load_Balancer_Administration/index.html
I am new to set load-balancer in a direct-routing haproxy+keepalived mode.
After read this post, I have some questtions on setting configuration.
1. My backend servers are database server, so I have to set “mode tcp” in haproxy.cfg, any other parameter I should notice?
2. According this post, direct-routing is accomplished by keepalived or haproxy ?
3. You set load-balance on haproxy.cfg (backend session) and keepalived.cfg (virtual_server session), will it conflict ?
4. You set-mark on incoming packets, for what ? Some articles use set-mark + ip route + ip rule for transparent proxy. In your case (all server in the same LAN), is it necessary ?
Yes, database servers need to use the tcp mode. Direct routing is done by keepalived (VRRP). I marked incoming packets to be able to use both HTTP and HTTPS.
Thanks for reply.
Direct routing is done by keepalived, so haproxy is for http/https (mode http) load balance ?
In my database load balance case, only use keepalived is ok or also need haproxy setting ?
Using haproxy + keepalived(direct route) in my case, will it show in/out connection statistic in its web ?
Yes, HAProxy is used for HTTP/S load balancing in this article.
You need HAProxy to load balance databases, but you don’t have to use keepalived if you don’t want a failover.
i went to use this configuration to set a tcp load balancing for live streaming. do you have an idea regarding that
No, not really.
Dont you need to set
net.ipv4.ip_nonlocal_bind = 1
for this to work ?
and probably
net.ipv4.ip_forward = 1 ?
You do need those, and both are mentioned in the blog post.
Hi,
Super nice description, thanks a lot. It works very nice :)
Just one small thing. Please remove the # in front of “#root@localhost”. That makes keeaplived crash like this :
Keepalived_vrrp exited due to segmentation fault (SIGSEGV).
Your feedback is appreciated Christian! I’ve updated the article.
I configured my HAProxy with a VIP not from the sub-networks as all LSV and real servers. When I am hitting my VIP for services at 8080(custom configured) I am getting “unknown command”
My LSV and Reals are from 10.10.10.10-14
My VIP is 20.20.20.20
Does the VIP from a different Ip block is a problem (It is pingable from all servers and LSV)?
VIP should not be a problem.
If I do “curl -s http:// 20.20.20.20:8080/health-check” I am getting an “OK” message return (whereas my health-check is configured at port 8081). So my HTTP web service request is forwarding to its Health-check scripts too.
Do I need to add or update an iptables command for health-check too, like I did for normal http request? Please help.
I configured on LSV router:
iptables -t mangle -A PREROUTING -p tcp -d 20.20.20.20/32 -m multiport –dport 8080 -j MARK –set-mark 8080
I configured on reals:
iptables -t nat -A PREROUTING -p tcp -d 20.20.20.20 -m multiport –dport 8080 -j REDIRECT
My issues are resolved without any iptables changes. Your post is a great one. Please add the following section is anybody who wants to use a different/custom port for health checks.
backend http-nodes
balance roundrobin
# If you want to use a different port 81 for health-check
server lvs-hap03 10.8.8.43:80 check port 81
server lvs-hap04 10.8.8.44:80 check port 81
Hello Sir is it possible to have a setup with one ISProuter+ethernetSwitch+(frontendRaspberryPi+backendMachine)masters located in a country, and another ISProuter+ethernetSwitch+(frontendRaspberryPi+backendMachine)slaves located in another country while still allowing this failover/heartbit between the two frontends? Regards
As long as your endpoints are accessible, it should be possible.
Thank you Sir, do you have some ways to do it that rapidly come to your mind? Regards
You can use this HAProxy tutorial as a starting point, but configure the backend services to meet your requirements.
Hi Sir, How can i implement below?
I want to make 2 HAproxy servers working in master-slave HA mode using keepalived and configure backend server of these haproxy servers to be google.com
VIP in /etc/hosts should point to test.com
so if i hit http:// test.com in local browser it should show contents of msn.com with url still showing as test.com
I am trying to implement below but its not working, I want to use 3 ips, each for HAproxy servers and one for VIP. Configure /etc/hosts file so that test.com will point to VIP. Want to make 2 HAproxy servers to work in master slave HA mode using keepalived. Create self sing cert for haproxy. configure backend server of these HAProxy servers to be http://www.google.com if i hit https:// test.com in local browser it should show the contents of google.com, it should be just proxy to google.com, url on the browser should remain https:// test.com while showing google.com
I have installed haproxy,keepalived on centos7 master and slave servers with below configuration
In /etc/haproxy/haproxy.cfg file on master server,
#———————————————————————
# main frontend which proxys to the backends
#———————————————————————
frontend main *:80
# use_backend static if url_static
default_backend app
backend app
http-request set-header Host http://www.google.com
server site google.com:443 ssl verify none check
In /etc/keepalived/keepalived.conf,
vrrp_script chk_haproxy {
script “killall -0 haproxy” # check the haproxy process
interval 2 # every 2 seconds
weight 2 # add 2 points if OK
}
vrrp_instance VI_1 {
interface eth1
state MASTER
virtual_router_id 51
priority 101
virtual_ipaddress {
172.28.128.33
}
track_script {
chk_haproxy
}
}
/etc/hosts – 172.28.128.33 test.com
If i try elinks https:// test.com i get unable to retrieve https:// test.com Connection refused.
Please note, i have not configured self sign certificate yet.
Can someone please help. Thanks