Linux Virtual Server (LVS) system offers a highly-available and scalable solution for production services using specialised routing and load-balancing techniques that can be configured through the Piranha configuration tool.
Software
Software used in this article:
- CentOS 6.7
- Piranha 0.8.6
- Ipvsadm 1.26
LVS Cluster
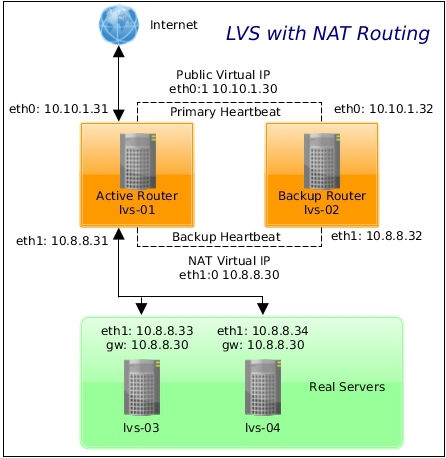
A Linux LVS cluster consists of two basic groups: the LVS routers and the real servers. To prevent a single point of failure, each group will contain two member systems.
As per CentOS documentation, the active router serves two roles in the cluster:
- To balance the load on the real servers,
- To check the integrity of the services on each of the real servers.
The backup router’s job is to monitor the active router and assume its role in the event of failure.
LVS Components
Pulse: this is the controlling process which starts all other daemons related to LVS routers. At boot time, the daemon is started by the /etc/rc.d/init.d/pulse script. It then reads the configuration file /etc/sysconfig/ha/lvs.cf. On the active router, pulse starts the LVS daemon. On the backup router, pulse determines the health of the active router by executing a simple heartbeat at a user-configurable interval.
lvs: the lvs daemon runs on the active LVS router once called by pulse. It reads the configuration file /etc/sysconfig/ha/lvs.cf, calls the ipvsadm utility to build and maintain the IPVS routing table, and assigns a nanny process for each configured LVS service. If nanny reports a real server is down, lvs instructs the ipvsadm utility to remove the real server from the IPVS routing table.
ipvsadm: this service updates the IPVS routing table in the kernel.
nanny: the nanny monitoring daemon runs on the active LVS router. Through this daemon, the active router determines the health of each real server and, optionally, monitors its workload. A separate process runs for each service defined on each real server.
Piranha configuration tool: this is the Web-based tool for monitoring, configuring, and administering an LVS cluster. This is the default tool to maintain the /etc/sysconfig/ha/lvs.cf LVS cluster configuration file.
/etc/sysconfig/ha/lvs.cf: this is the LVS cluster configuration file. Directly or indirectly, all daemons get their configuration information from this file.
Networking and IP Addresses
Our networks are set up as follows:
- 10.8.8.0/24 – internal network with no access to the Internet, but with a local DHCP server,
- 10.10.1.1/24 – LAN with access to the Internet.
Hostnames and roles of the virtual machines we are going to use:
- lvs-01 – the active LVS router,
- lvs-02 – the backup LVS router,
- lvs-03/lvs-04 – real servers, both running a pre-configured Apache webserver with SSL.
See the schema below for more information.
LVS-01 and LVS-02 Nodes’ Network Configuration
Network configuration on the lvs-01 node:
[root@lvs-01 ~]# cat /etc/sysconfig/network-scripts/ifcfg-eth0
DEVICE=eth0
TYPE=Ethernet
ONBOOT=yes
BOOTPROTO=static
PEERDNS=no
USERCTL=no
IPADDR=10.10.1.31
NETMASK=255.255.255.0
GATEWAY=10.10.1.1
[root@lvs-01 ~]# cat /etc/sysconfig/network-scripts/ifcfg-eth1
DEVICE=eth1
TYPE=Ethernet
ONBOOT=yes
BOOTPROTO=dhcp
PEERDNS=yes
USERCTL=no
Routing table on the lvs-01:
[root@lvs-01 ~]# ip ro
10.10.1.0/24 dev eth0  proto kernel  scope link  src 10.10.1.31
10.8.8.0/24 dev eth1  proto kernel  scope link  src 10.8.8.31
169.254.0.0/16 dev eth0  scope link  metric 1002
169.254.0.0/16 dev eth1  scope link  metric 1003
default via 10.10.1.1 dev eth0
Network configuration on the lvs-02 node:
[root@lvs-02 ~]# cat /etc/sysconfig/network-scripts/ifcfg-eth0
DEVICE=eth0
TYPE=Ethernet
ONBOOT=yes
BOOTPROTO=static
PEERDNS=no
USERCTL=no
IPADDR=10.10.1.32
NETMASK=255.255.255.0
GATEWAY=10.10.1.1
[root@lvs-02 ~]# cat /etc/sysconfig/network-scripts/ifcfg-eth1
DEVICE=eth1
TYPE=Ethernet
ONBOOT=yes
BOOTPROTO=dhcp
PEERDNS=yes
USERCTL=no
Routing table on the lvs-02:
[root@lvs-02 ~]# ip ro
10.10.1.0/24 dev eth0  proto kernel  scope link  src 10.10.1.32
10.8.8.0/24 dev eth1  proto kernel  scope link  src 10.8.8.32
169.254.0.0/16 dev eth0  scope link  metric 1002
169.254.0.0/16 dev eth1  scope link  metric 1003
default via 10.10.1.1 dev eth0
LVS-03 and LVS-04 Real Servers Nodes’ Network Configuration
Network configuration on the lvs-03 node:
[root@lvs-03 ~]# cat /etc/sysconfig/network-scripts/ifcfg-eth1
DEVICE=eth1
TYPE=Ethernet
ONBOOT=yes
BOOTPROTO=static
PEERDNS=no
USERCTL=no
IPADDR=10.8.8.33
NETMASK=255.255.255.0
GATEWAY=10.8.8.30
Routing table on the lvs-03:
[root@lvs-03 ~]# ip ro
10.8.8.0/24 dev eth1  proto kernel  scope link  src 10.8.8.33
169.254.0.0/16 dev eth1  scope link  metric 1002
default via 10.8.8.30 dev eth1
Network configuration on the lvs-04 node:
[root@lvs-04 ~]# cat /etc/sysconfig/network-scripts/ifcfg-eth1
DEVICE=eth1
TYPE=Ethernet
ONBOOT=yes
BOOTPROTO=static
PEERDNS=no
USERCTL=no
IPADDR=10.8.8.34
NETMASK=255.255.255.0
GATEWAY=10.8.8.30
Routing table on the lvs-04:
[root@lvs-04 ~]# ip ro
10.8.8.0/24 dev eth1  proto kernel  scope link  src 10.8.8.34
169.254.0.0/16 dev eth1  scope link  metric 1002
default via 10.8.8.30 dev eth1
LVS Router Installation
Configure LVS-01 Node
Enable IP forwarding:
# sed -i 's/net.ipv4.ip_forward = 0/net.ipv4.ip_forward = 1/' /etc/sysctl.conf
# sysctl -p
Install ipvsadm and Piranha packages:
# yum install -y piranha ipvsadm
Ensure the IP Virtual Server Netfilter kernel module is loaded:
# modprobe ip_vs
Set a password for the Piranha configuration tool:
# /usr/sbin/piranha-passwd
Once the password has been set, start the piranha-gui service:
# /etc/init.d/piranha-gui start
Note that we do not need to start the pulse service until configuration using the Piranha configuration tool is complete.
On the LVS routers, there are four services which need to be set to activate at boot time:
# chkconfig piranha-gui on
# chkconfig pulse on
# chkconfig iptables on
# chkconfig sshd on
Iptables service is required for multi-port services and firewall marks. SSH service is for remote logins and should be self explanatory I think.
Add a firewall rule to allow HTTP access to Piranha WebUI:
# iptables -A INPUT -s 10.8.8.0/24 -p tcp --dport 3636 -j ACCEPT
Add a rule for traffic that we’re balancing (HTTP and HTTPS):
# iptables -A INPUT -p tcp -m multiport --dports 80,443 -j ACCEPT
Configure LVS-02 Node
Install ipvsadm:
# yum install -y ipvsadm
Enable services:
# chkconfig pulse on
# chkconfig iptables on
# chkconfig sshd on
Copy sysctl.conf from the lvs-01 node:
[root@lvs-01 ~]# scp /etc/sysctl.conf root@lvs-02:/etc/
Add a rule for traffic that we’re balancing (HTTP and HTTPS):
# iptables -A INPUT -p tcp -m multiport --dports 80,443 -j ACCEPT
When finished configuring NAT routing with Piranha (see the following sections of the article), copy the lvs.cf file from the lvs-01 node:
[root@lvs-01 ~]# scp /etc/sysconfig/ha/lvs.cf root@lvs-02:/etc/sysconfig/ha/
Multi-Port Services
We are going to use multi-port services (HTTP and HTTPS), therefore firewall marks to bundle together different, but related protocols, are required. However, the job of assigning firewall marks must be performed by the network packet filter, iptables, outside of Piranha configuration tool.
Assigning firewall marks on both routers, the lvs-01 and the lvs-02:
# iptables -t mangle -A PREROUTING -p tcp -d 10.10.1.30/32 -m multiport --dport 80,443 -j MARK --set-mark 80
Where 10.10.1.30 is our public virtual IP address. Save iptables rules so that they get restored after a reboot:
# service iptables save
LVS NAT Routing Configuration with Piranha
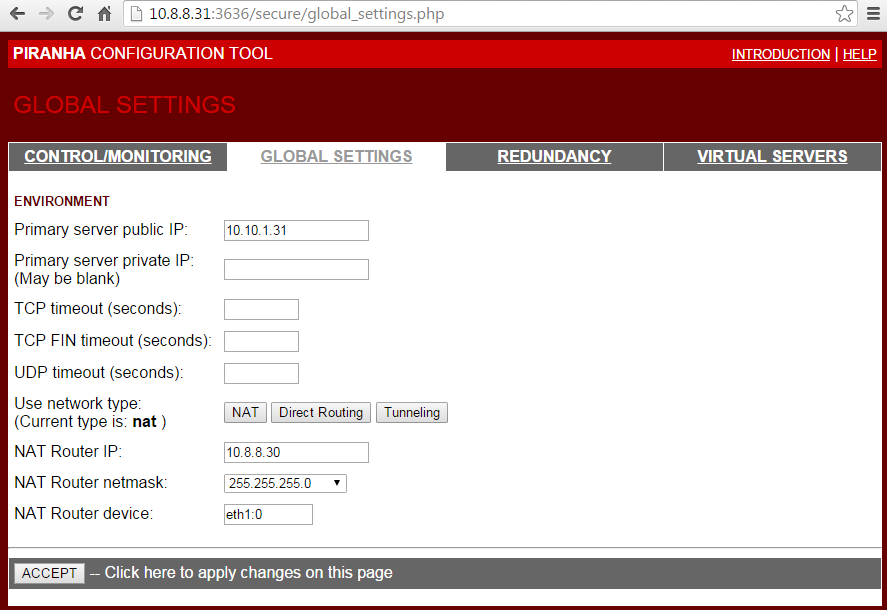
Navigate a web browser to http://10.8.8.31:3636/.
Configure the primary server and pick a NAT network type. Provide NAT router details. 10.8.8.30 is our NAT virtual IP.
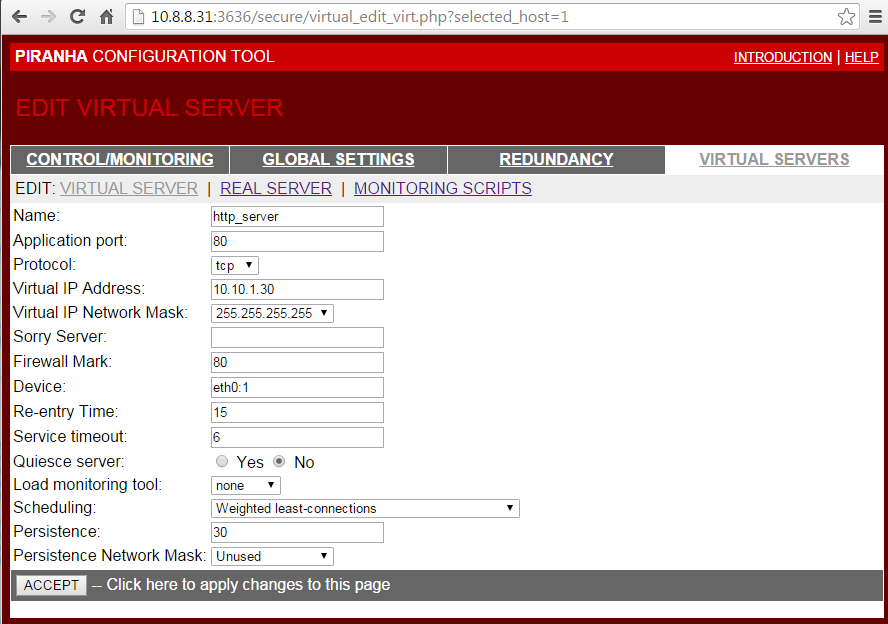
Add and configure a virtual server. 10.10.1.30 is our public virtual IP address. Firewall mark is used to bundle HTTP connections on port 80 and HTTPS connections on port 443.
Persistence is like a timer. It is set to 30 seconds. When a client connects to a service, LVS remembers the last connection for 30s.
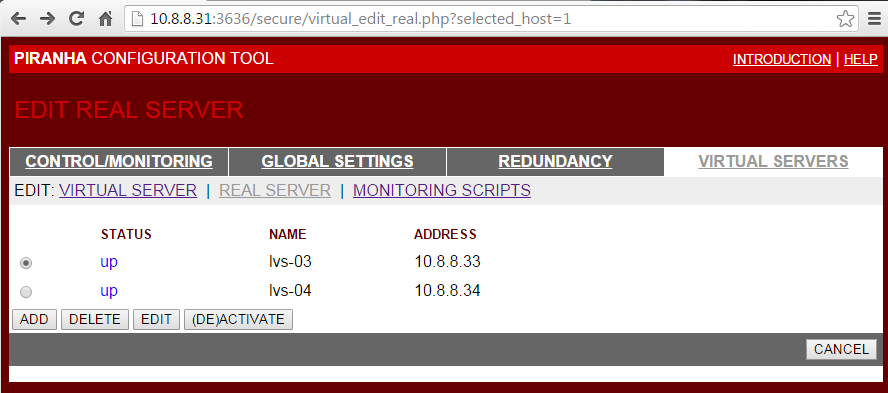
Add and activate the real servers.
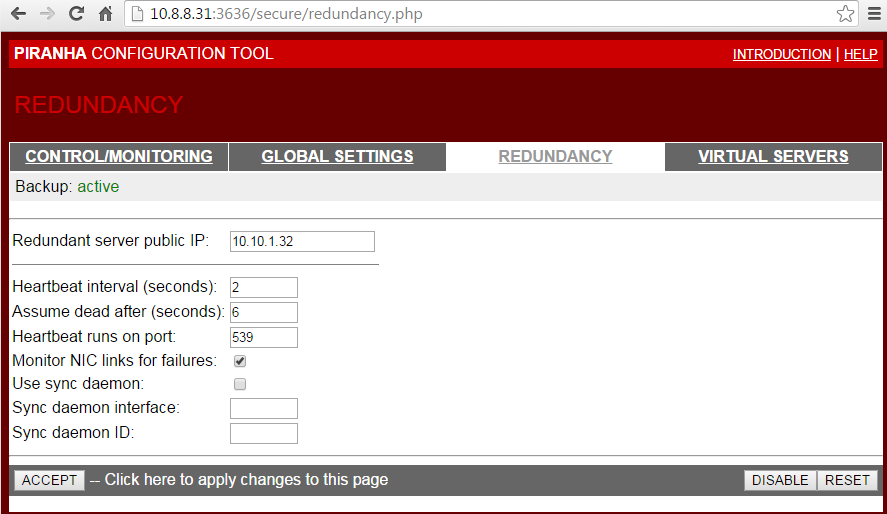
Configure redundancy by adding the lvs-02 node’s IP address.
Now, when everything is configured and saved, start the pulse service on the lvs-01 node:
# service pulse start
At this point we should be able to browse the public virtual IP 10.10.1.30 via both HTTP and HTTPS. Start the pulse service on the lvs-02 node. It should act as a backup node.
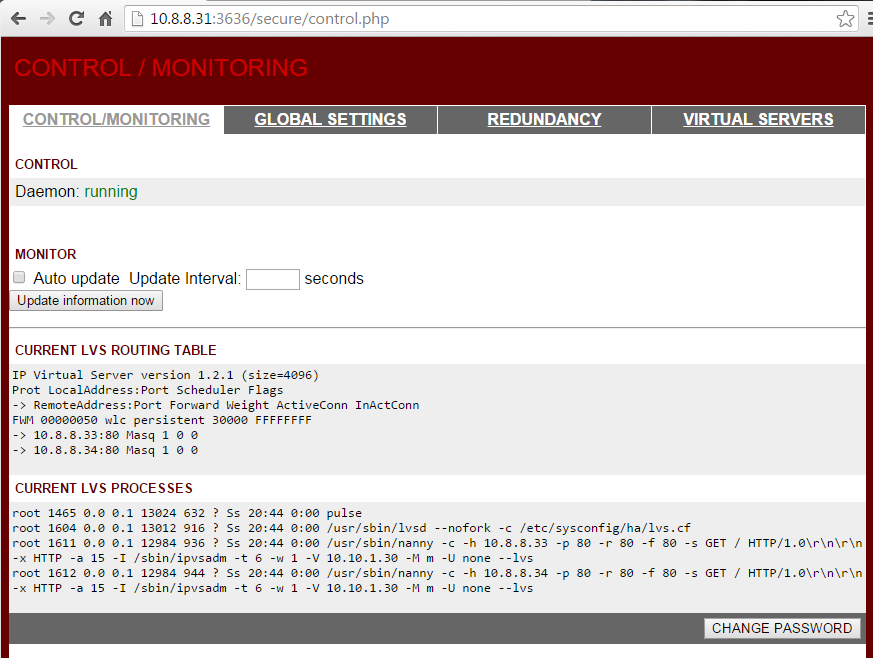
Check LVS status on the active lvs-01 node:
# ipvsadm -ln
IP Virtual Server version 1.2.1 (size=4096)
Prot LocalAddress:Port Scheduler Flags
  -> RemoteAddress:Port      Forward Weight ActiveConn InActConn
FWM  80 wlc persistent 30
  -> 10.8.8.33:80            Masq    1      1          14
  -> 10.8.8.34:80            Masq    1      0          34
lvs.cf
Content of the /etc/sysconfig/ha/lvs.cf is shown below for referencing purposes.
[root@lvs-01 ~]# cat /etc/sysconfig/ha/lvs.cf
serial_no = 3
primary = 10.10.1.31
service = lvs
backup_active = 1
backup = 10.10.1.32
heartbeat = 1
heartbeat_port = 539
keepalive = 2
deadtime = 6
network = nat
nat_router = 10.8.8.30 eth1:0
nat_nmask = 255.255.255.0
debug_level = NONE
monitor_links = 1
syncdaemon = 0
virtual http_server {
     active = 1
     address = 10.10.1.30 eth0:1
     vip_nmask = 255.255.255.255
     fwmark = 80
     port = 80
     persistent = 30
     send = "GET / HTTP/1.0\r\n\r\n"
     expect = "HTTP"
     use_regex = 0
     load_monitor = none
     scheduler = wlc
     protocol = tcp
     timeout = 6
     reentry = 15
     quiesce_server = 0
     server lvs-03 {
         address = 10.8.8.33
         active = 1
         weight = 1
     }
     server lvs-04 {
         address = 10.8.8.34
         active = 1
         weight = 1
     }
}
References
https://access.redhat.com/documentation/en-US/Red_Hat_Enterprise_Linux/6/html-single/Load_Balancer_Administration/index.html
https://access.redhat.com/documentation/en-US/Red_Hat_Enterprise_Linux/3/html/Cluster_Administration/s1-lvs-block-diagram.html
Nicely written. One thing I fail to understand though is the purpose of marking the packets with the:
# iptables -t mangle -A PREROUTING -p tcp -d 10.10.1.30/32 -m multiport –dport 80,443 -j MARK –set-mark 80
rule since I can’t see any other iptables rule mentioned actually using it.
I wrote this some time ago, but if I remember it right, I had to put that firewall mark “80” into the virtual server’s configuration fwmark=80, otherwise it didn’t work for me.
Ooops missed that setting in the lvs.cf and the FWM in the “ipvsadm -ln” output. I also did not pay much attention to the images so multiple failures on my side. Of course the fwmark is needed to group services so the session sticks to the same server when switching from port 80 to port 443, ie shopping cart etc.
Yep, that was for the group services, HTTP and HTTPS.
i tried follow your setup but then there is conflict of IP is I assign the VIP to both active and back VMs via eth0:1 and eth1:0. How can resolve that ?
Secondly after installation all routing kernal module, when I open the Piranha GUI, it doesn’t show the NAT router IP / subnet mask etc. those options are not showing.
All is set now, but eth0:1 ip assigned to ActiveVM and same IP assigned to BackVM via its eth0:1 is giving an IP conflict.
How can i assign that ?