Working with Katello – part 3. We’re continuing with Katello configuration, we’ll create a domain, FTP installation media, tweak some provisioning templates, deploy KVM guests.
This article is part of the Homelab Project with KVM, Katello and Puppet series.
Homelab
We have Katello installed on a CentOS 7 server:
katello.hl.local (10.11.1.4) – see here for installation instructions
See the image below to identify the homelab part this article applies to. 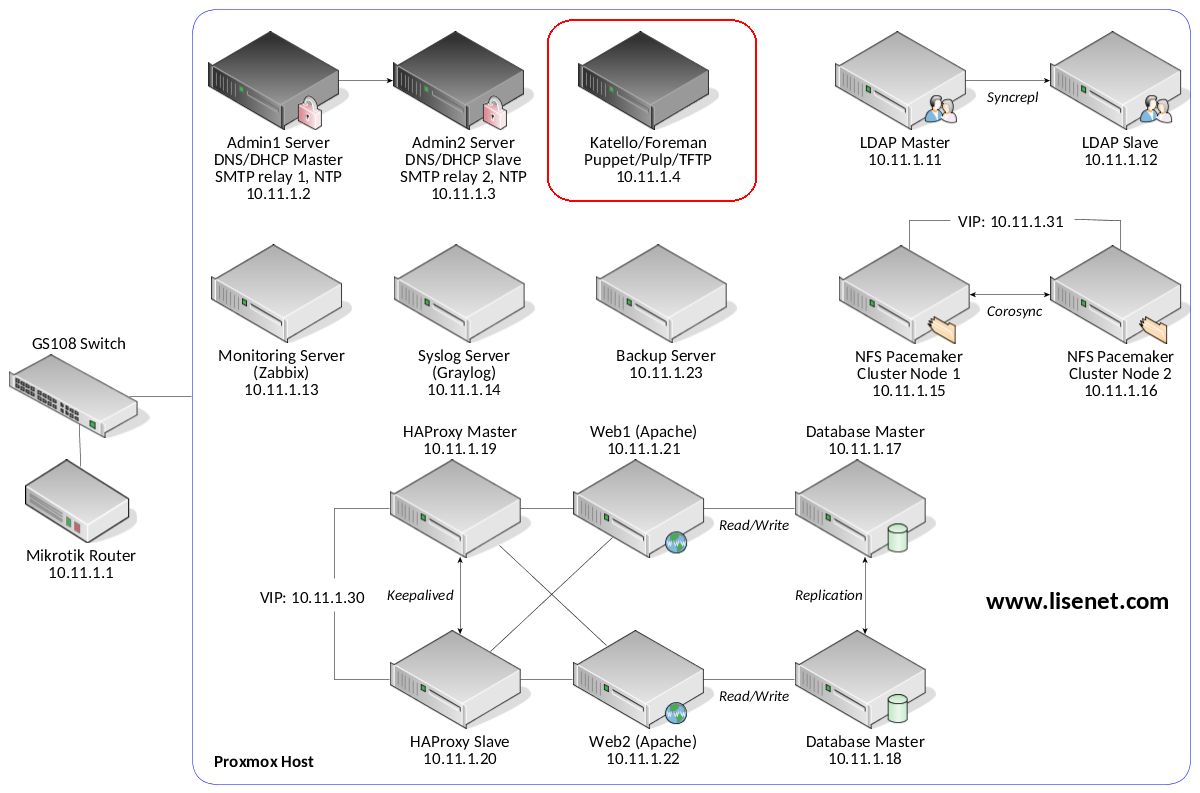
The Plan
Below is a step-by-step plan that we’ll be following in this article.
- Step 1: create a domain.
- Step 2: create a subnet.
- Step 3: set up FTP installation media for provisioning.
- Step 4: create a hardened partition table for provisioning.
- Step 5: create an operating system.
- Step 6: provisioning templates and Puppet 4.
- Step 7: create a host group.
- Step 8: create a new host.
- Step 9: create KVM guests on Proxmox.
- Step 10: PXE boot the VMs.
- Step 11: autosign Puppet signing requests.
- Step 12: backup Katello configuration.
- Step 13: backup Proxmox guests.
Configure Katello
Step 1: Create a Domain
Chances are the domain name has already beet set up if you provided it during the Katello installation.
# hammer domain create --name "hl.local"
If you get an error saying that the “Name has already been taken”, it is likely due to the Katello server not being assigned to the organisation.
If that is the case, then after assigning the Katello server to the organisation you will be able to see the domain name.
# hammer domain list
---|---------
ID | NAME
---|---------
1  | hl.local
---|---------
Step 2: Create a Subnet
In order to create a subnet we need to know our TFTP ID.
TFTP ID is actually our proxy ID.
# hammer proxy list
---|------------------|-------------------------------|--------------------------
ID | NAME             | URL                           | FEATURES
---|------------------|-------------------------------|--------------------------
1  | katello.hl.local | https://katello.hl.local:9090 | Templates, Pulp, TFTP,...
---|------------------|-------------------------------|--------------------------
Create a new subnet:
# hammer subnet create \
  --organizations "Lisenet" \
  --locations "HomeLab" \
  --name "homelab_LAN" \
  --network "10.11.1.0" \
  --mask "255.255.255.0" \
  --network-type "IPv4" \
  --gateway "10.11.1.1" \
  --dns-primary "10.11.1.2" \
  --dns-secondary "10.11.1.3" \
  --boot-mode "DHCP" \
  --ipam "None" \
  --domain-ids "1" \
  --tftp-id "1"
Note the IPs of the redundand DNS servers that we created previously. Verify:
# hammer subnet list
---|-------------|-----------|---------------|--------
ID | NAME        | NETWORK   | MASK          | VLAN ID
---|-------------|-----------|---------------|--------
1  | homelab_LAN | 10.11.1.0 | 255.255.255.0 |
---|-------------|-----------|---------------|--------
Step 3: FTP Installation Media
We’ll install and configure vsftpd to provide CentOS installation media via FTP.
# yum install vsftpd
# systemctl enable vsftpd
Configure firewall if not done already:
# firewall-cmd --permanent --add-service=ftp
# firewall-cmd --reload
Edit the file /etc/vsftpd/vsftpd.conf and configure the following:
anonymous_enable=YES
write_enable=NO
Restart the service:
# systemctl restart vsftpd
Note that FTP volume /var/ftp/pub/ should have at least 6GB of free disk space. If you don’t have a CentOS 7 DVD, you can download it from the Internet. Make sure it’s a full DVD and not a minimal one.
When done, attach the ISO file to the KVM guest and mount the disk:
# mount /dev/cdrom /mnt
Create a folder to store installation files, and sync everything from the disk:
# mkdir /var/ftp/pub/CentOS_7_x86_64
# rsync -rv --progress /mnt/ /var/ftp/pub/CentOS_7_x86_64/
Unmount the disk when finished:
# umount /mnt
Restore SELinux labels:
# restorecon -Rv /var/ftp/pub/
One last thing, we can mount /var/ftp/pub with “ro,nodev,noexec,nosuid”, as we only need to read files. Create CentOS 7 installation media:
# hammer medium create \
  --organizations "Lisenet" \
  --locations "HomeLab" \
  --name CentOS7_DVD_FTP \
  --path "ftp://katello.hl.local/pub/CentOS_7_x86_64/" \
  --os-family "Redhat"
Verify:
# hammer medium list
---|-----------------|--------------------------------------------
ID | NAME            | PATH
---|-----------------|--------------------------------------------
9  | CentOS7_DVD_FTP | ftp://katello.hl.local/pub/CentOS_7_x86_64/
---|-----------------|--------------------------------------------
Step 4: Create a Hardened Partition Table
Katello comes with several different partition tables that can be used out of the box. Here are some of the default ones:
# hammer partition-table list|grep default
83  | CoreOS default fake          | Coreos
85  | Jumpstart default            | Solaris
87  | Junos default fake           | Junos
88  | Kickstart default            | Redhat
89  | NX-OS default fake           | NXOS
90  | Preseed default              | Debian
92  | XenServer default            | Xenserver
As we can see above, the default one for Red Hat is called “Kickstart default”.
We are going to create a hardened partition table so that we have control over partitions and mountpoint that get created.
Create a file hardened_ptable.txt with the content below. Note that there is no space between < and %#.
<%#
kind: ptable
name: Kickstart hardened 32GB
oses:
- CentOS
- Fedora
- RedHat
%>

# System bootloader configuration
bootloader --location=mbr --boot-drive=sda --timeout=3
# Partition clearing information
clearpart --all --drives=sda
zerombr

# Disk partitioning information
part /boot --fstype="xfs" --ondisk=sda --size=1024 --label=boot --fsoptions="rw,nodev,noexec,nosuid"

# 30GB physical volume
part pv.01  --fstype="lvmpv" --ondisk=sda --size=30720
volgroup vg_os pv.01

logvol /        --fstype="xfs"  --size=4096 --vgname=vg_os --name=lv_root
logvol /home    --fstype="xfs"  --size=512  --vgname=vg_os --name=lv_home --fsoptions="rw,nodev,nosuid"
logvol /tmp     --fstype="xfs"  --size=1024 --vgname=vg_os --name=lv_tmp  --fsoptions="rw,nodev,noexec,nosuid"
logvol /var     --fstype="xfs"  --size=6144 --vgname=vg_os --name=lv_var  --fsoptions="rw,nosuid"
logvol /var/log --fstype="xfs"  --size=512  --vgname=vg_os --name=lv_log  --fsoptions="rw,nodev,noexec,nosuid"
logvol swap     --fstype="swap" --size=2048 --vgname=vg_os --name=lv_swap --fsoptions="swap"
Create a new partition table:
# hammer partition-table create \
  --organizations "Lisenet" \
  --locations "HomeLab" \
  --name "Kickstart hardened 32GB" \
  --os-family "Redhat" \
  --operatingsystems "CentOS 7.4.1708" \
  --file "hardened_ptable.txt"
Verify:
# hammer partition-table list|egrep 'ID|hardened'
ID  | NAME                         | OS FAMILY
103 | Kickstart hardened 32GB      | Redhat
Step 5: Create an Operating System
This step isn’t required in our particular case because the Katello server is deployed on CentOS 7, and the operating system for that has already been created. Since our homelab is CentOS 7 only, there is no need to create a new OS.
For references, if we were to create a new CentOS 7 operating system, we would do the following:
# hammer os create \
  --name "CentOS" \
  --major "7" \
  --minor "4.1708" \
  --family "Redhat" \
  --password-hash "SHA512" \
  --architectures "x86_64" \
  --media "CentOS7_DVD_FTP" \
  --partition-tables "Kickstart hardened 32GB"
Note references to the FTP installation media and the hardened partition table.
Step 6: Provisioning Templates and Puppet 4
Foreman includes many template examples. To get an overall idea, do the following:
# hammer template list | less
Katello ships with a number of templates in addition to the standard Foreman ones, e.g.:
Katello Kickstart Default – Kickstart template for CentOS, RHEL and other Red Hat-compatible operating systems.
Katello Kickstart Default Finish – image-based provisioning.
subscription_manager_registration – Snippet for registering a host for content.
To customise any of the above templates, we can clone them and add our changes.
While this sounds good, I have to admit that the default provisioning templates didn’t quite work for me, as I kept getting Puppet installation issues, mainly due to filesystem paths being different between Puppet versions 3.x and 4.x. I had to use the following to make Puppet 4 installation successful:
os_family = @host.operatingsystem.family
  if os_family == 'Redhat'
    var_dir = '/opt/puppetlabs/puppet/cache'
    log_dir = '/var/log/puppetlabs/puppet'
    run_dir = '/var/run/puppetlabs'
    ssl_dir = '/etc/puppetlabs/puppet/ssl'
  end
I ended up cloning some of the templates (see below), editing them manually to match my needs, and creating the new ones.
- Katello Kickstart Default (Provisioning template)
- Katello Kickstart Default Finish (Finish template)
- puppet.conf (Snippet)
- puppet_setup (Snippet)
- subscription_manager_registration (Snippet)
The way I’ve achieved this was fairly simple. First of all, I had to dump a template to a file:
# hammer template dump \
  --id "Katello Kickstart Default" > template1.txt
Then edit the file template1.txt, add changes and check for errors:
# erb -x -T '-' template1.txt|ruby -c
Finally, create a new template from the file:
# hammer template create \
  --organizations "Lisenet" \
  --locations "HomeLab" \
  --file "template1.txt" \
  --name "Katello Kickstart Puppet4 Default" \
  --type "provision" \
  --operatingsystems "CentOS 7.4.1708"
To avoid confusion we can always verify the template kind that we need to use from the list below:
# hammer template kinds
---------
NAME
---------
PXELinux
PXEGrub
PXEGrub2
iPXE
provision
finish
script
user_data
ZTP
POAP
snippet
---------
When we provision a new CentOS 7 server, it gets the subscription-manager package installed from the “os” repository, and then the system registers against Katello. This allows us to use products and repositories, and manage packages that are available to the server via a lifecycle environment.
The caveat is, however, that by default, public CentOS repositories remain enabled on the server. What we ideally want to do is to remove all public CentOS repositories when the system gets registered, because at that point repositories the system is subscribed to will already be available. To achieve this, we need to modify the snippet for subscription_manager_registration and create a custom one that removes public CentOS repositories, e.g.:
echo "Registering the System"
subscription-manager register --org="<%= @host.rhsm_organization_label %>" --name="<%= @host.name %>" --activationkey="<%= @host.params['kt_activation_keys'] %>"
echo "Removing public CentOS repositories"
rm -rvf /etc/yum.repos.d/CentOS-*
Step 7: Create a Host Group
A host group is in some ways similar to an inherited node declaration, in that it is a high level grouping of classes that can be named and treated as a unit.
This is then treated as a template and is selectable during the creation of a new host and ensures that the host is configured in one of your pre-defined states.
In addition to defining which Puppet classes get included when building this host type we are also able to assign variables and provisioning information to a host group to further refine the behavior of the Puppet runtime.
Now, we don’t need a Puppet environment in order to create a host group, but in practice it’s benefitial to have one since we intend to use Puppet to manage servers. The default Puppet environment is called “production”:
# hammer environment list
---|-----------
ID | NAME
---|-----------
1  | production
---|-----------
Let us create a new environment called “homelab” (I find the name “homelab” more appropriate that “production”):
# hammer environment create \
 --name "homelab" \
 --organizations "Lisenet" \
 --locations "HomeLab"
Verify:
# hammer environment list
---|-----------
ID | NAME
---|-----------
2  | homelab
1  | production
---|-----------
We’ll use the homelab environment when creating a host group. We’ll also need to create a Puppet folder structure when configuring Puppet modules, but this will be covered in the next article.
We’ll need the content source ID, which is the same as our Proxy ID:
# hammer proxy list
---|------------------|-------------------------------|--------------------------
ID | NAME             | URL                           | FEATURES
---|------------------|-------------------------------|--------------------------
1  | katello.hl.local | https://katello.hl.local:9090 | Templates, Pulp, TFTP,...
---|------------------|-------------------------------|--------------------------
Create a new host group for CentOS 7.
# hammer hostgroup create \
  --query-organization "Lisenet" \
  --locations "HomeLab" \
  --name "el7_group" \
  --description "Host group for CentOS 7 servers" \
  --lifecycle-environment "stable" \
  --content-view "el7_content" \
  --content-source-id "1" \
  --environment "homelab" \
  --puppet-proxy "katello.hl.local" \
  --puppet-ca-proxy "katello.hl.local" \
  --domain "hl.local" \
  --subnet "homelab_LAN" \
  --architecture "x86_64" \
  --operatingsystem "CentOS 4.1708" \
  --medium "CentOS7_DVD_FTP" \
  --partition-table "Kickstart hardened 32GB" \
  --pxe-loader "PXELinux BIOS" \
  --root-pass "PleaseChangeMe"
Remember the activation key which we created in the previous article? Now it’s time to associate that activation key with the host group:
# hammer hostgroup set-parameter  \
  --name "kt_activation_keys" \
  --value "el7-key" \
  --hostgroup "el7_group"
Step 8: Create a New Host
We want to create hosts for all our homelab servers.
| VM ID | GUEST_NAME | IP_ADDR | MAC_ADDR |
| 203 | ldap1.hl.local | 10.11.1.11 | 00:22:FF:00:00:11 |
| 204 | ldap2.hl.local | 10.11.1.12 | 00:22:FF:00:00:12 |
| 205 | monitoring.hl.local | 10.11.1.13 | 00:22:FF:00:00:13 |
| 206 | syslog.hl.local | 10.11.1.14 | 00:22:FF:00:00:14 |
| 207 | storage1.hl.local | 10.11.1.15 | 00:22:FF:00:00:15 |
| 208 | storage2.hl.local | 10.11.1.16 | 00:22:FF:00:00:16 |
| 209 | db1.hl.local | 10.11.1.17 | 00:22:FF:00:00:17 |
| 210 | db2.hl.local | 10.11.1.18 | 00:22:FF:00:00:18 |
| 211 | proxy1.hl.local | 10.11.1.19 | 00:22:FF:00:00:19 |
| 212 | proxy2.hl.local | 10.11.1.20 | 00:22:FF:00:00:20 |
| 213 | web1.hl.local | 10.11.1.21 | 00:22:FF:00:00:21 |
| 214 | web2.hl.local | 10.11.1.22 | 00:22:FF:00:00:22 |
| 215 | backup.hl.local | 10.11.1.23 | 00:22:FF:00:00:23 |
If we loop the details above through the following command, we’ll end up with all the servers that we need. The VM ID is used by Proxmox only and isn’t required by Katello.
# hammer host create \
  --name "$GUEST_NAME" \
  --hostgroup "el7_group" \
  --interface "type=interface,mac=$MAC_ADDR,ip=$IP_ADDR,managed=true,primary=true,provision=true"
We can check to see what’s inside the provisioning template by going to the following page:
https://katello.hl.local/unattended/provision?spoof=10.11.1.11
We should now have the following hosts available:
# hammer host list
---|---------------------|------------------|------------|------------|-------------------|--------------|----------------------
ID | NAME                | OPERATING SYSTEM | HOST GROUP | IP         | MAC               | CONTENT VIEW | LIFECYCLE ENVIRONMENT
---|---------------------|------------------|------------|------------|-------------------|--------------|----------------------
41 | admin1.hl.local     | CentOS 7.4.1708  | el7_group  | 10.11.1.2  | 00:22:ff:00:00:02 | el7_content  | stable
42 | admin2.hl.local     | CentOS 7.4.1708  | el7_group  | 10.11.1.3  | 00:22:ff:00:00:03 | el7_content  | stable
38 | backup.hl.local     | CentOS 7.4.1708  | el7_group  | 10.11.1.23 | 00:22:ff:00:00:23 | el7_content  | stable
26 | db1.hl.local        | CentOS 7.4.1708  | el7_group  | 10.11.1.17 | 00:22:ff:00:00:17 | el7_content  | stable
27 | db2.hl.local        | CentOS 7.4.1708  | el7_group  | 10.11.1.18 | 00:22:ff:00:00:18 | el7_content  | stable
2  | katello.hl.local    | CentOS 7.4.1708  |            | 10.11.1.4  | 00:22:ff:00:00:04 |              |
32 | ldap1.hl.local      | CentOS 7.4.1708  | el7_group  | 10.11.1.11 | 00:22:ff:00:00:11 | el7_content  | stable
33 | ldap2.hl.local      | CentOS 7.4.1708  | el7_group  | 10.11.1.12 | 00:22:ff:00:00:12 | el7_content  | stable
34 | monitoring.hl.local | CentOS 7.4.1708  | el7_group  | 10.11.1.13 | 00:22:ff:00:00:13 | el7_content  | stable
28 | proxy1.hl.local     | CentOS 7.4.1708  | el7_group  | 10.11.1.19 | 00:22:ff:00:00:19 | el7_content  | stable
29 | proxy2.hl.local     | CentOS 7.4.1708  | el7_group  | 10.11.1.20 | 00:22:ff:00:00:20 | el7_content  | stable
39 | storage1.hl.local   | CentOS 7.4.1708  | el7_group  | 10.11.1.15 | 00:22:ff:00:00:15 | el7_content  | stable
40 | storage2.hl.local   | CentOS 7.4.1708  | el7_group  | 10.11.1.16 | 00:22:ff:00:00:16 | el7_content  | stable
35 | syslog.hl.local     | CentOS 7.4.1708  | el7_group  | 10.11.1.14 | 00:22:ff:00:00:14 | el7_content  | stable
30 | web1.hl.local       | CentOS 7.4.1708  | el7_group  | 10.11.1.21 | 00:22:ff:00:00:21 | el7_content  | stable
31 | web2.hl.local       | CentOS 7.4.1708  | el7_group  | 10.11.1.22 | 00:22:ff:00:00:22 | el7_content  | stable
---|---------------------|------------------|------------|------------|-------------------|--------------|----------------------
Step 9: Create KVM Guests on Proxmox
Before we can PXE boot the VMs, we first need to create them.
Again, if we take into account the VM details that we’ve listed above and loop them through following qm command, we’ll end up with all the servers that we need.
# qm create $ID \
  --name $GUEST_NAME \
  --boot cn \
  --cores 1 \
  --hotplug disk,cpu \
  --memory 1536 \
  --net0 bridge=vmbr0,model=virtio,macaddr=$MAC_ADDR \
  --onboot 1 \
  --ostype l26 \
  --scsi0 file=data_hdd:32,format=qcow2 \
  --scsihw virtio-scsi-pci \
  --sockets 1 \
  --startup order=$ID
One thing that’s worth mentioning, when you create a new VM for PXE boot, make sure that it has at least 1536MB of RAM, as otherwise it may fail to provision successfuly. The amount of RAM can be reduced after a VM is configured.
Also note the disk size that we use, it’s set to 32GB to match the hardened partition table template.
Step 10: PXE Boot the VMs
Start the VMs, watch them PXE boot and get provisioned by Katello.
To start the VM with the ID of 203, simply do the following:
# qm start 203
The end result should be something like this:
# qm list
      VMID NAME                 STATUS     MEM(MB)    BOOTDISK(GB) PID
       200 admin1.hl.local      running    512               10.00 2439
       201 admin2.hl.local      running    512               10.00 2491
       202 katello.hl.local     running    10240             10.00 2551
       203 ldap1.hl.local       running    768               32.00 2598
       204 ldap2.hl.local       running    768               32.00 2654
       205 monitoring.hl.local  running    1024              32.00 29490
       206 syslog.hl.local      running    2048              32.00 2758
       207 storage1.hl.local    running    768               32.00 2637
       208 storage2.hl.local    running    768               32.00 8626
       209 db1.hl.local         running    1024              32.00 2952
       210 db2.hl.local         running    1024              32.00 3007
       211 proxy1.hl.local      running    768               32.00 3067
       212 proxy2.hl.local      running    768               32.00 1129
       213 web1.hl.local        running    768               32.00 3168
       214 web2.hl.local        running    768               32.00 1491
       215 backup.hl.local      running    768               32.00 1263
As mentioned earlier, the amount of RAM can be changed after a VM gets provisioned.
Step 11: Autosign Puppet Signing Requests
The Puppet signing requests for all servers will be listed under:
Infrastructure > Smart Proxies > Puppet CA > Certificates
I was unable to find a way for Hammer CLI to sign the certificates remotely, and there doesn’t seem to be a method to create autosign entries using the CLI either.
For Puppet, the workaround is to add a record for the domain name as an autosign entry in the smart proxy configuration: 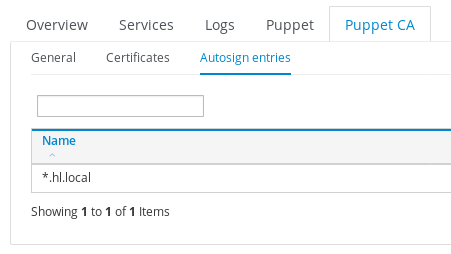
I did encounter a bizarre error when trying to delete a Puppet CA autosign entry:
Delete PuppetCA autosign entry for pxe-test.hl.local task failed with the following error:
ERF12-4681 [ProxyAPI::ProxyException]: Unable to delete PuppetCA autosign for pxe-test.hl.local
No such file or directory - /etc/puppet/autosign.conf
The proxy normally auto-determines the location of the autosign file by knowing the version of Puppet that’s loaded – the path in the log is a Puppet 3.x location, while our file is at the Puppet 4.x location. Since we are on Puppet 4.x, the real question is why the proxy is wrong?
I found a workaround on the Foreman community forum here. Do the following:
# mkdir /etc/puppet
# ln -sf /etc/puppetlabs/puppet/autosign.conf /etc/puppet/autosign.conf
# restorecon -Rv /etc/puppet/
This should resolve the problem.
Step 12: Backup Katello Configuration
It’s worth creating a backup of our Katello configuration to avoid losing changes we’ve made so far:
# katello-backup /mnt/backup/ --features=all -y
Step 13: Backup Proxmox Guests
We can backup all guest systems on the hypervisor by using the following command:
[pve]# vzdump -all \
  -dumpdir "/mnt/backup/" \
  -tmpdir "/mnt/backup/" \
  -mode snapshot \
  -compress 0 \
  -remove 0 \
  -mailnotification always \
  -mailto "[email protected]"
We store resulting files to /mnt/backup/, and also send an email to the root user upon completion.
What’s Next?
If all went well, then at this point we should have all of the homelab VMs created and running.
We’ll start looking into Puppet modules, and how we can use them to configure various homelab services automatically.
Hi, in the file hardened_ptable.txt a space has sneaked into the code between <and%. Kickstart will fail.
< %#
kind: ptable
….
Thanks Daniel. I fixed that now. WordPress isn’t great when it comes to formatting.
Seems like something is wrong with this line (I think spaces after <)
subscription-manager register –org=”” –name=”” –activationkey=””
Replacing it with this seems to work fine:
subscription-manager register –org=”” –name=”” –activationkey=””
Thanks. I said that before, WordPress isn’t great when it comes to formatting.
Small error in the table below step8, the ipaddr and macaddr labels are switched around.
Thanks very much, I’ve fixed that.
Hi Tomas,
With great interest and a lot of fun I am reading your homelab POS! It gives me so much positive energy in the COVID times :)
Everything is running smooth until the preparation of the Kickstart scripts. Somehow I am missing the “Katello Kickstart ..” et cetera templates. I cannot figure out why I am missing them. I am running Foreman 1.24.2 with Katello 3.14.1. According to their documentation it should be in the package.
I hope you can give me a pointer.
Regards
Jeroen
Kickstart templates should be available.
Hi Tomas,
You wrote a great guide full of information and details, thank you!!
The things that I do not understand here are:
1. why do you import a DVD and publish it through FTP when you have your pulp repositories available to install the OS, normally with the latest version of the OS that you have published already? Maybe the “synced content” in media selection was not available when you wrote it?
2. You do not connect foreman with Bind/DHCP, do you? Any reason?
Thank you Eduardo. I don’t really want the latest version, I prefer a static version of the OS from a DVD where I know that the content hasn’t changed, and that my PXE templates won’t break as a result of that. Obviously you are free to use any method that you like, that’s just my approach. With regards to DNS/DHCP, I’m used to running a DHCP server with failover and dynamic DNS updates, in my case there is no need to use Foreman for it, as it would be a single point of failure.
Thanks for the clarification,
you could allow foreman to manage the dynamic zone and the DHCP leases without loosing the HA. If foreman host is down, you just can’t use it to manage them, although the DHCP/BIND configuration will continue working as before.
Regards,
Eduardo
Hi,
Thank you for article, and slowly getting through it but sadly i got stuck and host group creation
“# hammer hostgroup create \
–query-organization “Lisenet” \
–locations “HomeLab” \
–name “el7_group” \
–description “Host group for CentOS 7 servers” \
–lifecycle-environment “stable” \
–content-view “el7_content” \
–content-source-id “1” \
–environment “homelab” \
–puppet-proxy “katello.hl.local” \
–puppet-ca-proxy “katello.hl.local” \
–domain “hl.local” \
–subnet “homelab_LAN” \
–architecture “x86_64” \
–operatingsystem “CentOS 4.1708” \
–medium “CentOS7_DVD_FTP” \
–partition-table “Kickstart hardened 32GB” \
–pxe-loader “PXELinux BIOS” \
–root-pass “PleaseChangeMe””
im getting:
“The selected content source and lifecycle environment do not match”
Everything else seems fine:
“hammer lifecycle-environment list
—|———|——–
ID | NAME | PRIOR
—|———|——–
1 | Library |
4 | stable | Library”
“hammer content-view version list
—|——————————-|———|———————–
ID | NAME | VERSION | LIFECYCLE ENVIRONMENTS
—|——————————-|———|———————–
3 | el7_content 1.0 | 1.0 | Library, stable
1 | Default Organization View 1.0 | 1.0 | Library
—|——————————-|———|———————–
“
Try setting your content-source-id to 3.
“The caveat is, however, that by default, public CentOS repositories remain enabled on the server. What we ideally want to do is to remove all public CentOS repositories when the system gets registered, because at that point repositories the system is subscribed to will already be available. To achieve this, we need to modify the snippet for subscription_manager_registration and create a custom one that removes public CentOS repositories”
It is better to disable the public repo using “enabled=0” in /etc/yum.conf rather than remove the file that will be reinstalled in a future release of “centos” with (centos-release) package
Thanks for your comment Fabien.