Working with Katello – part 5. We’re going to configure a separate lifecycle for Puppet modules.
This article is part of the Homelab Project with KVM, Katello and Puppet series.
Homelab
We have Katello installed on a CentOS 7 server:
katello.hl.local (10.11.1.4) – see here for installation instructions
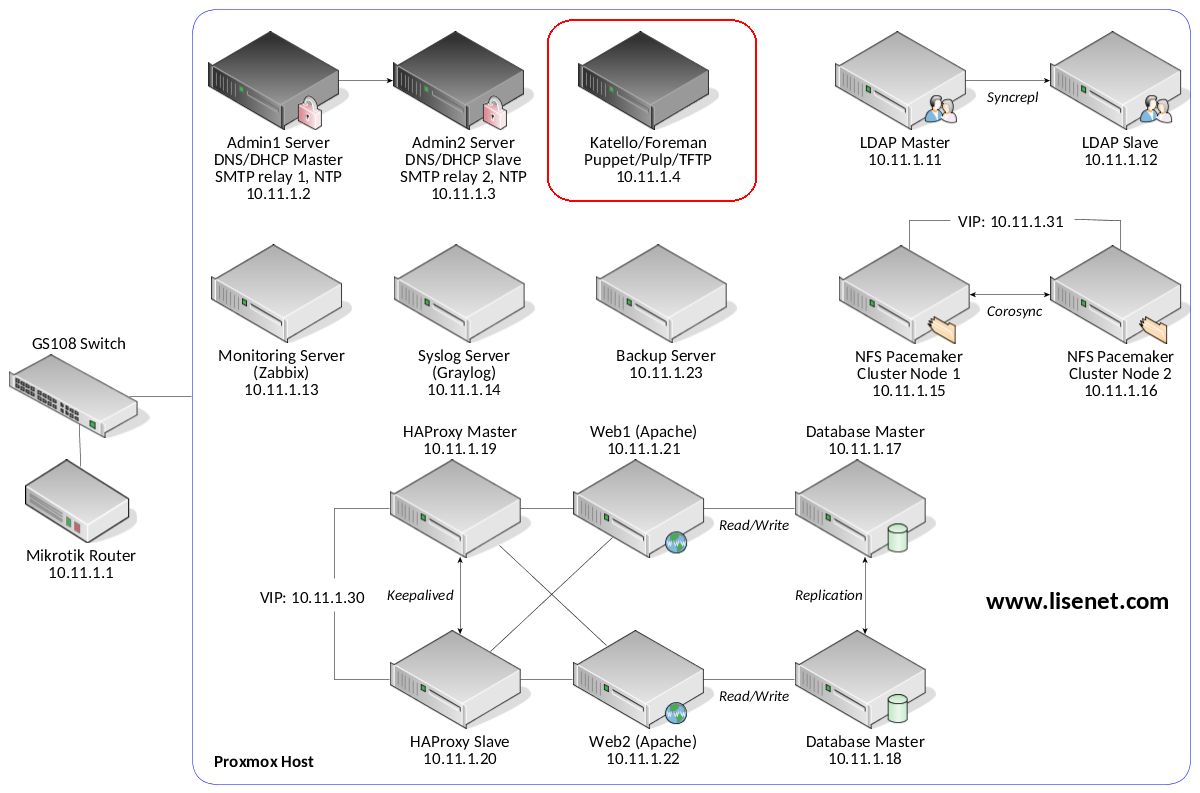
See the image below to identify the homelab part this article applies to.
Separate Lifecycle for Puppet Modules
The idea for using a separate lifecycle for Puppet modules was taken from a Red Hat blog post that was published by Maxim Burgerhout.
We already know that we can create a repository that contains RPM files. We can then create a content view by snapshotting the repository.
We can create a content view with Puppet modules, just like we would do with RPMs. Based on that content view, Katello creates a special directory on the filesystem and it’s where the Puppet master looks for Puppet modules.
Katello creates a Puppet environment from the Puppet module content view the moment we publish it. As a result, using a Puppet module content view as a Puppet environment directly makes it easy to iterate quickly during development of our homelab Puppet modules.
The Plan
Below is a step-by-step plan that we’ll be following in this article.
- Step 1: create a Puppet product.
- Step 2: build Puppet modules.
- Step 3: create a Puppet repository.
- Step 4: sync Puppet repository.
- Step 5: create a content view.
- Step 6: add Puppet modules to the content view.
- Step 7: publish Puppet content view.
- Step 8: backup Katello configuration.
Configure Katello
Step 1: Create a Puppet Product
# hammer product create --name "puppet"
Step 2: Build Puppet Modules
See here for more info: Build and Import Puppet Modules into Katello
The idea here is to have a single Katello repository containing all our Puppet modules.
A Katello repository may be a plain directory containing a Pulp manifest and packaged Puppet modules. According to the Pulp project documentation, the Pulp manifest is a file listing each Puppet module contained in the directory. Each module is listed on a separate line which has the following format: <name>,<checksum>,<size>. The name is the file name, the checksum is SHA256 digest of the file, and the size is the size of the file in bytes. The Pulp manifest must be named PULP_MANIFEST. Having all this information, we can build Puppet modules manually, generate a Pulp manifest and import everything into Katello.
Get the source from GitHub:
# cd /opt
# git clone https://github.com/lisenet/build-puppet-modules-for-katello.git
Build the modules, providing the path to the modules’ directory:
# bash ./build-puppet-modules-for-katello/puppet-module-build.sh \
  /etc/puppetlabs/code/environments/homelab/modules/
This will also create the file PULP_MANIFEST.
Step 3: Create a Puppet Repository
# hammer repository create \
  --product "puppet" \
  --name "homelab_modules" \
  --content-type "puppet" \
  --url "file:///etc/puppetlabs/code/environments/homelab/modules/"
Step 4: Synchronise Puppet Repository
# hammer repository synchronize \
  --product "puppet" \
  --name "homelab_modules"
Step 5: Create a Content View
# hammer content-view create \
  --name "puppet_content" \
  --description "Puppet modules"
Step 6: Add Puppet Modules to the Content View
View the module list:
# hammer puppet-module list
---|--------------------------|--------------|---------|-------------------------------------
ID | NAME                     | AUTHOR       | VERSION | UUID
---|--------------------------|--------------|---------|-------------------------------------
38 | graylog                  | graylog      | 0.6.0   | f27d9a89-9e0a-44fe-b72d-f101d94629a4
37 | sudo                     | saz          | 5.0.0   | f088fa68-bfa3-4429-a8f2-f9c893d52bfc
36 | ruby                     | puppetlabs   | 1.0.0   | eaaef4ba-bf52-4275-8eff-0340d98aa3f7
35 | archive                  | puppet       | 2.3.0   | e09d2bc5-ec62-488c-a1a8-df6364448378
34 | elasticsearch            | elastic      | 6.2.1   | d965e7b4-ec88-4813-b575-745f9e78c2f1
33 | augeasproviders_shellvar | herculesteam | 2.2.2   | cbbe2521-890b-476d-b3b5-beef1b72fd73
32 | haproxy                  | puppetlabs   | 2.1.0   | c9113401-719a-4d19-8ee8-8faca9a30317
31 | mongodb                  | puppet       | 2.1.0   | c8e47d0c-e54c-4cef-9b16-c1bad02e7fba
30 | sysctl                   | thias        | 1.0.6   | c23fabcc-0d62-4ecb-8ac3-ebe06e9772e6
29 | nfs                      | derdanne     | 2.0.7   | c09f3853-43a8-4d30-b81d-7ce160d8b3b8
28 | stdlib                   | puppetlabs   | 4.24.0  | 9ec2939a-3b08-4fbe-a7ff-1c34984350d7
27 | ssh                      | saz          | 3.0.1   | 99b1c530-fbe7-487a-8842-cfeacc688b74
26 | apache                   | puppetlabs   | 2.3.1   | 93f56575-da3d-41b6-964c-a70af87bcb0c
25 | concat                   | puppetlabs   | 2.2.1   | 9379ce64-6135-4b17-a1c3-5731b0ac89c3
24 | mysql                    | puppetlabs   | 5.3.0   | 92695de8-45c0-4271-832c-5721bdb5ffd9
23 | openldap                 | camptocamp   | 1.16.1  | 924b998d-b361-4f75-9e41-55f825d209da
22 | accounts                 | puppetlabs   | 1.3.0   | 8bf8366e-81f1-4dd1-8de6-9e330e7de759
21 | sssd                     | sgnl05       | 2.7.0   | 8afc1e88-9d4a-46ad-8107-5d457f4cd740
20 | snmp                     | razorsedge   | 3.9.0   | 8aed966e-e973-4d87-af1d-6f4b63051c32
19 | lisenet_firewall         | lisenet      | 1.0.0   | 8513e8ec-7cdd-4606-8d8c-92a660dc5da5
18 | corosync                 | puppet       | 6.0.0   | 7b4dba49-c793-47f7-b872-a683a4b8d131
17 | augeasproviders_core     | herculesteam | 2.1.4   | 77afedf9-65b8-4168-a8a1-5e534e84462d
16 | pe_gem                   | puppetlabs   | 0.2.0   | 5e639097-072a-4486-bc19-0b3ab6a8bbae
15 | keepalived               | arioch       | 1.2.5   | 4ff5c45b-0a93-4cbd-8574-1b246363378c
14 | firewall                 | puppetlabs   | 1.12.0  | 3a86241a-3c52-4339-a05d-6f6de0a033ac
13 | rsyslog                  | saz          | 5.0.0   | 330447a4-010a-4cfb-8b99-5cbcf327adaa
12 | systemd                  | camptocamp   | 1.1.1   | 2fea15c7-99d4-49cd-9eea-578c5e249657
11 | ntp                      | puppetlabs   | 7.1.1   | 2fd3c5d5-4943-4f54-bd60-3bd1d73af0d3
10 | translate                | puppetlabs   | 1.1.0   | 2e46f4e3-34f6-41a0-9466-4b163b87f5d9
9  | selinux                  | puppet       | 1.5.2   | 2e12d841-2801-45d2-a70c-e287d134b1e8
8  | postgresql               | puppetlabs   | 5.3.0   | 28f11fd1-223b-46fe-a92c-cfc485aa28ef
7  | datacat                  | richardc     | 0.6.2   | 24f45f62-7012-4ac1-809e-3efd9d5d9daa
6  | zabbix                   | puppet       | 6.2.0   | 2426fdbc-9dc2-4cf2-8810-a7702fdd7faa
5  | limits                   | saz          | 3.0.2   | 1b893348-11e9-45e7-9d64-5fb2819c1e96
4  | apt                      | puppetlabs   | 4.5.1   | 13c33cf0-acbe-4369-b44e-def9933e6d87
3  | wordpress                | hunner       | 1.0.0   | 0f928270-7b36-407b-b603-1efe6e261812
2  | staging                  | puppet       | 3.1.0   | 0a6ffb28-5049-4556-923d-7af3850ece63
1  | java                     | puppetlabs   | 2.4.0   | 081cb24f-cec7-4c12-a203-5685edc1936d
---|--------------------------|--------------|---------|-------------------------------------
We can loop the module IDs to add them to the content view:
# for i in $(seq 1 38);do \
  hammer content-view puppet-module add \
  --content-view "puppet_content" \
  --id "$i"; done
Step 7: Publish Puppet Content View
Let us check the environments that we have available before we publish the content view:
# hammer environment list
---|-----------
ID | NAME
---|-----------
2  | homelab
1  | production
---|-----------
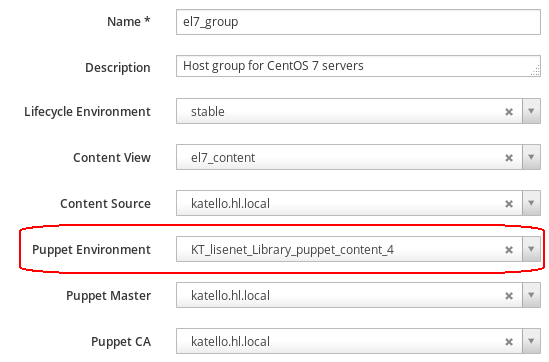
The production environment is the default one, and the homelab environment is the one we created manually. Publish Puppet content view:
# hammer content-view publish \
  --name "puppet_content" \
  --description "Publishing Puppet modules"
As mentioned earlier, Katello creates a Puppet environment from the Puppet module content view the moment we publish it. Verify:
# hammer environment list
---|------------------------------------
ID | NAME
---|------------------------------------
3  | KT_lisenet_Library_puppet_content_4
2  | homelab
1  | production
---|------------------------------------
We can now associate a host or hostgroup with whatever Puppet environment we want, including the one created for the Puppet module content view.
Step 8: Backup Katello Configuration
Let us create a backup of our Katello configuration so that we don’t lose any changes that we’ve made so far:
# katello-backup /mnt/backup/ --features=all -y
How we can publish this contents to all capsules. after publishing content it only create environment on satellite servers not on all capsule servers.
Please consult Katello documentation.
I think puppet-module-build.sh is not working for the newer versions of Puppet. I am using 6.6 and it gives me error : ” “puppet module build” is obsolete. So I am using pdk command for it:
pdk build –target-dir=”$module”
But this again gives me an error sayinh pdk should be run where there is metadat.json file. I already have the required files for each module. If anyone has faced such an issue?
I’m still on Puppet 5.x. Satellite does not support Puppet 6.x.
you will need to create a metadata.json file for each module that does not have one.
in the puppet-module-build.sh
comment the line for puppet module build
and make sure below are present there:
cd “$module”
echo -e “\n$module”;
pdk build –target-dir=”$module”
puppet 6 is compatible with foreman 1.22
Great guide. I’ve been following it using puppet 6.x, and changed the build script to work w/ puppet 6.x and pdk.
If anyone needs it I forked the repo and made the changes here: https://github.com/bilkoh/build-puppet-modules-for-katello
Eg: you can use w/ `git clone https://github.com/bilkoh/build-puppet-modules-for-katello.git` instead.
Thanks!