We’re going to use Puppet to install and configure HAProxy to load balance Apache web services. We’ll also configure Keepalived to provide failover capabilities.
This article is part of the Homelab Project with KVM, Katello and Puppet series. See here for a blog post on how to configure HAProxy and Keepalived manually.
Homelab
We have two CentOS 7 servers installed which we want to configure as follows:
proxy1.hl.local (10.11.1.19) – HAProxy with Keepalived (master router node)
proxy2.hl.local (10.11.1.20) – HAProxy with Keepalived (slave router node)
SELinux set to enforcing mode.
See the image below to identify the homelab part this article applies to.
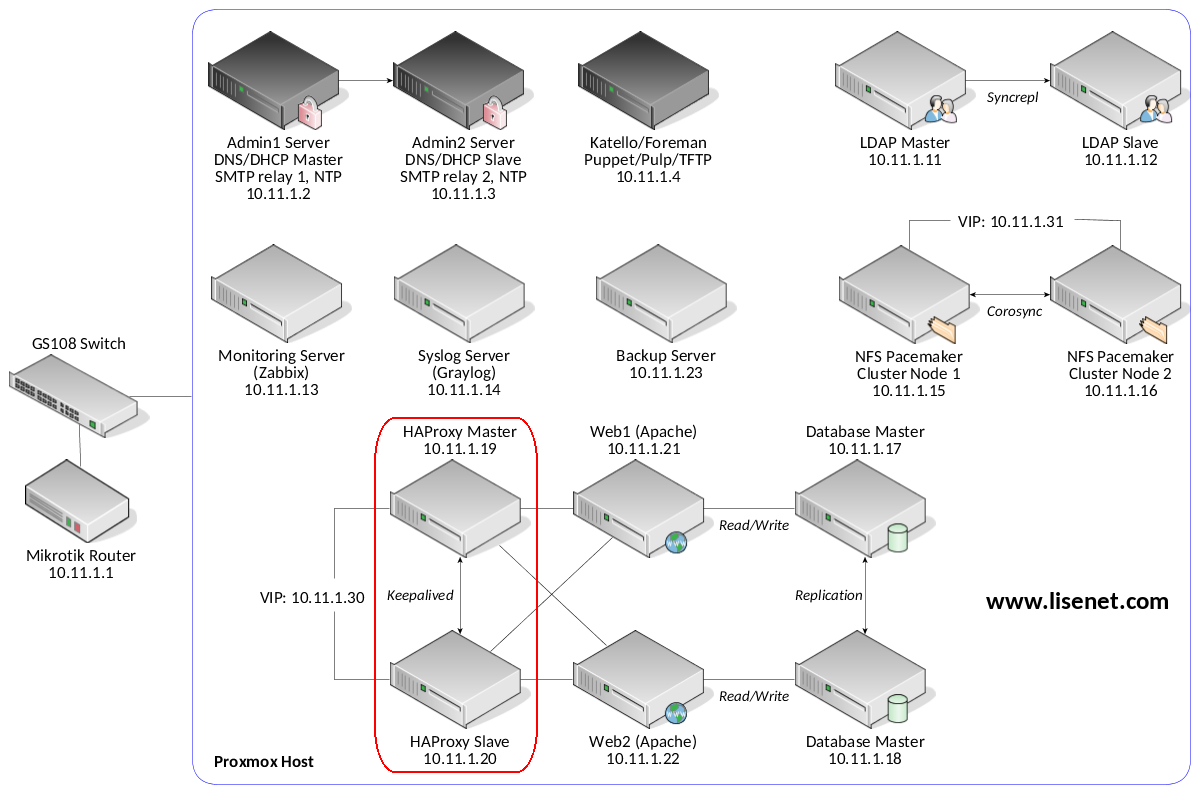
HAProxy and Virtual IP
We use 10.11.1.30 as a virtual IP, with a DNS name of blog.hl.local. This is the DNS of our WordPress site.
Below is a GIF representing our HA setup using HAProxy (primary and secondary load balancers).
Configuration with Puppet
Puppet master runs on the Katello server.
Puppet Modules
We use the following Puppet modules:
- arioch-keepalived – to configure Keepalived
- puppetlabs-haproxy – to configure HAProxy
- thias-sysctl – to configure kernel parameters
Please see each module’s documentation for features supported and configuration options available.
Firewall Configuration
Configure both proxy servers to allow VRRP and HTTP/S traffic. Port 8080 will be used for HAProxy statistics.
firewall { '007 allow VRRP':
  source => '10.11.1.0/24',
  proto  => 'vrrp',
  action => accept,
}->
firewall { '008 allow HTTP/S':
  dport  => [80, 443, 8080],
  source => '10.11.1.0/24',
  proto  => tcp,
  action => accept,
}
Kernel Parameters and IP Forwarding
Load balancing in HAProxy requires the ability to bind to an IP address that is nonlocal. This allows a running load balancer instance to bind to a an IP that is not local for failover.
In order for the Keepalived service to forward network packets properly to the real servers, each router node must have IP forwarding turned on in the kernel.
sysctl { 'net.ipv4.ip_forward': value => '1' }
sysctl { 'net.ipv4.ip_nonlocal_bind': value => '1' }
Install HAProxy
This needs to be applied for both proxy servers.
file {'/etc/pki/tls/private/hl.pem':
  ensure => 'file',
  source => 'puppet:///homelab_files/hl.pem',
  path => '/etc/pki/tls/private/hl.pem',
  owner => '0',
  group => '0',
  mode  => '0640',
}->
class { 'haproxy':
  global_options   => {
    'log'     => "127.0.0.1 local2",
    'chroot'  => '/var/lib/haproxy',
    'pidfile' => '/var/run/haproxy.pid',
    'maxconn' => '4096',
    'user'    => 'haproxy',
    'group'   => 'haproxy',
    'daemon'  => '',
    'ssl-default-bind-ciphers' => 'kEECDH+aRSA+AES:kRSA+AES:+AES256:!RC4:!kEDH:!LOW:!EXP:!MD5:!aNULL:!eNULL',
    'ssl-default-bind-options' => 'no-sslv3',
    'tune.ssl.default-dh-param' => '2048 ',
  },
  defaults_options => {
    'mode'    => 'http',
    'log'     => 'global',
    'option'  => [
      'httplog',
      'dontlognull',
      'http-server-close',
      'forwardfor except 127.0.0.0/8',
      'redispatch',
    ],
    'retries' => '3',
    'timeout' => [
      'http-request 10s',
      'queue 1m',
      'connect 10s',
      'client 1m',
      'server 1m',
      'http-keep-alive 10s',
      'check 10s',
    ],
    'maxconn' => '2048',
  },
}
haproxy::listen { 'frontend00':
  mode    => 'http',
  options => {
    'balance' => 'source',
    'redirect' => 'scheme https code 301 if !{ ssl_fc }',
  },
  bind    => {
    '10.11.1.30:80' => [],
    '10.11.1.30:443' => ['ssl', 'crt', '/etc/pki/tls/private/hl.pem'],
  },
}->
haproxy::balancermember { 'web1_web2':
  listening_service => 'frontend00',
  ports             => '443',
  server_names      => ['web1.hl.local','web2.hl.local'],
  ipaddresses       => ['10.11.1.21','10.11.1.22'],
  options           => 'check ssl verify none',
}->
haproxy::listen { 'stats':
  ipaddress => $::ipaddress,
  ports     => ['8080'],
  options   => {
    'mode'  => 'http',
    'stats' => ['enable','uri /','realm HAProxy\ Statistics','auth admin:PleaseChangeMe'],
  },
}
Note how we forward all HTTP traffic to HTTPS. We also enable HAProxy stats.
There are several HAProxy load balancing algorithms available, we use the source algorithm to select a server based on a hash of the source IP. This method helps to ensure that a user will end up on the same server.
Install Keepalived
Apply the following to the master node proxy1.hl.local:
include ::keepalived
keepalived::vrrp::script { 'check_haproxy':
  script => '/usr/bin/killall -0 haproxy',
}
keepalived::vrrp::instance { 'LVS_HAP':
  interface         => 'eth0',
  state             => 'MASTER',
  virtual_router_id => '51',
  priority          => '5',
  auth_type         => 'PASS',
  auth_pass         => 'PleaseChangeMe',
  virtual_ipaddress => '10.11.1.30/32',
  track_script      => 'check_haproxy',
}
Apply the following to the slave node proxy2.hl.local:
include ::keepalived
keepalived::vrrp::script { 'check_haproxy':
  script => '/usr/bin/killall -0 haproxy',
}
keepalived::vrrp::instance { 'LVS_HAP':
  interface         => 'eth0',
  state             => 'SLAVE',
  virtual_router_id => '51',
  priority          => '4',
  auth_type         => 'PASS',
  auth_pass         => 'PleaseChangeMe',
  virtual_ipaddress => '10.11.1.30/32',
  track_script      => 'check_haproxy',
}
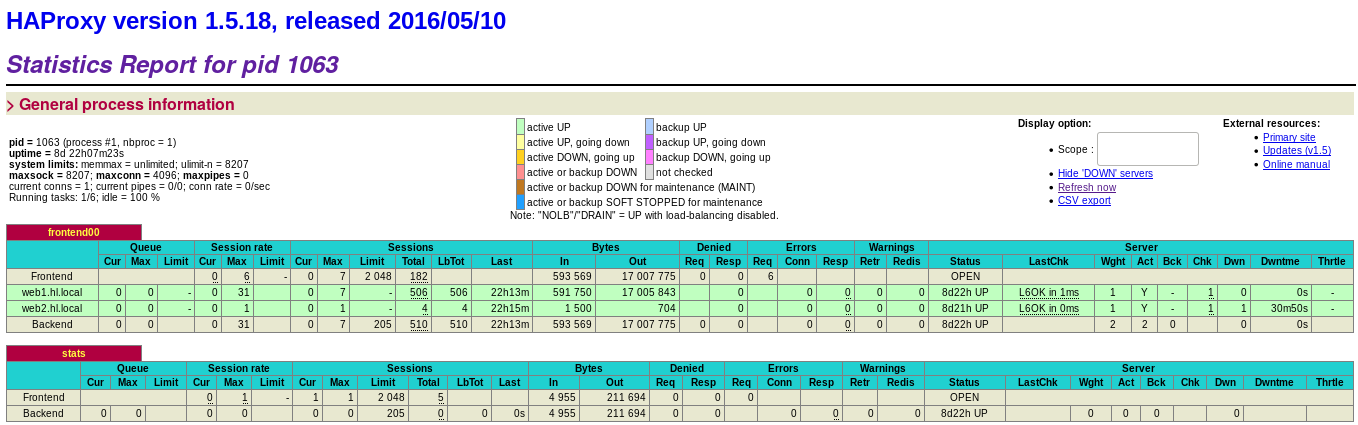
HAProxy Stats
If all goes well, we should be able to get some stats from HAProxy.
WordPress Site
Our WordPress site should be accessible via https://blog.hl.local.
First of all, this blog post series is impressive and it’s a lot of work. Congratulations !
Can you describe the hierarchy and files in which you put this different puppet definitions ?
For haproxy it s a single puppet module applied to both nodes, and for keepalived, how do you use parameter SLAVE/MASTER from Foreman ? With smart class parameters ?
Thanks in advance.
Hi Alex, thanks for your feedback! Since there are several ways you can achieve this with Puppet, I’m not going to go into details too much but rather explain the approach that I’ve taken.
I’ve started with node definitions as it was the easiest way to get things going. It should come as no surprise that node definitions don’t scale at all, therefore this method is only good for making sure that your Puppet configuration is working, and that you can deploy HAProxy and Keepalived.
Once I had the deployment working, I created two Puppet classes, one to configure a master, and one to configure a slave. As a result, I was able to assign the classes to hosts via Katello’s WebUI. This configuration can at least scale, but classes are still hardcoded. That’s where smart class parameters came into play. I ended up with a single class which I could pass custom data to. This way allowed me to define a master/slave by using Katello’s WebUI. There is an example of how to pass a custom class parameter to a firewall module, check the article about Puppet modules if you’re interested.
Thanks for the article. Question: If you are using keepalived only for vip management and haproxy for the actual load balancing and data transfer, is enabling ip_forward really necessary? Haproxy is there between the connections, no forwarding should be necessary.
You’re welcome. Does it work for you if you don’t enable IP forwarding?
Hey Lisenet, thanks for the awesome work.
Can you please explain how to get/create a virtual IP?
Hi, a virtual IP address is an IP address that does not correspond to a physical network interface. You select an IP address that you want to use as a virtual IP address in the same way you’d select an IP address for your server, and assign it to Keepalived. It will then float from one instance to another during failover.