We’re going to use Puppet to install and configure a Zabbix server. We will also allow active Zabbix agent auto-registration.
This article is part of the Homelab Project with KVM, Katello and Puppet series.
Homelab
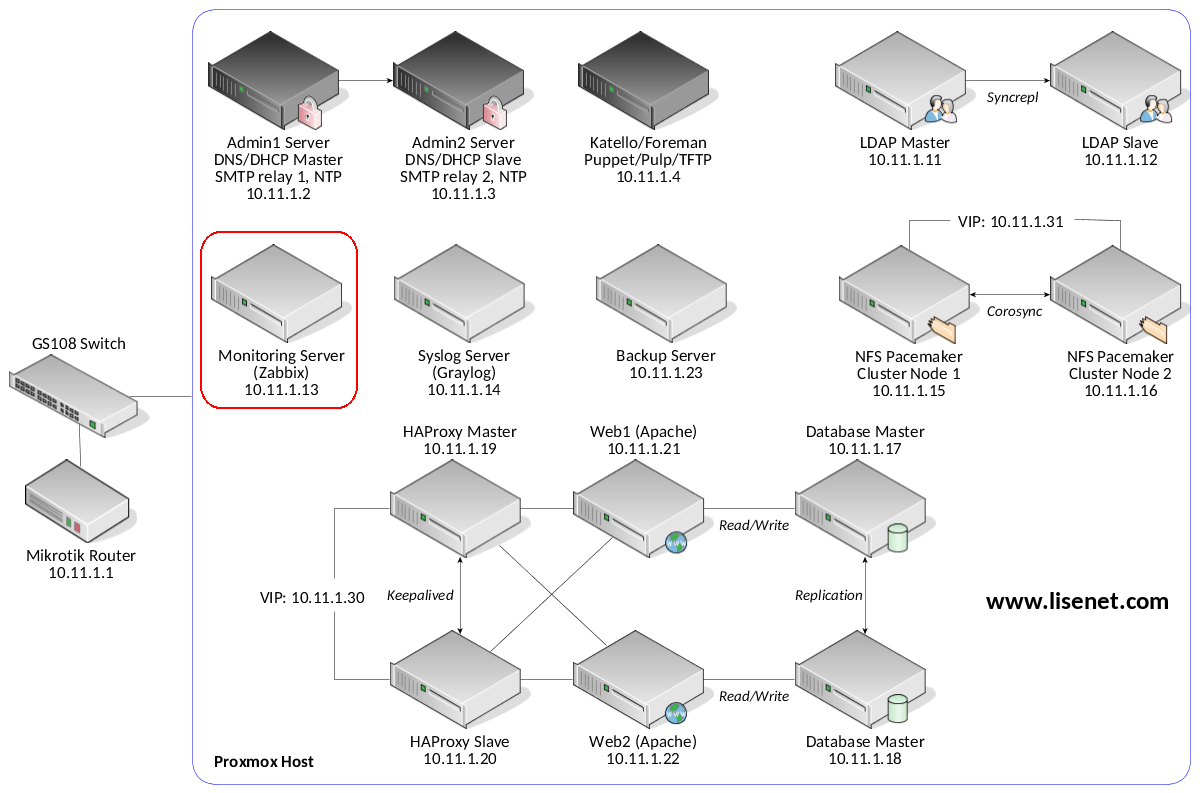
We have a CentOS 7 VM installed which we want to configure as a Zabbix server:
monitoring.hl.local (10.11.1.13) – Zabbix server with agent auto-registration
SELinux set to enforcing mode.
See the image below to identify the homelab part this article applies to.
Zabbix LTS and PHP
We want to use a stable Zabbix LTS release, which is Zabbix 3.0 at the time of writing.
Note that Zabbix 3.0 LTS release supports PHP 5.4 or later, however PHP v7 is not supported yet. For more info, see Zabbix documentation.
Also note that PHP 5.6 will receive security support until 31 December 2018. For more info, see PHP supported versions. We will therefore use Remi’s PHP 5.6 repository served by Katello (we configured it here).
Configuration with Puppet
Puppet master runs on the Katello server.
Puppet Modules
We use puppet-zabbix Puppet module to configure the server. We also use puppetlabs-apache and puppetlabs-mysql to configure frontend and backend services.
Please see each module’s documentation for features supported and configuration options available.
Manage Firewall
We start with firewall configuration:
firewall { '007 allow Zabbix active checks':
  dport  => [10051],
  source => '10.11.1.0/24',
  proto  => tcp,
  action => accept,
}->
firewall { '008 allow Zabbix WebUI':
  dport  => [80, 443],
  source => '10.11.1.0/24',
  proto  => tcp,
  action => accept,
}
Install Apache
We use Apache to run Zabbix frontend, and MySQL as Zabbix backend database.
Do a minimal Apache install only, but make sure that a PHP module is loaded:
class { 'apache':
  default_vhost     => false,
  default_ssl_vhost => false,
  default_mods      => false,
  mpm_module        => 'prefork',
  server_signature  => 'Off',
  server_tokens     => 'Prod',
  trace_enable      => 'Off',
}
include apache::mod::php
Install MySQL
MySQL 5.7 repository is served by Katello (we configured it here).
class { 'mysql::server':
  package_name       => 'mysql-community-server',
  service_name       => 'mysqld',
  root_password      => 'PleaseChangeMe',
  create_root_my_cnf => true,
  manage_config_file => true,
  config_file        => '/etc/my.cnf',
  purge_conf_dir     => true,
  restart            => true,
  override_options   => {
    mysqld => {
      bind-address => '127.0.0.1',
      datadir      => '/var/lib/mysql',
      log-error    => '/var/log/mysqld.log',
      pid-file     => '/var/run/mysqld/mysqld.pid',
      wait_timeout => '3600',
      interactive_timeout => '3600',
    },
    mysqld_safe => {
      log-error => '/var/log/mysqld.log',
    },
  },
  remove_default_accounts => true,
}
Install Zabbix Server
Zabbix 3.0 repository is served by Katello. Since this is the case, we set manage_repo to false.
class { 'zabbix':
  zabbix_version  => '3.0',
  zabbix_url      => 'monitoring.hl.local',
  database_type   => 'mysql',
  manage_repo     => false,
  manage_firewall => true,
  manage_vhost    => true,
  apache_use_ssl  => true,
}
If all goes well, at this point Zabbix should be up and running.
Configure Active Agent Auto-Registration
This part should be configured after the server has been created.
It is possible to allow active Zabbix agent auto-registration, after which the server can start monitoring them. This way new hosts can be added for monitoring without configuring them manually on the server.
When installed succesfully, Zabbix web interface will be accessibe and we can log in with the default credentials:
- Username: Admin
- Password: zabbix
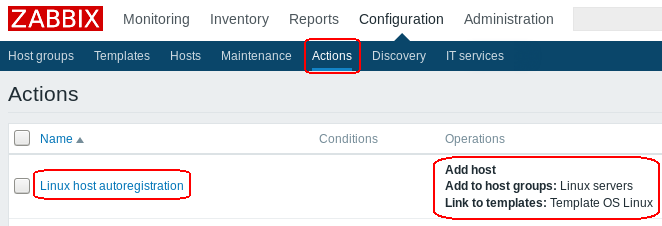
In the Zabbix frontend, go to Configuration > Actions, select Auto registration as the event source and click on Create action. Use something like this:
- Name: Linux host autoregistration
- Conditions: none
- Operations: Link to templates: Template OS Linux
See the image below for more info.
We don’t use any conditions here as it’s optional and not really necessary for the homelab, however, we could use HostMetadataItem=system.uname if we wanted to separate say Linux servers from Windows.
Install Zabbix Agents on All Servers
By now we should have our Zabbix server running with agent auto-registration enabled. One thing that is still left to do is to configure Puppet to install a Zabbix agent on all homelab servers, and allow Zabbix passive checks.
This needs to go in to the main environment manifest file /etc/puppetlabs/code/environments/homelab/manifests/site.pp so that configuration is applied to all servers.
class { 'zabbix::agent':
  zabbix_version => '3.0',
  ## Do not use DNS, use IP address.
  server  => '10.11.1.13',
  ## Do not set logtype to 'system' unless you want
  ## to find yourself debugging SELinux problems.
  logtype => 'file',
  logfile => '/var/log/zabbix/zabbix_agentd.log',
  ## Use Katello repository
  manage_repo => false,
  manage_firewall => false,
  manage_selinux => true,
  ## Zabbix Agent does not work well with SELinux
  ## See: https://support.zabbix.com/browse/ZBX-12592
  selinux_require => [
    'type kernel_t',
    'type devlog_t',
    'type zabbix_agent_t',
    'class sock_file write',
    'class process setrlimit',
    'class unix_dgram_socket {connect create sendto}',
  ],
  selinux_rules => { 'zabbix_agent_t' => [
    'allow zabbix_agent_t kernel_t:unix_dgram_socket sendto',
    'allow zabbix_agent_t self:process setrlimit',
    'allow zabbix_agent_t self:unix_dgram_socket { connect create }',
    ]
  },
  ## Allow active Zabbix agent auto-registration,
  ## after which the server can start monitoring them.
  serveractive => 'monitoring.hl.local',
  hostmetadata => 'system.uname',
}
Configure firewall on all servers to allow Zabbix passive checks:
firewall { '006 allow Zabbix passive checks':
  proto  => 'tcp',
  source => 'monitoring.hl.local',
  dport  => '10050',
  action => 'accept',
}
The end result should be similar to this:
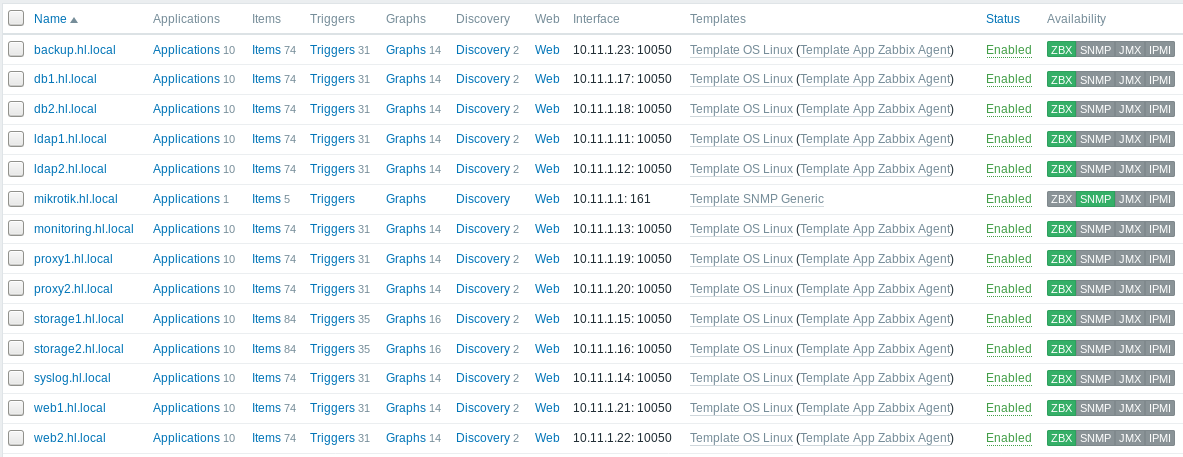
All agents auto-register with the server.