Working with Katello – part 1. We’ll use Katello to create a product that contains RPM repositories, we’ll also create a content view as well as promote the content view to a lifecycle environment.
This article is part of the Homelab Project with KVM, Katello and Puppet series.
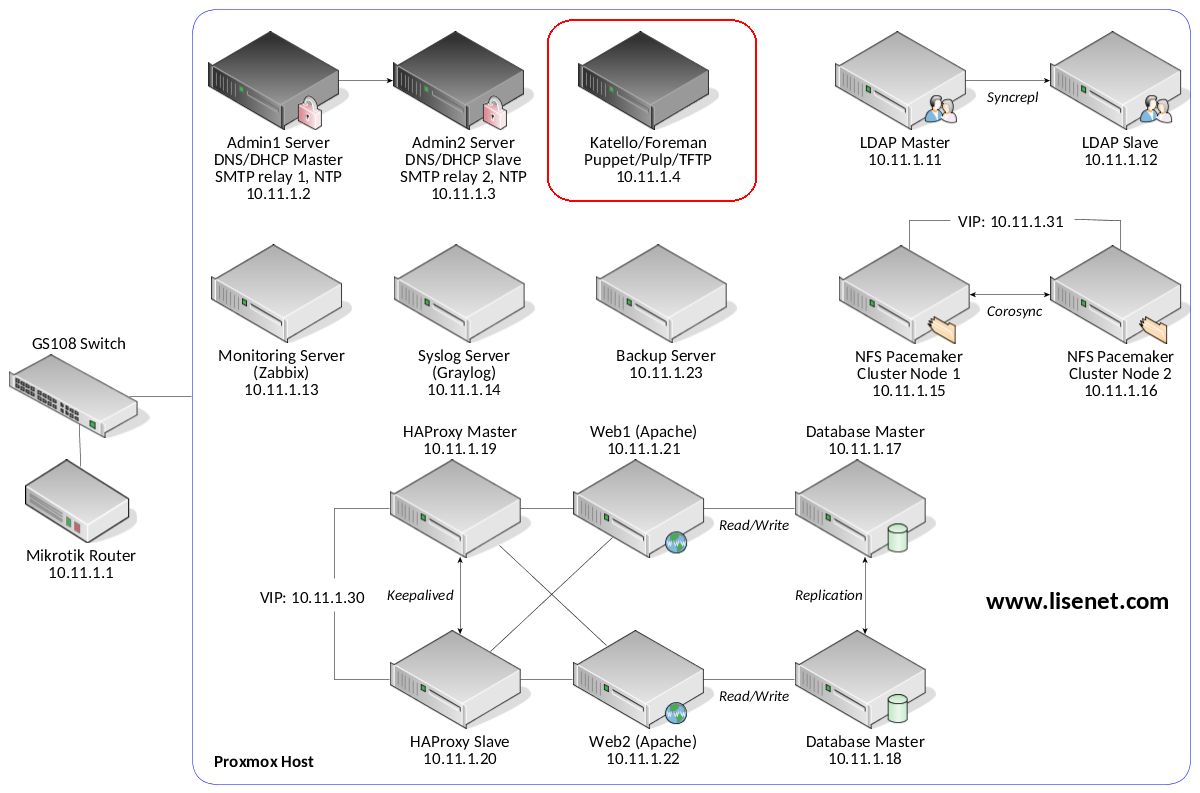
Homelab
We have Katello installed on a CentOS 7 server:
katello.hl.local (10.11.1.4) – see here for installation instructions
See the image below to identify the homelab part this article applies to.
Some of Katello Definitions Used in the Article
All of this can be found in the official Katello user guide, therefore I’ll reference the main points only.
Repository – Collection of content (either RPM or Puppet).
Product – Collection of Repositories, Content Hosts subscribe to a product.
Library – A special pre-created Lifecycle Environment where Repositories are created and content is synced or uploaded to. A Content Host can subscribe to library and receive content as soon as the content is synced or uploaded.
Content View – snapshot of one or more repositories and/or puppet modules.
Publishing – Content Views are “published” in order to lock their contents in place. The content of the Content View is cloned and all filters applied. Publishing creates a new version of the Content View.
Promoting – Content Views can be cloned to different Lifecycle Environments (dev, test, prod).
If you’re not familiar with Katello then I recommend you giving the official Katello user guide a go.
Hammer CLI
Hammer is the CLI tool for Foreman. We will be using Hammer exclusively.
If you’re not familiar with Hammer, take a look at this cheat sheet: https://access.redhat.com/articles/2258471
This article assumes saved credentials in ~/.hammer/cli.modules.d/foreman.yml.
# cat ~/.hammer/cli.modules.d/foreman.yml
:foreman:
 :host: 'https://katello.hl.local/'
 :username: 'admin'
 :password: '**********'
Because many hammer commands are organisation specific, we can set a default organisation and a default location for hammer commands so that we don’t have to specify it every time.
# hammer defaults add --param-name organization --param-value "Lisenet"
# hammer defaults add --param-name location --param-value "HomeLab"
Verify:
# hammer defaults list
-------------|--------
PARAMETER    | VALUE
-------------|--------
organization | Lisenet
location     | HomeLab
-------------|--------
The Plan
Below is a step-by-step plan that we’ll be following in this article.
- Step 1: create a product.
- Step 2: download and import GPG keys.
- Step 3: create RPM repositories.
- Step 4: sync RPM repositories.
- Step 5: create a content view.
- Step 6: add repositories to the content view.
- Step 7: create a lifecycle environment.
- Step 8: publish a content view.
- Step 9: promote the content view version to lifecycle environment.
- Step 10: create an activation key.
- Step 11: add subscription to the activation key.
- Step 12: backup Katello configuration.
Configure Katello
Step 1: Create a Katello Product
Create a product that will be used for RPM repositories.
# hammer product create \
  --name "el7_repos" \
  --description "Various repositories to use with CentOS 7"
Verify:
# hammer product list
---|-----------|-------------------------------------------|--------------|--------------|-----------
ID | NAME      | DESCRIPTION                               | ORGANISATION | REPOSITORIES | SYNC STATE
---|-----------|-------------------------------------------|--------------|--------------|-----------
1  | el7_repos | Various repositories to use with CentOS 7 | Lisenet      | 0            |
---|-----------|-------------------------------------------|--------------|--------------|-----------
Step 2: Download and Import GPG Keys
GPG keys provide a way to verify the integrity of packages found within a repository or a product.
Create a folder to store GPG keys:
# mkdir /etc/pki/rpm-gpg/import/
# cd /etc/pki/rpm-gpg/import/
Note that GPG keys that you need will depend on the repositories that you plan to use. In my case I’m going to need the ones listed below.
CentOS 7 signing GPG key:
# wget http://mirror.centos.org/centos/7/os/x86_64/RPM-GPG-KEY-CentOS-7
# hammer gpg create \
  --key "RPM-GPG-KEY-CentOS-7" \
  --name "RPM-GPG-KEY-CentOS-7"
EPEL 7 signing GPG key:
# wget https://archive.fedoraproject.org/pub/epel/RPM-GPG-KEY-EPEL-7Server
# hammer gpg create \
  --key "RPM-GPG-KEY-EPEL-7Server" \
  --name "RPM-GPG-KEY-EPEL-7Server"
MySQL signing GPG key:
# wget https://repo.mysql.com/RPM-GPG-KEY-mysql
# hammer gpg create \
  --key "RPM-GPG-KEY-mysql" \
  --name "RPM-GPG-KEY-mysql"
Puppet signing GPG keys:
# wget https://yum.puppetlabs.com/RPM-GPG-KEY-puppet
# hammer gpg create \
  --key "RPM-GPG-KEY-puppet" \
  --name "RPM-GPG-KEY-puppet"
Zabbix signing GPG key:
# wget http://repo.zabbix.com/RPM-GPG-KEY-ZABBIX
# hammer gpg create \
  --key "RPM-GPG-KEY-ZABBIX" \
  --name "RPM-GPG-KEY-ZABBIX"
Remi signing GPG key (for PHP 7.x):
# wget https://rpms.remirepo.net/RPM-GPG-KEY-remi
# hammer gpg create \
  --key "RPM-GPG-KEY-remi" \
  --name "RPM-GPG-KEY-remi"
Graylog signing GPG key:
# wget https://raw.githubusercontent.com/Graylog2/fpm-recipes/master/recipes/graylog-repository/files/rpm/RPM-GPG-KEY-graylog
# hammer gpg create \
  --key "RPM-GPG-KEY-graylog" \
  --name "RPM-GPG-KEY-graylog"
MongoDB signing GPG key:
# wget https://www.mongodb.org/static/pgp/server-3.6.asc
# hammer gpg create \
  --key "server-3.6.asc" \
  --name "RPM-GPG-KEY-mongodb"
Elasticsearch signing GPG key:
# wget https://artifacts.elastic.co/GPG-KEY-elasticsearch
# hammer gpg create \
  --key "GPG-KEY-elasticsearch" \
  --name "GPG-KEY-elasticsearch"
Bacula signing GPG key:
# wget https://copr-be.cloud.fedoraproject.org/results/slaanesh/Bacula/pubkey.gpg \
  -O slaanesh-bacula.gpg
# hammer gpg create \
  --key "slaanesh-bacula.gpg" \
  --name "RPM-GPG-KEY-slaanesh-bacula"
Lynis signing GPG key (this one is optional):
# wget https://packages.cisofy.com/keys/cisofy-software-rpms-public.key
# hammer gpg create \
  --key "cisofy-software-rpms-public.key" \
  --name "RPM-GPG-KEY-cisofy"
Verify:
# hammer gpg list --order ID
---|---------------------------------
ID | NAME
---|---------------------------------
1  | RPM-GPG-KEY-CentOS-7
2  | RPM-GPG-KEY-EPEL-7Server
3  | RPM-GPG-KEY-mysql
5  | RPM-GPG-KEY-cisofy
7  | GPG-KEY-elasticsearch
8  | RPM-GPG-KEY-puppet
9  | RPM-GPG-KEY-ZABBIX
10 | RPM-GPG-KEY-remi
11 | RPM-GPG-KEY-graylog
12 | RPM-GPG-KEY-mongodb
14 | RPM-GPG-KEY-slaanesh-bacula
---|---------------------------------
Step 3: Create Repositories
CentOS 7 base repository:
# hammer repository create \
  --product "el7_repos" \
  --name "base_x86_64" \
  --label "base_x86_64" \
  --content-type "yum" \
  --download-policy "on_demand" \
  --gpg-key "RPM-GPG-KEY-CentOS-7" \
  --url "http://mirror.centos.org/centos/7/os/x86_64/" \
  --mirror-on-sync "no"
CentOS 7 extras repository:
# hammer repository create \
  --product "el7_repos" \
  --name "extras_x86_64" \
  --label "extras_x86_64" \
  --content-type "yum" \
  --download-policy "on_demand" \
  --gpg-key "RPM-GPG-KEY-CentOS-7" \
  --url "http://mirror.centos.org/centos/7/extras/x86_64/"
  --mirror-on-sync "no"
CentOS 7 updates repository:
# hammer repository create \
  --product "el7_repos" \
  --name "updates_x86_64" \
  --label "updates_x86_64" \
  --content-type "yum" \
  --download-policy "on_demand" \
  --gpg-key "RPM-GPG-KEY-CentOS-7" \
  --url "http://mirror.centos.org/centos/7/updates/x86_64/"
  --mirror-on-sync "no"
EPEL 7 repository:
# hammer repository create \
  --product "el7_repos" \
  --name "epel_x86_64" \
  --label "epel_x86_64" \
  --content-type "yum" \
  --download-policy "on_demand" \
  --gpg-key "RPM-GPG-KEY-EPEL-7Server" \
  --url "https://dl.fedoraproject.org/pub/epel/7Server/x86_64/"
MySQL 5.7 repository:
# hammer repository create \
  --product "el7_repos" \
  --name "mysql_57_x86_64" \
  --label "mysql_57_x86_64" \
  --content-type "yum" \
  --download-policy "on_demand" \
  --gpg-key "RPM-GPG-KEY-mysql" \
  --url "https://repo.mysql.com/yum/mysql-5.7-community/el/7/x86_64/"
Lynis repository for security auditing (this one is optional):
# hammer repository create \
  --product "el7_repos" \
  --name "lynis" \
  --label "lynis" \
  --content-type "yum" \
  --download-policy "on_demand" \
  --gpg-key "RPM-GPG-KEY-cisofy" \
  --url "https://packages.cisofy.com/community/lynis/rpm/"
Katello repository to download the latest client from. Currently not GPG signed.
# hammer repository create \
  --product "el7_repos" \
  --name "katello_agent_x86_64" \
  --label "katello_agent_x86_64" \
  --content-type "yum" \
  --download-policy "on_demand" \
  --url "https://fedorapeople.org/groups/katello/releases/yum/latest/client/el7/x86_64/"
Puppet repository:
# hammer repository create \
  --product "el7_repos" \
  --name "puppet_pc1_x86_64" \
  --label "puppet_pc1_x86_64" \
  --content-type "yum" \
  --download-policy "on_demand" \
  --gpg-key "RPM-GPG-KEY-puppet" \
  --url "https://yum.puppetlabs.com/el/7Server/PC1/x86_64/"
Zabbix 3.0 LTS repository:
# hammer repository create \
  --product "el7_repos" \
  --name "zabbix_30_x86_64" \
  --label "zabbix_30_x86_64" \
  --content-type "yum" \
  --download-policy "on_demand" \
  --gpg-key "RPM-GPG-KEY-ZABBIX" \
  --url "http://repo.zabbix.com/zabbix/3.0/rhel/7/x86_64/"
Remi PHP 5.6 repository. Note that PHP 5.6 will receive security support until year December 2018.
# hammer repository create \
  --product "el7_repos" \
  --name "remi_php_56_x86_64" \
  --label "remi_php_56_x86_64" \
  --content-type "yum" \
  --download-policy "on_demand" \
  --gpg-key "RPM-GPG-KEY-remi" \
  --url "https://mirrors.ukfast.co.uk/sites/remi/enterprise/7/php56/x86_64/"
Remi PHP 7.2 repository:
# hammer repository create \
  --product "el7_repos" \
  --name "remi_php_72_x86_64" \
  --label "remi_php_72_x86_64" \
  --content-type "yum" \
  --download-policy "on_demand" \
  --gpg-key "RPM-GPG-KEY-remi" \
  --url "https://mirrors.ukfast.co.uk/sites/remi/enterprise/7/php72/x86_64/"
Remi safe repository:
# hammer repository create \
  --product "el7_repos" \
  --name "remi_safe_x86_64" \
  --label "remi_safe_x86_64" \
  --content-type "yum" \
  --download-policy "on_demand" \
  --gpg-key "RPM-GPG-KEY-remi" \
  --url "https://mirrors.ukfast.co.uk/sites/remi/enterprise/7/safe/x86_64/"
Graylog 2.4 repository:
# hammer repository create \
  --product "el7_repos" \
  --name "graylog_24_x86_64" \
  --label "graylog_24_x86_64" \
  --content-type "yum" \
  --download-policy "on_demand" \
  --gpg-key "RPM-GPG-KEY-graylog" \
  --url "https://packages.graylog2.org/repo/el/stable/2.4/x86_64/"
Elasticsearch 5.x repository. At the time I write this, Graylog 2.4 does not work with Elasticsearch 6.x.
# hammer repository create \
  --product "el7_repos" \
  --name "elasticsearch_5_x86_64" \
  --label "elasticsearch_5_x86_64" \
  --content-type "yum" \
  --download-policy "on_demand" \
  --gpg-key "GPG-KEY-elasticsearch" \
  --url "https://artifacts.elastic.co/packages/5.x/yum"
MongoDB 3.6 repository:
# hammer repository create \
  --product "el7_repos" \
  --name "mongodb_36_x86_64" \
  --label "mongodb_36_x86_64" \
  --content-type "yum" \
  --download-policy "on_demand" \
  --gpg-key "RPM-GPG-KEY-mongodb" \
  --url "https://repo.mongodb.org/yum/redhat/7Server/mongodb-org/3.6/x86_64/"
Bacula repository:
# hammer repository create \
  --product "el7_repos" \
  --name "slaanesh_bacula_x86_64" \
  --label "slaanesh_bacula_x86_64" \
  --content-type "yum" \
  --download-policy "on_demand" \
  --gpg-key "RPM-GPG-KEY-slaanesh-bacula" \
  --url "https://copr-be.cloud.fedoraproject.org/results/slaanesh/Bacula/epel-7-x86_64/"
Verify:
# hammer repository list --order ID
---|------------------------|-----------|--------------|-------------------------------------------------------------------------------
ID | NAME                   | PRODUCT   | CONTENT TYPE | URL
---|------------------------|-----------|--------------|-------------------------------------------------------------------------------
1  | base_x86_64            | el7_repos | yum          | http://mirror.centos.org/centos/7/os/x86_64/
2  | extras_x86_64          | el7_repos | yum          | http://mirror.centos.org/centos/7/extras/x86_64/
3  | updates_x86_64         | el7_repos | yum          | http://mirror.centos.org/centos/7/updates/x86_64/
4  | epel_x86_64            | el7_repos | yum          | https://dl.fedoraproject.org/pub/epel/7Server/x86_64/
5  | mysql_57_x86_64        | el7_repos | yum          | https://repo.mysql.com/yum/mysql-5.7-community/el/7/x86_64/
6  | lynis                  | el7_repos | yum          | https://packages.cisofy.com/community/lynis/rpm/
7  | katello_agent_x86_64   | el7_repos | yum          | https://fedorapeople.org/groups/katello/releases/yum/latest/client/el7/x86_64/
8  | puppet_pc1_x86_64      | el7_repos | yum          | https://yum.puppetlabs.com/el/7Server/PC1/x86_64/
9  | zabbix_30_x86_64       | el7_repos | yum          | http://repo.zabbix.com/zabbix/3.0/rhel/7/x86_64/
10 | remi_php_56_x86_64     | el7_repos | yum          | https://mirrors.ukfast.co.uk/sites/remi/enterprise/7/php56/x86_64/
11 | graylog_24_x86_64      | el7_repos | yum          | https://packages.graylog2.org/repo/el/stable/2.4/x86_64/
12 | mongodb_36_x86_64      | el7_repos | yum          | https://repo.mongodb.org/yum/redhat/7Server/mongodb-org/3.6/x86_64/
13 | elasticsearch_5_x86_64 | el7_repos | yum          | https://artifacts.elastic.co/packages/5.x/yum
14 | remi_php_72_x86_64     | el7_repos | yum          | https://mirrors.ukfast.co.uk/sites/remi/enterprise/7/php72/x86_64/
15 | remi_safe_x86_64       | el7_repos | yum          | https://mirrors.ukfast.co.uk/sites/remi/enterprise/7/safe/x86_64/
16 | slaanesh_bacula_x86_64 | el7_repos | yum          | https://copr-be.cloud.fedoraproject.org/results/slaanesh/Bacula/epel-7-x86_64/
----|------------------------|-----------|--------------|-------------------------------------------------------------------------------
Step 4: Synchronise Repositories
Since we’ve created our repositories in order, we can use the loop below to sync all of them by using repository IDs:
# for i in $(seq 1 16); do \
  hammer repository synchronize \
  --product "el7_repos" \
  --id "$i"; \
  done
If that’s not an option then you’ll likely have to sync them one by one.
Note that the initial synchronisation may take a while.
Step 5: Create a Content View
A content view is a snapshot of one or more repositories.
# hammer content-view create \
  --name "el7_content" \
  --description "Content view for CentOS 7"
Verify:
# hammer product list
---|-----------|-------------------------------------------|--------------|--------------|------------------
ID | NAME      | DESCRIPTION                               | ORGANISATION | REPOSITORIES | SYNC STATE
---|-----------|-------------------------------------------|--------------|--------------|------------------
1  | el7_repos | Various repositories to use with CentOS 7 | Lisenet      | 16           | Syncing Complete.
---|-----------|-------------------------------------------|--------------|--------------|------------------
Step 6: Add Repositories to Content View
Again, because we’ve created our repositories in order, we can use the loop below to add them all to the content view by using repository IDs:
# for i in $(seq 1 16); do \
  hammer content-view add-repository \
  --name "el7_content" \
  --product "el7_repos" \
  --repository-id "$i"; \
  done
Step 7: Create a Lifecycle Environment
A lifecycle environment is like a container for content view versions which are used by content hosts. We can have different “containers” for different lifecycle environments (eg. dev, qa, prod).
There is a special kind of Lifecycle Environment that does not have a parent, it’s called Library. The library serves as the main container for synced content such as products, puppet modules, and published content views, and every organisation has a library.
In practise, we can use the library environment as our homelab test environment (simply because it’s already there), and anything that gets tested and later becomes stable can be promoted to a subsequent environment. Following this logic we will call our lifecycle environment as “stable”.
# hammer lifecycle-environment create \
  --name "stable" \
  --label "stable" \
  --prior "Library"
Verify:
# hammer lifecycle-environment list
---|---------|--------
ID | NAME    | PRIOR
---|---------|--------
1  | Library |
2  | stable  | Library
---|---------|--------
Step 8: Publish a Content View
We need to published a content view in order to lock its content (RPM repositories) in place.
# hammer content-view publish \
  --name "el7_content" \
  --description "Publishing repositories"
Verify:
# hammer content-view version list
---|-------------------------------|---------|-----------------------
ID | NAME                          | VERSION | LIFECYCLE ENVIRONMENTS
---|-------------------------------|---------|-----------------------
2  | el7_content 1.0               | 1.0     | Library
1  | Default Organization View 1.0 | 1.0     | Library
---|-------------------------------|---------|-----------------------
Step 9: Promote Version to Lifecycle Environment
The initial version of the content view, which is version 1.0, contains recently synced RPM repositories, and does not have any changes, therefore it’s OK to promote it to our stable lifecycle environment.
# hammer content-view version promote \
  --content-view "el7_content" \
  --version "1.0" \
  --to-lifecycle-environment "stable"
Verify:
# hammer content-view version list
---|-------------------------------|---------|-----------------------
ID | NAME                          | VERSION | LIFECYCLE ENVIRONMENTS
---|-------------------------------|---------|-----------------------
2  | el7_content 1.0               | 1.0     | Library, stable
1  | Default Organization View 1.0 | 1.0     | Library
---|-------------------------------|---------|-----------------------
Step 10: Create an Activation Key
Activation keys provide a way to define properties that can be applied to Content Hosts during registration.
We’ll create a new key called “el7-key”.
# hammer activation-key create \
  --name "el7-key" \
  --description "Key to use with CentOS7" \
  --lifecycle-environment "stable" \
  --content-view "el7_content" \
  --unlimited-hosts
Verify:
# hammer activation-key list
---|---------|----------------|-----------------------|-------------
ID | NAME    | HOST LIMIT     | LIFECYCLE ENVIRONMENT | CONTENT VIEW
---|---------|----------------|-----------------------|-------------
1  | el7-key | 0 of Unlimited | stable                | el7_content
---|---------|----------------|-----------------------|-------------
Step 11: Add Subscription to Activation Key
List organisation subscriptions:
# hammer subscription list
---|----------------------------------|-----------|----------|----------|---------|---------|---------------------|-----------|---------
ID | UUID                             | NAME      | TYPE     | CONTRACT | ACCOUNT | SUPPORT | END DATE            | QUANTITY  | CONSUMED
---|----------------------------------|-----------|----------|----------|---------|---------|---------------------|-----------|---------
1  | 8a8b818461b4f6b00161b4fea2bc0007 | el7_repos | Physical |          |         |         | 2048/02/13 20:54:01 | Unlimited | 0
---|----------------------------------|-----------|----------|----------|---------|---------|---------------------|-----------|---------
Add the subscription above to our activation key:
# hammer activation-key add-subscription \
  --name "el7-key" \
  --quantity "1" \
  --subscription-id "1"
Step 12: Backup Katello Configuration
It is a good idea to backup our Katello configuration so that we don’t lose any changes we’ve made up to this point:
# katello-backup /mnt/backup/ --features=all -y
What’s Next?
So now that we have products, repositories and content views configured, the next step will be to import Errata into CentOS repositories, configure Katello infrastructure (subnets, domains) and provisioning setup.
Awesome work. I’ll continue reading.
If I use Red hat in my environment (RHEL6, 7) and oracle databases, where do I find the GPG keys and repositories I need to add?
If you have a RHEL subscription, then contact Red Hat to get access to their repositories. You should be using them on your RHEL system anyway. The same goes for Oracle, contact your supplier.
Otherwise you can always use public repositories if you wish, e.g. CentOS or Rocky Linux.