Configuring encryption between Kubernetes pods with Istio and mTLS.
Pre-requisites
We are using our Kubernetes homelab to deploy MetalLB and Istio.
The Plan
In this article, we are going to use our Kubernetes cluster do the following:
- Install MetalLB.
- Install Istio 1.9.
- Deploy a demo application (Apache/PHP/MySQL) that does not use encryption.
- Capture some packets to prove that traffic between the application and the database is not encrypted.
- Enable sidecar injection for a namespace.
- Deploy Istio gateway resource and enforce mTLS for a namespace.
- Capture some more packets to prove that traffic between the application and the database is encrypted.
What is MetalLB, Istio and Mutual TLS (mTLS)?
MetalLB: What Problem Does it Solve for Us?
Kubernetes does not offer an implementation of network load balancers (Services of type LoadBalancer) for bare metal clusters.
If you tried to deploy Nginx and had its service external IP address stuck in a “pending” state, then that’s what it means.
$ kubectl get svc -n test
NAME    TYPE           CLUSTER-IP      EXTERNAL-IP   PORT(S)        AGE
nginx   LoadBalancer   10.111.52.200   pending       80:30402/TCP   2h
MetalLB aims to solve this issue by offering a network load balancer implementation that integrates with standard network equipment, so that external services on bare metal clusters “just work”.
Istio: What Problem Does it Solve for Us?
Istio is a service mesh. You can read more about Istio here: https://istio.io/latest/docs/concepts/what-is-istio/
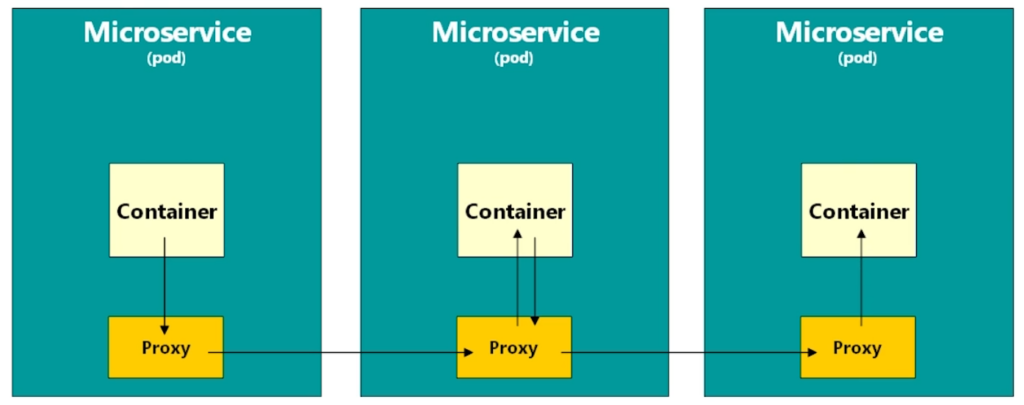
Istio’s traffic management model relies on the Envoy proxies that are deployed along with our services, e.g. Apache and MySQL. Istio’s data plane uses those Envoy proxies deployed as sidecars to control all traffic that our mesh services send and receive. See the image below.
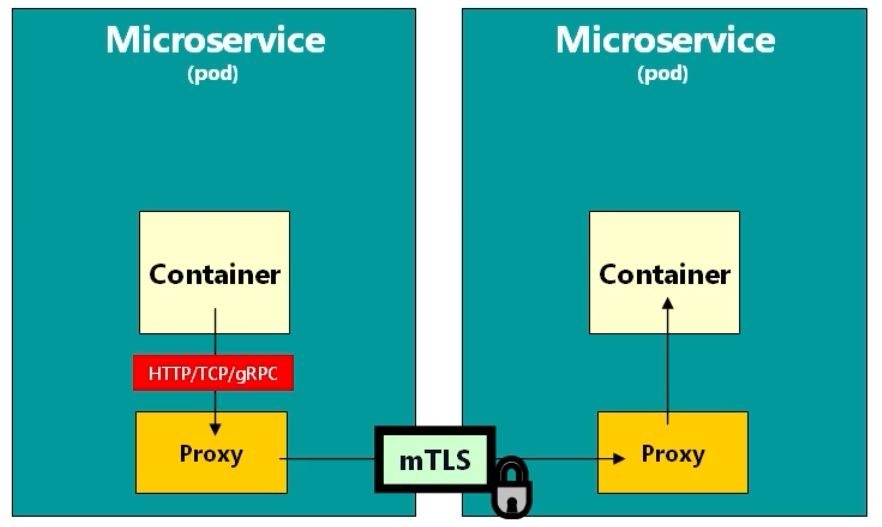
This model makes it possible for Istio to use mutual TLS between the client side proxy and the server side proxy. When we talk about the client, we refer to a container that initiates a request. The server is a container that receives the request. The end result is that all traffic between our services is encrypted, without us having to make any code changes to applications. See the image below.
Why is this important? There are cases where we are not allowed to have unencrypted traffic between Kubernetes pods that process Personally Identifiable Information due of GDPR, because containers may be running on different worker nodes, and these worker nodes will likely be in different AWS availability zones (different buildings). See the image below that illustrates this example.
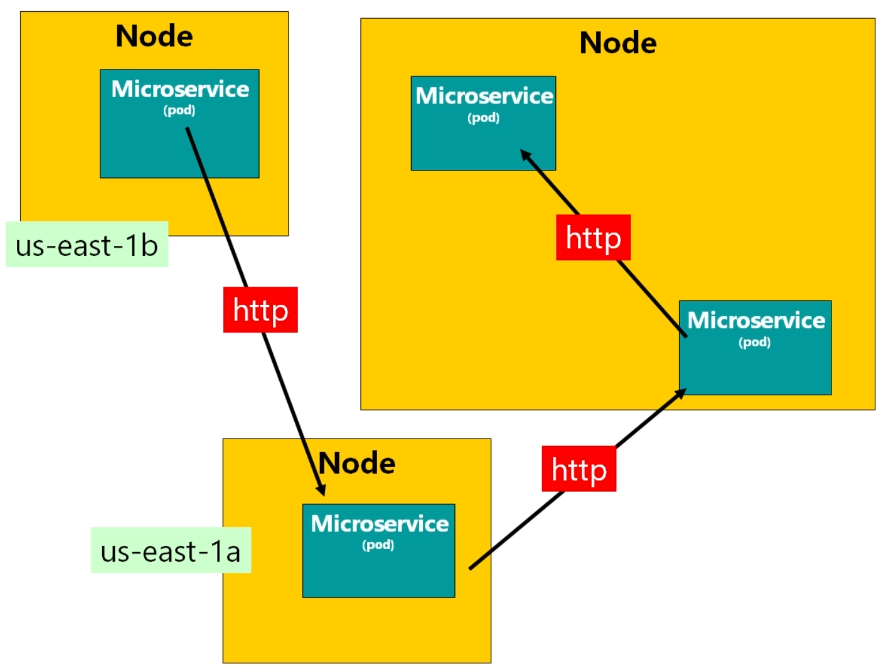
While the nodes are part of the same Kubernetes cluster, traffic between them leaves the datacentre. Two availability zones mean two different facilities each with redundant power, networking and connectivity, possibly miles/kilometres apart.
This is less relevant to our homelab setup, but the idea is the same – we want traffic encrypted between pods. Note that Istio offers much more than just mTLS, this is the feature that we are interested in.
Istio Ingress Gateway is basically a load balancer operating at the edge of the mesh receiving incoming HTTP/S connections. We will configure Istio to expose a service outside of the service mesh using an Istio Gateway.
Fun fact, OpenShift Service Mesh is based on the Istio project.
Download Files from GitHub
Configuration files used in this article are hosted on GitHub. Clone the following repository:
$ git clone https://github.com/lisenet/kubernetes-homelab.git
Install and Configure MetalLB
As per MetalLB documentation, if you are using kube-proxy in IPVS mode, since Kubernetes v1.14.2 you have to enable strict ARP mode.
$ kubectl edit configmap -n kube-system kube-proxy
Set the following:
ipvs:
  strictARP: true
Update the config map metallb/metallb-config-map.yml and specify the IP address range to use with the load balancer, e.g.:
---
apiVersion: v1
kind: ConfigMap
metadata:
  name: config
  namespace: metallb-system
  labels:
    app: metallb
data:
  config: |
    address-pools:
    - name: default
      protocol: layer2
      addresses:
      - 10.11.1.51-10.11.1.59
Optionally, update the secrets file metallb/metallb-secret.yml with your randomly generated secretkey.
Create a namespace and install MetalLB network load balancer:
$ kubectl apply -f ./metallb/namespace.yml
$ kubectl apply -f ./metallb/
Verify:
$ kubectl get all -n metallb-system
NAME                              READY   STATUS    RESTARTS   AGE
pod/controller-8646d74db7-rbw8t   1/1     Running   0          14h
pod/speaker-5mxp7                 1/1     Running   0          14h
pod/speaker-9l2cq                 1/1     Running   0          14h
pod/speaker-bmbf5                 1/1     Running   0          14h
pod/speaker-fq6lc                 1/1     Running   0          14h
pod/speaker-jvg68                 1/1     Running   0          14h
pod/speaker-m6r4c                 1/1     Running   0          14h

NAME                     DESIRED   CURRENT   READY   UP-TO-DATE   AVAILABLE   NODE SELECTOR            AGE
daemonset.apps/speaker   6         6         6       6            6           kubernetes.io/os=linux   15h

NAME                         READY   UP-TO-DATE   AVAILABLE   AGE
deployment.apps/controller   1/1     1            1           15h

NAME                                    DESIRED   CURRENT   READY   AGE
replicaset.apps/controller-8646d74db7   1         1         1       15h
Install and Configure Istio
There are different ways to install Istio. We can use the istioctl utility, or we can generate a Kubernetes manifest and deploy Istio using kubectl. We will use the latter, mainly due to the fact that it allows us to store the configuration file in source control.
Install Istioctl
Download and install istioctl. This article is based on Istio 1.9.
$ curl -sSfL -o istioctl.tgz https://github.com/istio/istio/releases/download/1.9.2/istioctl-1.9.2-linux-amd64.tar.gz
$ tar xf istioctl.tgz
$ sudo mv istioctl /usr/local/bin/ && sudo chown root: /usr/local/bin/istioctl
Create an Istio Operator Config and Generate a Kubernetes YAML Manifest
We will not use istioctl to install Istio, but will generate a Kubernetes manifest instead that will be stored in source control and used with kubectl.
Start with creating a basic Istio operator file. We will call it istio-operator.yml.
---
apiVersion: install.istio.io/v1alpha1
kind: IstioOperator
metadata:
  namespace: istio-system
spec:
  profile: default
There are several profiles available, see the Istio website for differences. We want to deploy istio-ingressgateway, therefore the default profile is suitable. We don’t need istio-egressgateway.
We are going to update the operator file and add our ingressGateways configuration to deploy two pods instead of one, as well as configure services ports. From my experience with AWS, the first port is picked to be the port used for health checks. To make sure that worker nodes are always in service, we are going to deploy a lightweight httpd-healthcheck container that displays a static HTML page. In this case even if we don’t have any applications deployed yet, our worker nodes would still be in service.
---
apiVersion: install.istio.io/v1alpha1
kind: IstioOperator
metadata:
  namespace: istio-system
spec:
  profile: default
  components:
    ingressGateways:
      - enabled: true
        name: istio-ingressgateway
        k8s:
         hpaSpec:
           minReplicas: 2 # default 1
         service:
            ports:
              # Whatever is listed as the first port in a Service of
              # type LoadBalancer is picked to be the port used for
              # health checks. 10001 is the port of httpd-healthcheck.
              - name: httpd-healthcheck
                port: 10001
                targetPort: 10001
              - name: http
                port: 80
                targetPort: 8080
              - name: https
                port: 443
                targetPort: 8443
              # Istio readiness port of gateways
              - name: status-port
                port: 15021
                targetPort: 15021
    pilot:
      k8s:
        resources:
          requests:
            cpu: 100m
            memory: 150Mi
  values:
    global:
      proxy:
        resources:
          limits:
            cpu: 2000m
            memory: 1024Mi
          requests:
            cpu: 10m
            memory: 128Mi
Note that istio-operator.yml is an Istio operator YAML file. This is not a Kubernetes YAML file. If we attempt to apply it using kubectl it will fail, because it does not recognise it as a Kubernetes file.
We want to generate a YAML file that does exactly the same thing that we would be doing with istioctl install using the operator file. For that we need to generate a manifest:
$ istioctl manifest generate -f ./istio-operator.yml --set values.global.jwtPolicy=first-party-jwt > ./istio-kubernetes.yml
The output is a Kubernetes YAML file that can be used with kubectl apply.
Note that you can skip the --set values.global.jwtPolicy=first-party-jwt parameter if your cluster supports third party tokens. While AWS cloud provider, and possibly others, supports this feature, many local development tools and custom installations may not prior to Kubernetes 1.20.
Install istiod and istio-ingressgateway
The Istio namespace must be created manually.
$ kubectl create ns istio-system
The kubectl apply command may show transient errors due to resources not being available in the cluster in the correct order. If that happens, simply run the command again.
$ kubectl apply -f ./istio-kubernetes.yml
We have created a simple httpd-healthcheck that can be used with Istio ingressgateway load balancer. See the code below.
---
apiVersion: v1
kind: Namespace
metadata:
  name: httpd-healthcheck
  labels:
    app: httpd-healthcheck
    istio-injection: enabled
---
apiVersion: v1
kind: Service
metadata:
  name: httpd-healthcheck-service
  namespace: httpd-healthcheck
  labels:
    app: httpd-healthcheck
spec:
  selector:
    app: httpd-healthcheck
  ports:
    - port: 10001
      name: tcp-httpd-healthcheck-10001
---
apiVersion: networking.istio.io/v1beta1
kind: VirtualService
metadata:
  name: httpd-healthcheck-virtual-service
  namespace: httpd-healthcheck
spec:
  hosts:
    - "*"
  gateways:
    - httpd-healthcheck-gateway
  tcp:
    - match:
        - port: 10001
      route:
        - destination:
            host: httpd-healthcheck-service
            port:
              number: 10001
---
apiVersion: networking.istio.io/v1beta1
kind: Gateway
metadata:
  name: httpd-healthcheck-gateway
  namespace: httpd-healthcheck
spec:
  selector:
    istio: ingressgateway # use istio default controller
  servers:
    - port:
        number: 10001
        name: tcp-httpd-healthcheck
        protocol: TCP
      hosts:
        - "*"
---
apiVersion: apps/v1
kind: Deployment
metadata:
  name: httpd-healthcheck
  namespace: httpd-healthcheck
  labels:
    app: httpd-healthcheck
spec:
  replicas: 2
  selector:
    matchLabels:
      app: httpd-healthcheck
  template:
    metadata:
      name: httpd-healthcheck
      labels:
        app: httpd-healthcheck
    spec:
      # Deployment has PodAntiAffinity configured to ensure that
      # the scheduler does not co-locate replicas on a single node.
      affinity:
        podAntiAffinity:
          requiredDuringSchedulingIgnoredDuringExecution:
          - labelSelector:
              matchExpressions:
              - key: app
                operator: In
                values:
                - httpd-healthcheck
            topologyKey: "kubernetes.io/hostname"
      containers:
      - name: httpd-healthcheck
        image: lisenet/httpd-healthcheck:0.1
        imagePullPolicy: IfNotPresent
        ports:
        - containerPort: 10001
        resources:
          limits:
            memory: "128Mi"
            cpu: "100m"
          requests:
            memory: "64M"
            cpu: "1m"
      restartPolicy: Always
      terminationGracePeriodSeconds: 60
Install httpd-healthcheck (see GitHub repository):
$ kubectl apply -f ./httpd-healthcheck/
Verify:
$ kubectl get svc -n istio-system
NAME                   TYPE           CLUSTER-IP       EXTERNAL-IP   PORT(S)                                                      AGE
istio-ingressgateway   LoadBalancer   10.99.133.23     10.11.1.51    10001:31098/TCP,80:32500/TCP,443:30649/TCP,15021:31522/TCP   15h
istiod                 ClusterIP      10.103.218.247   none          15010/TCP,15012/TCP,443/TCP,15014/TCP                        15h
Note the external IP address 10.11.1.51 that has been assigned by the MetalLB.
Optional: Install Istio Add-ons Prometheus and Kiali
This section is optional and does not affect further configuration.
Istio provides a basic sample installation to quickly get Prometheus up and running:
$ kubectl apply -f ./istio-addons/prometheus/istio-addon-prometheus.yml
Use port forwarding to access Prometheus dashboard:
$ kubectl -n istio-system port-forward svc/prometheus 9090:9090
Kiali is an observability console for Istio with service mesh configuration and validation capabilities. Istio provides a basic sample installation to quickly get Kiali up and running:
$ kubectl apply -f ./istio-addons/kiali/istio-addon-kiali.yml
Use port forwarding to access Kiali dashboard:
$ kubectl -n istio-system port-forward svc/kiali 20001:20001
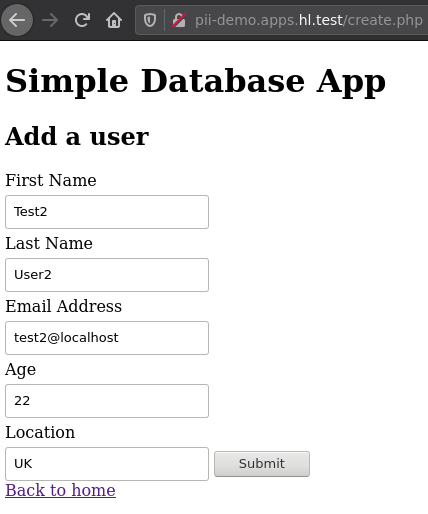
Deploy a PII Demo Application to Test mTLS
We are going to deploy a simple Apache/PHP/MySQL application that does not use encryption between the webserver and the database server. This setup is quite common.
Install PII Demo Application
The content of the file pii-demo.yml can be seen below. We do not need to change any details.
---
apiVersion: v1
kind: ConfigMap
metadata:
  name: mysql-server-config
  namespace: pii-demo
  labels:
    app: mysql-server
data:
  my.cnf: |
    [mysqld]
    bind_address = 0.0.0.0
    skip_name_resolve
    skip_log_bin
---
apiVersion: v1
kind: ConfigMap
metadata:
  name: mysql-initdb-config
  namespace: pii-demo
  labels:
    app: mysql-server
data:
  initdb.sql: |
    CREATE TABLE users (id INT(11) UNSIGNED AUTO_INCREMENT PRIMARY KEY, firstname VARCHAR(30) NOT NULL,	lastname VARCHAR(30) NOT NULL, email VARCHAR(50) NOT NULL, age INT(3), location VARCHAR(50), date TIMESTAMP);
---
apiVersion: v1
kind: Secret
metadata:
  name: mysql-credentials
  namespace: pii-demo
  labels:
    app: mysql-server
type: Opaque
data:
  mysql_root_password: Rm1qdWYzdVV6OWc4dFQyVGFDcHlSYTNuQTZWOQ==
  mysql_database: cGlpX2RlbW8=
  mysql_user: cGlpX3VzZXI=
  mysql_password: Rm1qdWYzdVV6OWc4dFQyVGFDcHlSYTNuQTZWOQ==
---
apiVersion: apps/v1
kind: Deployment
metadata:
  name: mysql-server
  namespace: pii-demo
  labels:
    app: mysql-server
spec:
  replicas: 1
  selector:
    matchLabels:
      app: mysql-server
  template:
    metadata:
      name: mysql-server
      labels:
        app: mysql-server
    spec:
      affinity:
        podAntiAffinity:
          requiredDuringSchedulingIgnoredDuringExecution:
          - labelSelector:
              matchExpressions:
              - key: app
                operator: In
                values:
                - mysql-server
            topologyKey: "kubernetes.io/hostname"
      containers:
        - name: mysql-server
          image: mysql:5.7
          imagePullPolicy: IfNotPresent
          env:
            - name: MYSQL_ROOT_PASSWORD
              valueFrom:
                secretKeyRef:
                  name: mysql-credentials
                  key: mysql_root_password
            - name: MYSQL_USER
              valueFrom:
                secretKeyRef:
                  name: mysql-credentials
                  key: mysql_user
            - name: MYSQL_PASSWORD
              valueFrom:
                secretKeyRef:
                  name: mysql-credentials
                  key: mysql_password
            - name: MYSQL_DATABASE
              valueFrom:
                secretKeyRef:
                  name: mysql-credentials
                  key: mysql_database
          livenessProbe:
            tcpSocket:
              port: 3306
          ports:
            - containerPort: 3306
              name: mysql
          resources:
            limits:
              memory: "512Mi"
              cpu: "200m"
            requests:
              memory: "64Mi"
              cpu: "10m"
          volumeMounts:
            - name: mysql-datadir
              mountPath: /var/lib/mysql
            - name: mysql-server-config
              mountPath: /etc/mysql/conf.d/my.cnf
              subPath: my.cnf
              readOnly: true
            - name: mysql-initdb
              mountPath: /docker-entrypoint-initdb.d
      terminationGracePeriodSeconds: 60
      volumes:
        - name: mysql-datadir
          emptyDir: {}
        - name: mysql-server-config
          configMap:
            name: mysql-server-config
        - name: mysql-initdb
          configMap:
            name: mysql-initdb-config
---
apiVersion: v1
kind: Service
metadata:
  name: mysql-server
  namespace: pii-demo
  labels:
    app: mysql-server
spec:
  selector:
    app: mysql-server
  ports:
    - port: 3306
      targetPort: 3306
---
apiVersion: apps/v1
kind: Deployment
metadata:
  name: httpd-server
  namespace: pii-demo
  labels:
    app: httpd-server
spec:
  replicas: 1
  selector:
    matchLabels:
      app: httpd-server
  template:
    metadata:
      name: httpd-server
      labels:
        app: httpd-server
    spec:
      affinity:
        podAntiAffinity:
          requiredDuringSchedulingIgnoredDuringExecution:
          - labelSelector:
              matchExpressions:
              - key: app
                operator: In
                values:
                - httpd-server
            topologyKey: "kubernetes.io/hostname"
      containers:
        - name: httpd-server
          image: lisenet/httpd-pii-demo:0.1
          imagePullPolicy: IfNotPresent
          livenessProbe:
            tcpSocket:
              port: 80
          ports:
            - containerPort: 80
              name: httpd
          resources:
            limits:
              memory: "128Mi"
              cpu: "100m"
            requests:
              memory: "64Mi"
              cpu: "10m"
      terminationGracePeriodSeconds: 60
---
apiVersion: v1
kind: Service
metadata:
  name: httpd-server
  namespace: pii-demo
  labels:
    app: httpd-server
spec:
  selector:
    app: httpd-server
  type: NodePort
  ports:
    - port: 80
      targetPort: 80
      nodePort: 30080
Create a namespace:
$ kubectl create ns pii-demo
Deploy the application (this does not use Istio or mTLS):
$ kubectl apply -f ./pii-demo.yml
Retrieve webserver service config for NodePort:
$ kubectl get svc -n pii-demo
NAME           TYPE        CLUSTER-IP       EXTERNAL-IP   PORT(S)        AGE
httpd-server   NodePort    10.100.84.220    none          80:30080/TCP   14h
mysql-server   ClusterIP   10.107.140.245   none          3306/TCP       14h
The httpd-server pod is running on the node srv36, the mysql-server pod is on the node srv35:
$ kubectl get pods -o wide -n pii-demo
NAME                            READY   STATUS    RESTARTS   AGE   IP                NODE
httpd-server-6bf48894bb-bxkfz   1/1     Running   0          14h   192.168.135.249   srv36
mysql-server-6dc7f694d8-pqcpl   1/1     Running   0          14h   192.168.139.176   srv35
Open the application in a web browser using it’s NodePort and enter some personally identifiable information. Note that the webserver does not use HTTPS. It could but this is not relevant to Istio’s mTLS.

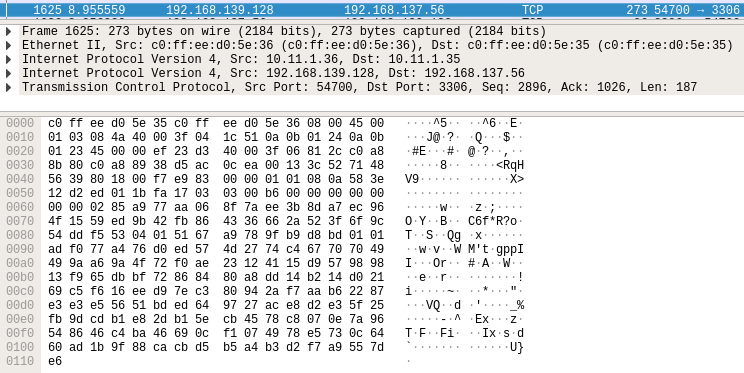
If we perform a man-in-the-middle attack and capture packets travelling from the node srv36 to the node srv35 (not from my laptop/browser to the webserver!), we will see the data in plain text:
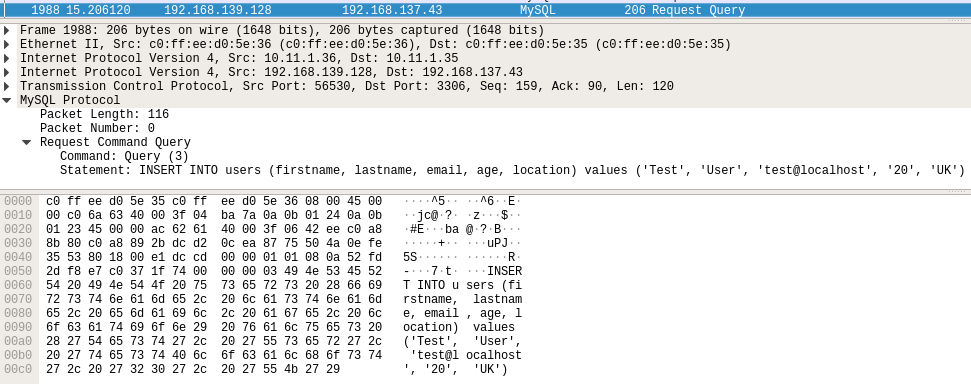
This is expected because traffic between the pods, and the nodes, is not encrypted. Our PHP application has not been configured to send encrypted traffic to MySQL.
Configure Istio with Strict mTLS
Istio configures workload sidecars to use mTLS automatically. Note that by default, Istio configures the destination workloads using PERMISSIVE mode. When PERMISSIVE mode is enabled, a container can accept both plain text and encrypted traffic. In order to allow mTLS traffic only, the configuration must to be changed to STRICT mode.
Enable Sidecar Injection for Namespace
For us to take advantage of Istio’s features, pods in the namespace must be running an Istio sidecar proxy.
$ kubectl label ns pii-demo istio-injection=enabled
Verify:
$ kubectl describe ns pii-demo
Name:         pii-demo
Labels:       istio-injection=enabled
Annotations:
Status:       Active

No resource quota.

No LimitRange resource.
Create an Istio Gateway for Namespace with Strict mTLS
Create a file istio-gateway-peer-virtual-service.yml with the following config:
---
apiVersion: networking.istio.io/v1beta1
kind: Gateway
metadata:
  name: pii-demo-gateway
  namespace: pii-demo
spec:
  selector:
    istio: ingressgateway # use istio default ingress gateway
  servers:
    - port:
        number: 80
        name: http
        protocol: HTTP
      hosts:
        - "*"
---
apiVersion: "security.istio.io/v1beta1"
kind: "PeerAuthentication"
metadata:
  name: default # mandatory for a namespace policy
  namespace: pii-demo
spec:
  mtls:
    mode: STRICT # in this mode, the service can only accept encrypted traffic
---
apiVersion: networking.istio.io/v1beta1
kind: VirtualService
metadata:
  name: httpd-server-virtual-service
  namespace: pii-demo
spec:
  # the destination hosts to which traffic is being sent
  hosts:
    - "pii-demo.apps.hl.test"
  # the name of gateway and sidecar that should apply the route
  gateways:
    - pii-demo-gateway
  http:
    - route:
      - destination:
          host: httpd-server
          port:
            number: 80
This creates an Istio Gateway, configures STRICT mode for mTLS for the namespace, and creates a VirtualService resource to route to the PHP application. By using a virtual service we no longer have to rely on the NodePort.
Deploy the configuration:
$ kubectl apply -f ./istio-gateway-peer-virtual-service.yml
Verify:
$ kubectl get gw -n pii-demo
NAME               AGE
pii-demo-gateway   12h
$ kubectl get vs -n pii-demo
NAME                           GATEWAYS               HOSTS                       AGE
httpd-server-virtual-service   ["pii-demo-gateway"]   ["pii-demo.apps.hl.test"]   12h
How do we access the application? Remember the IP address 10.11.1.51 that was assigned to Istio’s Ingressgateway by the MetalLB earlier? We need to create a DNS entry for pii-demo.apps.hl.test that points to 10.11.1.51.
$ host pii-demo.apps.hl.test
pii-demo.apps.hl.test has address 10.11.1.51
Test the Application with mTLS
Delete the httpd-server and mysql-server pods that are currently running so that we can get sidecars injected. We should see two containers in each pod:
$ kubectl get pods -n pii-demo
NAME                            READY   STATUS    RESTARTS   AGE
httpd-server-6bf48894bb-bxkfz   2/2     Running   0          12h
mysql-server-6dc7f694d8-pqcpl   2/2     Running   0          12h
Open the application in a web browser using the host’s DNS (that points to Istio gateway’s IP address) and enter some personally identifiable information. Note that the webserver still does not use HTTPS, because we have not configured the Istio gateway to use SSL certificates (we could, but it would not make a difference for what it is that we are trying to achieve here).
If we perform a man-in-the-middle attack again and capture packets travelling from the node srv36 to the node srv35 (not from my laptop/browser to the webserver), we will see encrypted data:
Traffic between containers is encrypted without us having to modify the application.
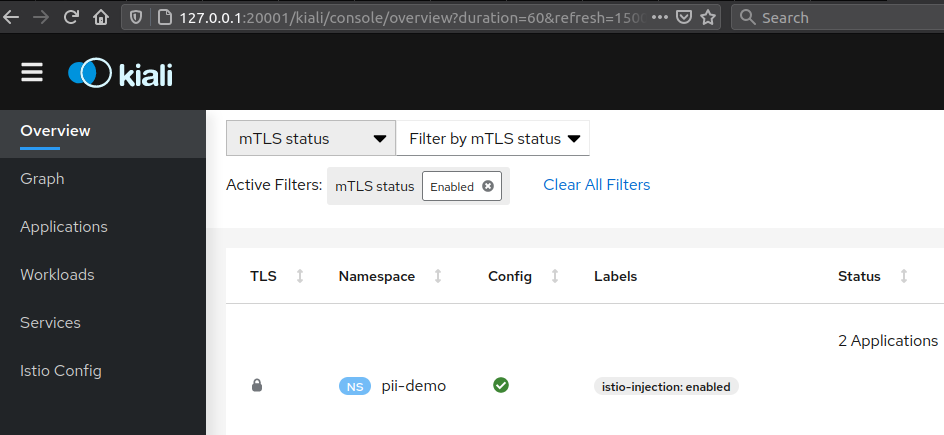
If you’ve got Kiali installed, you can use a webUI to verify that mTLS for the namespace is enabled.
Credits
Istio diagrams by Richard Chesterwood, who kindly let me to use them in this article.
Simple Database App was written by Tania Rascia. I pulled the code and built a Docker image.
This is excellent, a stunning amount of detail! I really need to do something with MetalLB asap.
Many thanks!
Thank you Richard!
great guide, somehow i get not found “istio-ca-root-cert” configmap.
was that something that should have been installed automatically?
or i need to manually adjust?
this came after applying the yaml generated manifest from the istioctl command
Hi, thanks. Yea, the config map gets installed automatically:
Which version of Istio are you using?