We are going to build a highly available Kubernetes homelab cluster with three control plane nodes and three worker nodes.
Homelab Update Log
July 2023
The Kubernetes homelab has been upgraded from Rocky Linux 8 to Rocky Linux 9. See GitHub repositories for changes: kubernetes-homelab and homelab-ansible.
September 2022
Migration from dockershim. Docker runtime support using dockshim in the kubelet has been removed in Kubernetes 1.24. Docker packages have been removed and replaced with containerd. The container runtime has been changed from from Docker engine to containerd. See this article for more info.
June 2021
This Kubernetes homelab has been upgraded from CentOS 7 to Rocky Linux 8. See GitHub repositories for changes: kubernetes-homelab and homelab-ansible.
Highly Available Kubernetes Homelab Cluster
The kubeadm tool is great if you need a simple way to deploy Kubernetes, and integrate it into provisioning systems such as Ansible. I use Ansible a lot nowadays, but before I got to the point of automating my Kubernetes homelab, I had to do it by hand. You can’t automate what you don’t understand.
As we will be deploying three Kubernetes control plane nodes, we need to deploy a kube-apiserver load balancer in front of them. The load balancer distributes traffic to all healthy control plane nodes in its target list. HAProxy is my homelab load balancer of choice, and we will configure it with Keepalived to provide node redundancy. If one of the HAProxy servers becomes unavailable, the other one will serve traffic.
We will use three KVM hosts to deploy resources. The goal is to maintain service in the event of a loss of a (single) hypervisor host.
Pre-requisites
For Kubernetes, we will use 3 control-plane nodes and 3 worker nodes. We will also use 2 servers for HAProxy to provide high availability with a virtual IP addess of 10.11.1.30.
We will need a DNS server. My DNS server configuration is described here and won’t be covered in this article. One small change is that I stopped using hl.local and moved to a reserved top level DNS name hl.test (see rfc2606 for more info).
Below are our requirements for the installation:
- 2 servers for HAProxy with Keepalived, running CentOS 7, 1 CPU, 1 GB RAM, 8 GB disk.
- 3 servers for control-plane nodes, running CentOS 7, 2 CPU, 4 GB RAM, 16 GB disk.
- 3 servers for worker nodes, running CentOS 7, 2 CPU, 6 GB RAM, 16 GB disk.
- Full network connectivity between all machines in the cluster.
- sudo privileges on all machines.
- SSH access from one device to all nodes in the system.
- A DNS server with a DNS entry for the HAProxy load balancer pointing to a virtual IP address 10.11.1.30.
I use PXE boot to provision servers. Starting with a pair of admin servers already running from my previous homelab deployment.
I have provisioned three master nodes:
[laptop]$ for i in 1 2 3; do \
  virt-install \
  --connect qemu+ssh://root@kvm${i}.hl.test/system \
  --name srv3${i}-master \
  --network bridge=br0,model=virtio,mac=C0:FF:EE:D0:5E:3${i} \
  --disk path=/var/lib/libvirt/images/srv3${i}.qcow2,size=16 \
  --pxe \
  --ram 4096 \
  --vcpus 2 \
  --os-type linux \
  --os-variant centos7.0 \
  --sound none \
  --rng /dev/urandom \
  --virt-type kvm \
  --wait 0; \
done
I have also provisioned three worker nodes:
[laptop]$ for i in 1 2 3; do \
  virt-install \
  --connect qemu+ssh://root@kvm${i}.hl.test/system \
  --name srv3$(($i + 3))-node \
  --network bridge=br0,model=virtio,mac=C0:FF:EE:D0:5E:3$(($i + 3)) \
  --disk path=/var/lib/libvirt/images/srv3$(($i + 3)).qcow2,size=16 \
  --pxe \
  --ram 8192 \
  --vcpus 2 \
  --os-type linux \
  --os-variant centos7.0 \
  --sound none \
  --rng /dev/urandom \
  --virt-type kvm \
  --wait 0; \
done
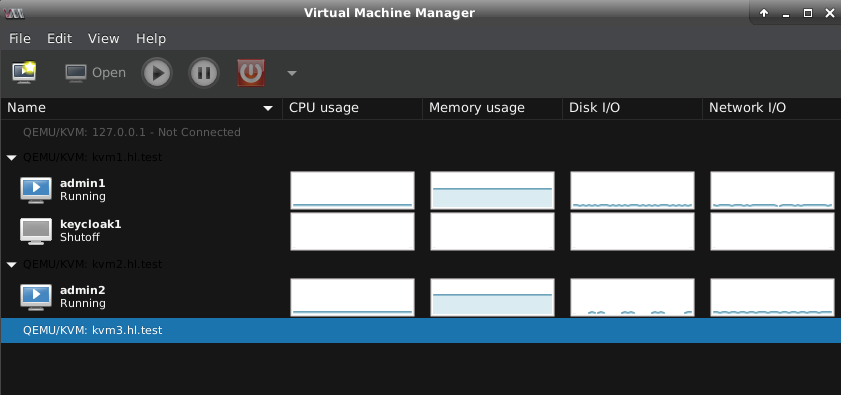
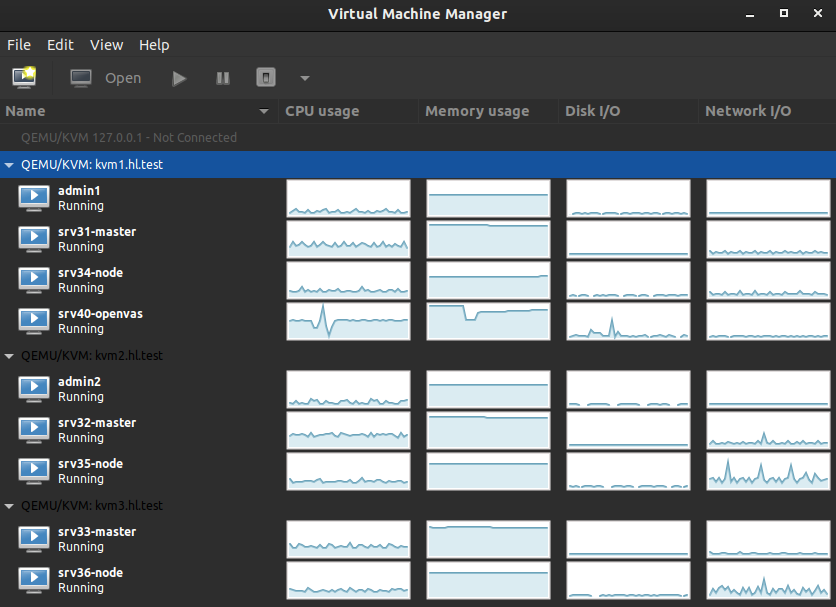
This is what the end result looked like:
I have also configured passwordless root SSH authentication from one device (my laptop) to all nodes in the system:
[laptop]$ for i in $(seq 1 6); do \
  ssh-copy-id -f -i ~/homelab/ansible/roles/hl.users/files/id_rsa_root.pub [email protected]${i}; \
done
My DNS record for HAProxy:
$ host kubelb.hl.test
kubelb.hl.test has address 10.11.1.30
Homelab details can be seen in the table below.
| Hostname | IP address | RAM (MB) | Notes |
| admin1.hl.test | 10.11.1.2 | 1024 | DNS/DHCP master, NTP, SMTP, HAProxy master, Keepalived |
| admin2.hl.test | 10.11.1.3 | 1024 | DNS/DHCP slave, NTP, SMTP, HAProxy backup, Keepalived |
| kubelb.hl.test | 10.11.1.30 | N/A | Virtual IP address for HAProxy/keepalived |
| srv31.hl.test | 10.11.1.31 | 4096 | Kubernetes control plane |
| srv32.hl.test | 10.11.1.32 | 4096 | Kubernetes control plane |
| srv33.hl.test | 10.11.1.33 | 4096 | Kubernetes control plane |
| srv34.hl.test | 10.11.1.34 | 6144 | Kubernetes worker node |
| srv35.hl.test | 10.11.1.35 | 6144 | Kubernetes worker node |
| srv36.hl.test | 10.11.1.36 | 6144 | Kubernetes worker node |
These are my KVM hypervisor details.
| Hostname | IP address | CPU Cores | RAM (MB) | Notes |
| kvm1.hl.test | 10.11.1.21 | 8 | 28672 | Physical KVM host with SSD storage |
| kvm2.hl.test | 10.11.1.22 | 8 | 16384 | Physical KVM host with SSD storage |
| kvm3.hl.test | 10.11.1.23 | 8 | 16384 | Physical KVM host with SSD storage |
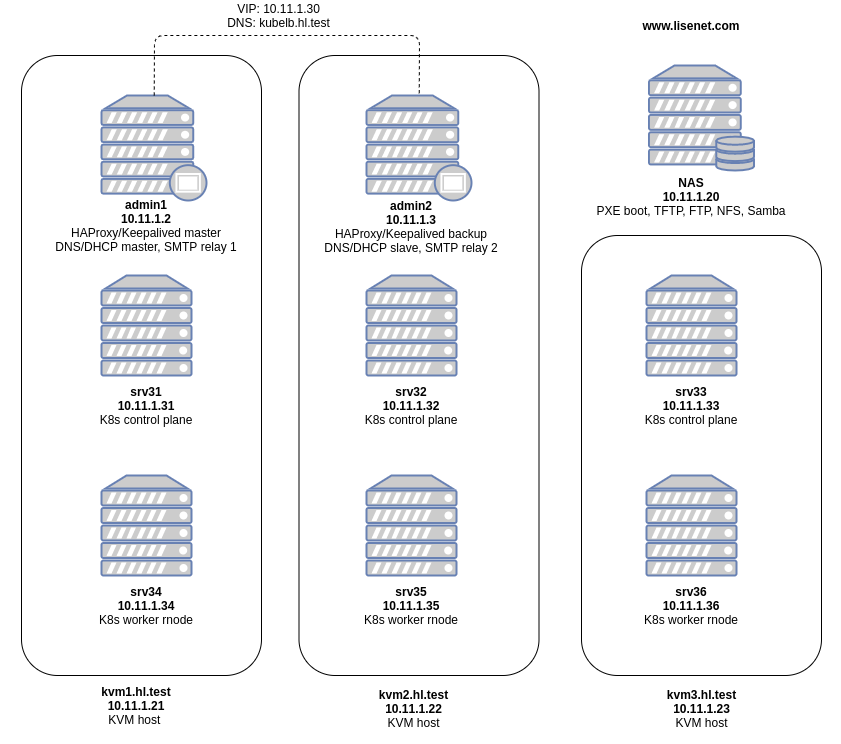
Homelab network diagram below.
Software
Kubernetes development continues to grow at a rapid pace, and keeping up to date can be a challenge. Therefore it’s important to know which software versions can work together without breaking things.
Software used in this article:
- CentOS 7
- calico 3.17
- kubeadm 1.19.7
- kubelet 1.19.7
- kubectl 1.19.7
- kubernetes-cni 0.8.7
- docker-ce 19.03
According to Calico project documentation, Calico 3.17 has been tested against the following Kubernetes versions: 1.17, 1.18, 1.19. Kubernetes 1.20 is not on the list yet, therefore we are going to use 1.19.
Unfortunatelly I could not find supported Docker versions in the Relase Notes for Kubernetes 1.19, so I decided to use docker-ce 19.03.
SELinux set to enforcing mode and firewalld is enabled on all servers.
1 Install and Configure HAProxy Load Balancer with Keepalived
Run these commands on both servers admin1 and admin2.
1.1 Configure Firewalld
Configure firewall to allow inbound HAProxy traffic on kube-apiserver port:
$ sudo firewall-cmd --permanent --add-port=6443/tcp
$ sudo firewall-cmd --reload
Configure firewall to allow inbound traffic for HAProxy stats:
$ sudo firewall-cmd --permanent --add-port=8080/tcp
$ sudo firewall-cmd --reload
Configure firewall to allow VRRP traffic to pass between the keepalived nodes:
$ sudo firewall-cmd --permanent --add-rich-rule='rule protocol value="vrrp" accept'
$ sudo firewall-cmd --reload
1.2 Configure SELinux
Allow HAProxy to listen on kube-apiserver port 6443:
$ sudo semanage port -a -t http_cache_port_t 6443 -p tcp
1.3 Install Packages
$ sudo yum install -y haproxy keepalived psmisc
1.4 Configure HAProxy
Add the following configuration to file /etc/haproxy/haproxy.cfg, keeping in mind that our virtual IP address is 10.11.1.30:
global
  log /dev/log  local0
  log /dev/log  local1 notice
  stats socket /var/lib/haproxy/stats level admin
  chroot /var/lib/haproxy
  user haproxy
  group haproxy
  daemon

defaults
  log global
  mode  http
  option  httplog
  option  dontlognull
        timeout connect 5000
        timeout client 50000
        timeout server 50000

frontend kubernetes
    bind 10.11.1.30:6443
    option tcplog
    mode tcp
    default_backend kubernetes-master-nodes

backend kubernetes-master-nodes
    mode tcp
    balance roundrobin
    option tcp-check
    server srv31-master 10.11.1.31:6443 check fall 3 rise 2
    server srv32-master 10.11.1.32:6443 check fall 3 rise 2
    server srv33-master 10.11.1.33:6443 check fall 3 rise 2

listen stats 10.11.1.30:8080
    mode http
    stats enable
    stats uri /
    stats realm HAProxy\ Statistics
    stats auth admin:haproxy
Enable and start the haproxy service:
$ sudo systemctl enable --now haproxy
You can access HAProxy stats page by navigating to the following URL: http://10.11.1.30:8080/. Username is “admin”, and password is “haproxy”.
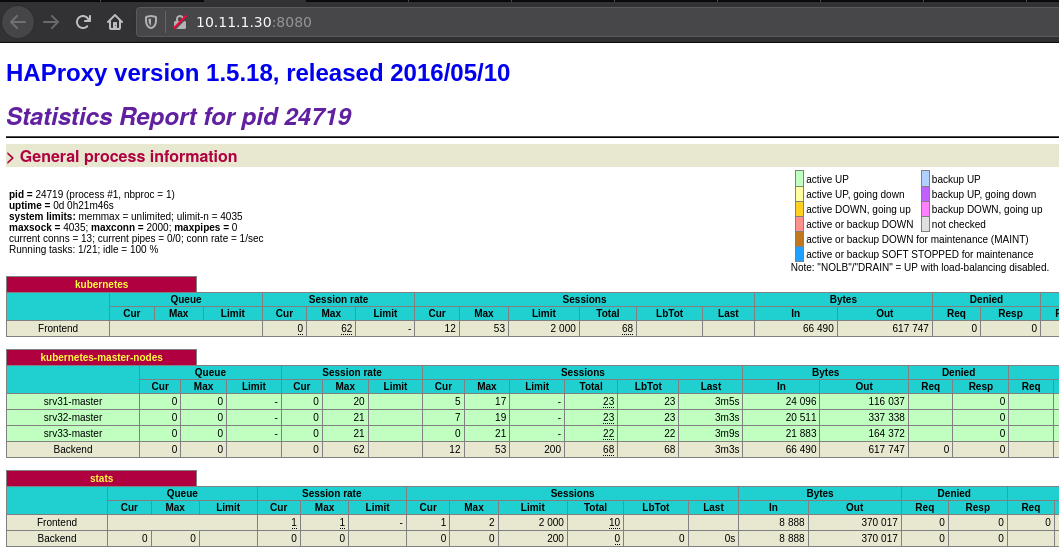
Note: the screenhost was taken after deploying Kubernetes.
1.5 Configure Keepalived
The host’s kernel needs to be configured to allow a process to bind to a non-local IP address. This is because non-active VRRP nodes will not have the virtual IP configured on any interfaces.
$ echo "net.ipv4.ip_nonlocal_bind=1" | sudo tee /etc/sysctl.d/ip_nonlocal_bind.conf
$ sudo sysctl --system
Configure the master keepalived node admin1 by adding the following content to /etc/keepalived/keepalived.conf:
global_defs {
   notification_email {
     root@localhost
   }
   notification_email_from root@localhost
   smtp_server localhost
   smtp_connect_timeout 30
}

# Script used to check if HAProxy is running
vrrp_script check_haproxy {
    script "killall -0 haproxy" # check the haproxy process
    interval 2 # every 2 seconds
    weight 2 # add 2 points if OK
}

vrrp_instance VI_1 {
    state MASTER # MASTER on haproxy, BACKUP on haproxy2
    interface eth0
    virtual_router_id 255
    priority 101 # 101 on haproxy, 100 on haproxy2
    advert_int 1
    authentication {
        auth_type PASS
        auth_pass EhazK1Y2MBK37gZktTl1zrUUuBk
    }
    virtual_ipaddress {
        10.11.1.30
    }

    track_script {
        check_haproxy
    }
}
Configure the backup keepalived node admin2 by adding the following content to /etc/keepalived/keepalived.conf:
global_defs {
   notification_email {
     root@localhost
   }
   notification_email_from root@localhost
   smtp_server localhost
   smtp_connect_timeout 30
}

# Script used to check if HAProxy is running
vrrp_script check_haproxy {
    script "killall -0 haproxy" # check the haproxy process
    interval 2 # every 2 seconds
    weight 2 # add 2 points if OK
}

vrrp_instance VI_1 {
    state BACKUP # MASTER on haproxy, BACKUP on haproxy2
    interface eth0
    virtual_router_id 255
    priority 100 # 101 on haproxy, 100 on haproxy2
    advert_int 1
    authentication {
        auth_type PASS
        auth_pass EhazK1Y2MBK37gZktTl1zrUUuBk
    }
    virtual_ipaddress {
        10.11.1.30
    }
    track_script {
        check_haproxy
    }
}
Enable and start the keepalived service:
$ sudo systemctl enable --now keepalived
2 Install Docker Packages
Run these commands on all Kubernetes servers.
Install the yum-utils package (which provides the yum-config-manager utility) and set up the stable repository.
$ sudo yum install -y yum-utils
$ sudo yum-config-manager \
  --add-repo https://download.docker.com/linux/centos/docker-ce.repo
Install Docker engine:
$ sudo yum install -y \
  docker-ce-19.03.14-3.el7.x86_64 \
  docker-ce-cli-19.03.14-3.el7.x86_64 \
  containerd.io-1.4.3-3.1.el7.x86_64
Start and enable service:
$ sudo systemctl enable --now docker
3 Install Kubernetes Packages and Disable Swap
Run these commands on all Kubernetes servers.
Our PXE boot servers don’t have swap configured by default, but in case you do, disable it. Running kubelet with swap on is not supported.
$ sudo swapoff -a
Set up the repository. Add the following to /etc/yum.repos.d/kubernetes.repo:
[kubernetes]
name=Kubernetes
baseurl=https://packages.cloud.google.com/yum/repos/kubernetes-el7-\$basearch
enabled=1
gpgcheck=1
repo_gpgcheck=1
gpgkey=https://packages.cloud.google.com/yum/doc/yum-key.gpg https://packages.cloud.google.com/yum/doc/rpm-package-key.gpg
exclude=kubelet kubeadm kubectl
We exclude all Kubernetes packages from any system upgrades because they have a special process that has to be followed.
Install kubeadm, kubelet and kubectl:
$ sudo yum install -y --disableexcludes=kubernetes \
  kubernetes-cni-0.8.7-0.x86_64 \
  kubelet-1.19.7-0.x86_64 \
  kubectl-1.19.7-0.x86_64 \
  kubeadm-1.19.7-0.x86_64
Enable kubelet service:
$ sudo systemctl enable --now kubelet
Note that the kubelet is now in a crashloop and restarting every few seconds, as it waits for kubeadm to tell it what to do.
4 Configure kubelet Eviction Thresholds
Run these commands on all Kubernetes servers.
Unless resources are set aside for system daemons, Kubernetes pods and system daemons will compete for resources and eventually lead to resource starvation issues. Kubelet has the extra args parameter to specify eviction thresholds that trigger the kubelet to reclaim resources.
$ echo "KUBELET_EXTRA_ARGS=--eviction-hard=memory.available<256Mi,nodefs.available<1Gi,imagefs.available<1Gi"|sudo tee /etc/sysconfig/kubelet
Restart kubelet service:
$ sudo systemctl restart kubelet
5 Let iptables see Bridged Traffic
Run these commands on all Kubernetes servers.
$ echo "net.bridge.bridge-nf-call-iptables=1" | sudo tee /etc/sysctl.d/k8s-iptables.conf
$ echo "net.bridge.bridge-nf-call-ip6tables=1" | sudo tee /etc/sysctl.d/k8s-ip6tables.conf
$ sudo sysctl --system
6 Configure Firewalld
6.1 Firewall Rules for Control-plane Nodes
Run these commands on Kubernetes control-plane nodes only.
We are going to open the following ports on the control-plane nodes:
- 6443 – Kubernetes API server
- 2379,2380 – etcd server client API
- 2381 – etcd metrics API
- 10250 – Kubelet API
- 10251 – kube-scheduler
- 10252 – kube-controller-manager
- 179 – Calico networking (BGP)
$ sudo firewall-cmd --permanent --add-port={6443,2379-2381,10250-10252}/tcp
$ sudo firewall-cmd --permanent --add-port=179/tcp
$ sudo firewall-cmd --permanent --add-masquerade
$ sudo firewall-cmd --reload
One interesting note here, I kept getting CoreDNS crashes like this one:
CoreDNS crashes with error “Failed to list v1.Service: Get https://10.96.0.1:443/api/v1/***: dial tcp 10.96.0.1:443: connect: no route to host”.
I added masquerade to firewalld and I think it helped fix the problem.
6.2 Firewall Rules for Worker Nodes
Run these commands on Kubernetes worker nodes only.
We are going to open the following ports on the worker nodes:
- 10250 – Kubelet API
- 30000-32767 – NodePort Services
- 179 – Calico networking (BGP)
$ sudo firewall-cmd --permanent --add-port={10250,30000-32767}/tcp
$ sudo firewall-cmd --permanent --add-port=179/tcp
$ sudo firewall-cmd --permanent --add-masquerade
$ sudo firewall-cmd --reload
7 Initialise the First Control Plane Node
7.1 Initialise One Master Node Only
Run these commands on the first control plane node srv31 only.
$ sudo kubeadm init \
  --kubernetes-version "1.19.7" \
  --pod-network-cidr "192.168.0.0/16" \
  --service-dns-domain "apps.hl.test" \
  --control-plane-endpoint "kubelb.hl.test:6443" \
  --upload-certs
Command output (note that your output will be different than what is provided below):
W0116 15:49:53.753185   12133 configset.go:348] WARNING: kubeadm cannot validate component configs for API groups [kubelet.config.k8s.io kubeproxy.config.k8s.io]
[init] Using Kubernetes version: v1.19.7
[preflight] Running pre-flight checks
	[WARNING Firewalld]: firewalld is active, please ensure ports [6443 10250] are open or your cluster may not function correctly
	[WARNING IsDockerSystemdCheck]: detected "cgroupfs" as the Docker cgroup driver. The recommended driver is "systemd". Please follow the guide at https://kubernetes.io/docs/setup/cri/
[preflight] Pulling images required for setting up a Kubernetes cluster
[preflight] This might take a minute or two, depending on the speed of your internet connection
[preflight] You can also perform this action in beforehand using 'kubeadm config images pull'
[certs] Using certificateDir folder "/etc/kubernetes/pki"
[certs] Generating "ca" certificate and key
[certs] Generating "apiserver" certificate and key
[certs] apiserver serving cert is signed for DNS names [kubelb.hl.test kubernetes kubernetes.default kubernetes.default.svc kubernetes.default.svc.apps.hl.test srv31] and IPs [10.96.0.1 10.11.1.31]
[certs] Generating "apiserver-kubelet-client" certificate and key
[certs] Generating "front-proxy-ca" certificate and key
[certs] Generating "front-proxy-client" certificate and key
[certs] Generating "etcd/ca" certificate and key
[certs] Generating "etcd/server" certificate and key
[certs] etcd/server serving cert is signed for DNS names [localhost srv31] and IPs [10.11.1.31 127.0.0.1 ::1]
[certs] Generating "etcd/peer" certificate and key
[certs] etcd/peer serving cert is signed for DNS names [localhost srv31] and IPs [10.11.1.31 127.0.0.1 ::1]
[certs] Generating "etcd/healthcheck-client" certificate and key
[certs] Generating "apiserver-etcd-client" certificate and key
[certs] Generating "sa" key and public key
[kubeconfig] Using kubeconfig folder "/etc/kubernetes"
[kubeconfig] Writing "admin.conf" kubeconfig file
[kubeconfig] Writing "kubelet.conf" kubeconfig file
[kubeconfig] Writing "controller-manager.conf" kubeconfig file
[kubeconfig] Writing "scheduler.conf" kubeconfig file
[kubelet-start] Writing kubelet environment file with flags to file "/var/lib/kubelet/kubeadm-flags.env"
[kubelet-start] Writing kubelet configuration to file "/var/lib/kubelet/config.yaml"
[kubelet-start] Starting the kubelet
[control-plane] Using manifest folder "/etc/kubernetes/manifests"
[control-plane] Creating static Pod manifest for "kube-apiserver"
[control-plane] Creating static Pod manifest for "kube-controller-manager"
[control-plane] Creating static Pod manifest for "kube-scheduler"
[etcd] Creating static Pod manifest for local etcd in "/etc/kubernetes/manifests"
[wait-control-plane] Waiting for the kubelet to boot up the control plane as static Pods from directory "/etc/kubernetes/manifests". This can take up to 4m0s
[apiclient] All control plane components are healthy after 32.032492 seconds
[upload-config] Storing the configuration used in ConfigMap "kubeadm-config" in the "kube-system" Namespace
[kubelet] Creating a ConfigMap "kubelet-config-1.19" in namespace kube-system with the configuration for the kubelets in the cluster
[upload-certs] Storing the certificates in Secret "kubeadm-certs" in the "kube-system" Namespace
[upload-certs] Using certificate key:
c4161499f1f614322ea788831b4f72529175712c7c6f8888cdc14f5aab83fbce
[mark-control-plane] Marking the node srv31 as control-plane by adding the label "node-role.kubernetes.io/master=''"
[mark-control-plane] Marking the node srv31 as control-plane by adding the taints [node-role.kubernetes.io/master:NoSchedule]
[bootstrap-token] Using token: 8rd7kq.kcg3bkzkzdus8v54
[bootstrap-token] Configuring bootstrap tokens, cluster-info ConfigMap, RBAC Roles
[bootstrap-token] configured RBAC rules to allow Node Bootstrap tokens to get nodes
[bootstrap-token] configured RBAC rules to allow Node Bootstrap tokens to post CSRs in order for nodes to get long term certificate credentials
[bootstrap-token] configured RBAC rules to allow the csrapprover controller automatically approve CSRs from a Node Bootstrap Token
[bootstrap-token] configured RBAC rules to allow certificate rotation for all node client certificates in the cluster
[bootstrap-token] Creating the "cluster-info" ConfigMap in the "kube-public" namespace
[kubelet-finalize] Updating "/etc/kubernetes/kubelet.conf" to point to a rotatable kubelet client certificate and key
[addons] Applied essential addon: CoreDNS
[addons] Applied essential addon: kube-proxy

Your Kubernetes control-plane has initialized successfully!

To start using your cluster, you need to run the following as a regular user:

  mkdir -p $HOME/.kube
  sudo cp -i /etc/kubernetes/admin.conf $HOME/.kube/config
  sudo chown $(id -u):$(id -g) $HOME/.kube/config

You should now deploy a pod network to the cluster.
Run "kubectl apply -f [podnetwork].yaml" with one of the options listed at:
  https://kubernetes.io/docs/concepts/cluster-administration/addons/

You can now join any number of the control-plane node running the following command on each as root:

  kubeadm join kubelb.hl.test:6443 --token 8rd7kq.kcg3bkzkzdus8v54 \
    --discovery-token-ca-cert-hash sha256:4efb75f7e09c0a2a9db0d317dd40ac9cf9906c31109a670428d0d49981264904 \
    --control-plane --certificate-key c4161499f1f614322ea788831b4f72529175712c7c6f8888cdc14f5aab83fbce

Please note that the certificate-key gives access to cluster sensitive data, keep it secret!
As a safeguard, uploaded-certs will be deleted in two hours; If necessary, you can use
"kubeadm init phase upload-certs --upload-certs" to reload certs afterward.

Then you can join any number of worker nodes by running the following on each as root:

kubeadm join kubelb.hl.test:6443 --token 8rd7kq.kcg3bkzkzdus8v54 \
    --discovery-token-ca-cert-hash sha256:4efb75f7e09c0a2a9db0d317dd40ac9cf9906c31109a670428d0d49981264904
7.2 Configure Kube Config on Your Local Machine
Run the following commands on your local machine (e.g. your laptop):
$ mkdir -p $HOME/.kube
$ scp srv31:/etc/kubernetes/admin.conf $HOME/.kube/config
$ sudo chown $(id -u):$(id -g) $HOME/.kube/config
7.3 Install Calico Pod Network
Run the following commands on your local machine (e.g. your laptop) where you have kubectl configured.
$ kubectl apply -f https://docs.projectcalico.org/archive/v3.17/manifests/calico.yaml
Make sure that the control-plane node status is ready:
$ kubectl get nodes
NAME    STATUS   ROLES    AGE   VERSION
srv31   Ready    master   10m   v1.19.7
8 Join Other Control Plane Nodes to the Cluster
Run the following command on control-plane nodes srv32 and srv33.
Note that your actual command will be different than what is provided below!
$ sudo kubeadm join kubelb.hl.test:6443 --token 8rd7kq.kcg3bkzkzdus8v54 \
  --discovery-token-ca-cert-hash sha256:4efb75f7e09c0a2a9db0d317dd40ac9cf9906c31109a670428d0d49981264904 \
  --control-plane --certificate-key c4161499f1f614322ea788831b4f72529175712c7c6f8888cdc14f5aab83fbce
The output should contain the following lines:
[...]
This node has joined the cluster and a new control plane instance was created:

* Certificate signing request was sent to apiserver and approval was received.
* The Kubelet was informed of the new secure connection details.
* Control plane (master) label and taint were applied to the new node.
* The Kubernetes control plane instances scaled up.
* A new etcd member was added to the local/stacked etcd cluster.
[...]
9 Join Worker Nodes to the Cluster
Run the following command on worker nodes srv34, srv35 and srv36.
Note that your actual command will be different than what is provided below!
$ sudo kubeadm join kubelb.hl.test:6443 --token 8rd7kq.kcg3bkzkzdus8v54 \
  --discovery-token-ca-cert-hash sha256:4efb75f7e09c0a2a9db0d317dd40ac9cf9906c31109a670428d0d49981264904
The output should contain the following lines:
[...]
This node has joined the cluster:
* Certificate signing request was sent to apiserver and a response was received.
* The Kubelet was informed of the new secure connection details.
[...]
10 Verify the Cluster
To verify, run the following commands on your local machine where you have kubectl configured.
$ kubectl get nodes -o wide
NAME    STATUS   ROLES    AGE     VERSION   INTERNAL-IP   EXTERNAL-IP   OS-IMAGE                KERNEL-VERSION           CONTAINER-RUNTIME
srv31   Ready    master   6h16m   v1.19.7   10.11.1.31    none          CentOS Linux 7 (Core)   3.10.0-1160.el7.x86_64   docker://19.3.14
srv32   Ready    master   6h2m    v1.19.7   10.11.1.32    none          CentOS Linux 7 (Core)   3.10.0-1160.el7.x86_64   docker://19.3.14
srv33   Ready    master   5h58m   v1.19.7   10.11.1.33    none          CentOS Linux 7 (Core)   3.10.0-1160.el7.x86_64   docker://19.3.14
srv34   Ready    none     5h55m   v1.19.7   10.11.1.34    none          CentOS Linux 7 (Core)   3.10.0-1160.el7.x86_64   docker://19.3.14
srv35   Ready    none     5h52m   v1.19.7   10.11.1.35    none          CentOS Linux 7 (Core)   3.10.0-1160.el7.x86_64   docker://19.3.14
srv36   Ready    none     5h49m   v1.19.7   10.11.1.36    none          CentOS Linux 7 (Core)   3.10.0-1160.el7.x86_64   docker://19.3.14
$ kubectl get all -A
NAMESPACE     NAME                                           READY   STATUS    RESTARTS   AGE
kube-system   pod/calico-kube-controllers-744cfdf676-thmgj   1/1     Running   0          6h3m
kube-system   pod/calico-node-2gjtd                          1/1     Running   0          5h55m
kube-system   pod/calico-node-cpx67                          1/1     Running   0          5h52m
kube-system   pod/calico-node-p57h8                          1/1     Running   0          5h59m
kube-system   pod/calico-node-qkn55                          1/1     Running   0          5h46m
kube-system   pod/calico-node-rg8nz                          1/1     Running   0          6h3m
kube-system   pod/calico-node-xwrth                          1/1     Running   0          5h49m
kube-system   pod/coredns-f9fd979d6-6mx72                    1/1     Running   0          6h13m
kube-system   pod/coredns-f9fd979d6-vszn8                    1/1     Running   0          6h13m
kube-system   pod/etcd-srv31                                 1/1     Running   0          6h13m
kube-system   pod/etcd-srv32                                 1/1     Running   0          5h59m
kube-system   pod/etcd-srv33                                 1/1     Running   6          5h55m
kube-system   pod/kube-apiserver-srv31                       1/1     Running   0          6h13m
kube-system   pod/kube-apiserver-srv32                       1/1     Running   0          5h59m
kube-system   pod/kube-apiserver-srv33                       1/1     Running   1          5h55m
kube-system   pod/kube-controller-manager-srv31              1/1     Running   1          6h13m
kube-system   pod/kube-controller-manager-srv32              1/1     Running   0          5h59m
kube-system   pod/kube-controller-manager-srv33              1/1     Running   0          5h55m
kube-system   pod/kube-proxy-8dpxx                           1/1     Running   0          5h49m
kube-system   pod/kube-proxy-jk5zw                           1/1     Running   0          5h52m
kube-system   pod/kube-proxy-jwr47                           1/1     Running   0          5h59m
kube-system   pod/kube-proxy-mv6k9                           1/1     Running   0          5h46m
kube-system   pod/kube-proxy-n5pxd                           1/1     Running   0          5h55m
kube-system   pod/kube-proxy-rbhqp                           1/1     Running   0          6h13m
kube-system   pod/kube-scheduler-srv31                       1/1     Running   1          6h13m
kube-system   pod/kube-scheduler-srv32                       1/1     Running   0          5h59m
kube-system   pod/kube-scheduler-srv33                       1/1     Running   0          5h55m

NAMESPACE     NAME                 TYPE        CLUSTER-IP   EXTERNAL-IP   PORT(S)                  AGE
default       service/kubernetes   ClusterIP   10.96.0.1    none          443/TCP                  6h13m
kube-system   service/kube-dns     ClusterIP   10.96.0.10   none          53/UDP,53/TCP,9153/TCP   6h13m

NAMESPACE     NAME                         DESIRED   CURRENT   READY   UP-TO-DATE   AVAILABLE   NODE SELECTOR            AGE
kube-system   daemonset.apps/calico-node   6         6         6       6            6           kubernetes.io/os=linux   6h3m
kube-system   daemonset.apps/kube-proxy    6         6         6       6            6           kubernetes.io/os=linux   6h13m

NAMESPACE     NAME                                      READY   UP-TO-DATE   AVAILABLE   AGE
kube-system   deployment.apps/calico-kube-controllers   1/1     1            1           6h3m
kube-system   deployment.apps/coredns                   2/2     2            2           6h13m

NAMESPACE     NAME                                                 DESIRED   CURRENT   READY   AGE
kube-system   replicaset.apps/calico-kube-controllers-744cfdf676   1         1         1       6h3m
kube-system   replicaset.apps/coredns-f9fd979d6                    2         2         2       6h13m
This concludes the Kubernetes homelab cluster installation using kubeadm.
Related Kubernetes Homelab Articles
Create Your Own Certificate Authority (CA) for Homelab Environment
Install Kube State Metrics on Kubernetes
Install and Configure Prometheus Monitoring on Kubernetes
Install and Configure Grafana on Kubernetes
Install and Configure Alertmanager with Slack Integration on Kubernetes
Monitor Etcd Cluster with Grafana and Prometheus
Monitor Bind DNS Server with Grafana and Prometheus (bind_exporter)
Monitor HAProxy with Grafana and Prometheus (haproxy_exporter)
Monitor Linux Servers with Grafana and Prometheus (node_exporter)
Monitor Mikrotik Router with Grafana and Prometheus (mikrotik-exporter)
Install MetalLB and Istio Ingress Gateway with Mutual TLS for Kubernetes
Blue/Green Deployment with Istio: Match Host Header and sourceLabels for Pod to Pod Communication
Moving to TrueNAS and Democratic CSI for Kubernetes Persistent Storage
Migrating HA Kubernetes Cluster from CentOS 7 to Rocky Linux 8
Install Kubecost to Help Optimise Kubernetes Applications
Speedtest with InfluxDB and Grafana on Kubernetes
References
https://kubernetes.io/docs/setup/production-environment/tools/kubeadm/install-kubeadm/
https://kubernetes.io/docs/setup/production-environment/tools/kubeadm/create-cluster-kubeadm/
https://kubernetes.io/docs/setup/production-environment/tools/kubeadm/high-availability/
why .test and not home.arpa?
As per RFC2606, .test is a reserved TLD and is recommended for use in testing of current or new DNS related code. No other reason.
I’ve been following this guide and may have spotted a type which is confusing me.
in 6.1 where you advise on adding firewall rules you say:
8443 – Kubernetes API server
but in the config you have the port as 6443. Is it supposed to be 6443 or 8443?
It was indeed a typo, thanks for spotting. I’ve updated the article.
Hi. Thank you for putting together these lab guides. I’m not sure if you touched on this already, but may I ask why you moved away from using Proxmox as your KVM hypervisor? I still have my setup from your original lab guide with Katello and Puppet, so I was wondering if it’s worth tearing it down in favor of your new KVM setup.
Thanks!
Hi Jeff, thanks for your feedback.
The reason I decided to move away from Proxmox to QEMU/KVM was not that interesting to be honest with you. Don’t tear yours down just yet.
I started to get annoyed having to patch Proxmox WebUI javascript to remove their “no valid subscription” nagware pop-up every time there was a software update. I don’t use Proxmox at work, and I make no income from using Proxmox software in my homelab, therefore I don’t need their subscription. Being constantly reminded that I don’t have one (a borderline criminal) was starting to take its toll on my mental health. I therefore migrated to QEMU/KVM and happy days.
Thank you for the quick response! I also just joined your Patreon to do what I can to help support.
Thanks again!
You’re welcome Jeff, and thank you very much for support!