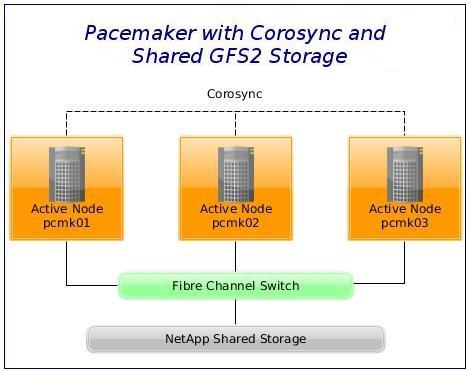
We are going to build a three-node active/active HA cluster using Pacemaker and Corosync.
The Plan
Our aim is to build a three-node (never trust clusters without odd numbers of voters) active/active GFS2 cluster using Pacemaker and Corosync.
We have three CentOS 7 virtual machines on VMware (ESXi), named pcmk01, pcmk02 and pcmk03.
The convention followed in the article is that [ALL]# denotes a command that needs to be run on all cluster nodes.
TL;DR
The article covers setup and configuration of:
- Passwordless SSH authentication
- Pacemaker with Corosync
- iSCSI Multipath Device (NetApp)
- STONITH (VMware fencing device)
- Pacemaker for GFS2
- LVM
Notes
Red Hat does not support using GFS2 for cluster file system deployments greater than 16 nodes.
The gfs2_tool command is not supported in RHEL 7.
Make sure that the clocks on the GFS2 nodes are synchronised. Unnecessary inode time-stamp updating severely impacts cluster performance. NTP configuration is not covered in this article.
iSCSI server installation and setup is beyond the scope of this article. It is assumed that you have a functional shared storage server in place already. You may want to check this post for an iSCSI target configuration on RHEL 7, you may find it helpful.
Software
Software used in this article:
- CentOS Linux release 7.2.1511 (Core)
- pacemaker-1.1.13
- corosync-2.3.4
- pcs-0.9.143
- resource-agents-3.9.5
- device-mapper-multipath 0.4.9
- gfs2-utils 3.1.8
Networking and Firewall Configuration
IP Addresses and Hostnames
The following networks will be used:
- 10.247.50.0/24 – LAN with access to the Internet,
- 172.16.21.0/24 – non-routable cluster heartbeat vlan for Corosync,
- 10.11.0.0/16 – non-routable iSCSI vlan,
- 10.12.0.0/16 – non-routable iSCSI vlan.
Hostnames and IPs as defined in /etc/hosts file:
10.247.50.10 vcentre
10.247.50.211 pcmk01 vm-pcmk01
10.247.50.212 pcmk02 vm-pcmk02
10.247.50.213 pcmk03 vm-pcmk03
172.16.21.11 pcmk01-cr
172.16.21.12 pcmk02-cr
172.16.21.13 pcmk03-cr
10.11.0.147 pcmk01-iscsi1
10.11.0.148 pcmk02-iscsi1
10.11.0.149 pcmk03-iscsi1
10.12.0.147 pcmk01-iscsi2
10.12.0.148 pcmk02-iscsi2
10.12.0.149 pcmk03-iscsi2
The vcentre record above points to our VMware vCenter server, which is on 10.247.50.10.
We have set the following hostnames:
[pcmk01]# hostnamectl set-hostname pcmk01
[pcmk02]# hostnamectl set-hostname pcmk02
[pcmk03]# hostnamectl set-hostname pcmk03
Iptables
This article uses Iptables firewall. Note that CentOS 7 utilises FirewallD as the default firewall management tool.
Replace FirewallD service with Iptables:
[ALL]# systemctl stop firewalld.service
[ALL]# systemctl mask firewalld.service
[ALL]# systemctl daemon-reload
[ALL]# yum install -y iptables-services
[ALL]# systemctl enable iptables.service
[ALL]# service iptables save
We use the following firewall rules:
# iptables -S
-P INPUT ACCEPT
-P FORWARD ACCEPT
-P OUTPUT ACCEPT
-A INPUT -p icmp -j ACCEPT
-A INPUT -i lo -j ACCEPT
-A INPUT -s 10.0.0.0/8 -p tcp -m tcp --dport 22 -m state --state NEW -j ACCEPT
-A INPUT -s 10.0.0.0/8 -p tcp -m tcp --dport 2224 -m state --state NEW -j ACCEPT
-A INPUT -s 172.16.21.0/24 -d 172.16.21.0/24 -m comment --comment Corosync -j ACCEPT
-A INPUT -s 10.11.0.0/16 -d 10.11.0.0/16 -m comment --comment iSCSI_1 -j ACCEPT
-A INPUT -s 10.12.0.0/16 -d 10.12.0.0/16 -m comment --comment iSCSI_2 -j ACCEPT
-A INPUT -p udp -m multiport --dports 67,68 -m state --state NEW -j ACCEPT
-A INPUT -p udp -m multiport --dports 137,138,139,445 -j DROP
-A INPUT -m state --state RELATED,ESTABLISHED -j ACCEPT
-A INPUT -j LOG --log-prefix "iptables_input "
-A INPUT -j REJECT --reject-with icmp-port-unreachable
-A FORWARD -j LOG --log-prefix "iptables_forward "
Sysctl and SELinux
Open /etc/sysctl.conf for editing and place the following to disable IPv6:
net.ipv6.conf.all.disable_ipv6 = 1
net.ipv6.conf.default.disable_ipv6 = 1
Also cause a node to panic if an oops (an in-kernel segfault or GFS assertion failure) happens:
kernel.panic_on_oops = 1
This should be turned on automatically by GFS. Load values from file:
[ALL]# sysctl -p
SELinux is set to enforcing mode.
1. Configure Passwordless SSH Authentication Between Cluster Nodes
Install rsync package, generate an SSH keypair and distribute it accross cluster nodes.
[ALL]# yum install rsync
[pcmk01]# ssh-keygen -b 2048 -t rsa -C "root@pcmk-nodes" -f ~/.ssh/id_rsa
[pcmk01]# mv ~/.ssh/id_rsa.pub ~/.ssh/authorized_keys
Sync with ourselves to get an ECDSA key fingerprint stored into known_hosts, then sync with other cluster nodes:
[pcmk01]# rsync -av /root/.ssh/* pcmk01:/root/.ssh/
[pcmk01]# rsync -av /root/.ssh/* pcmk02:/root/.ssh/
[pcmk01]# rsync -av /root/.ssh/* pcmk03:/root/.ssh/
Optional: Sync Various Configuration Between Cluster Nodes
Here is a neat rsync_nodes.sh script to keep nodes in sync:
#!/bin/bash
# written by Tomas (http://www.lisenet.com)
# 07/02/2016 (dd/mm/yy)
# copyleft free software
# Simple script to keep cluster nodes in sync
#
LOGFILE=""$HOME"/rsync_nodes.log";
# Nodes to keep in sync.
NODE1="pcmk01";
NODE2="pcmk02";
NODE3="pcmk03";
# Files and directories to sync.
# More files can be added as required.
FILE1="/etc/hosts";
FILE2="/etc/sysconfig/iptables";
FILE3="/etc/sysctl.conf";
FILE4="/etc/security/limits.conf";
FILE5="/etc/multipath.conf";
DIR1="/etc/yum.repos.d/";
#
echo "Logfile is: "$LOGFILE"";
echo "Syncing "$FILE1"";
rsync -av "$FILE1" "$NODE2":"$FILE1" >>"$LOGFILE" 2>&1;
rsync -av "$FILE1" "$NODE3":"$FILE1" >>"$LOGFILE" 2>&1;
echo "Syncing "$FILE2"";
rsync -av "$FILE2" "$NODE2":"$FILE2" >>"$LOGFILE" 2>&1;
rsync -av "$FILE2" "$NODE3":"$FILE2" >>"$LOGFILE" 2>&1;
echo "Syncing "$FILE3"";
rsync -av "$FILE3" "$NODE2":"$FILE3" >>"$LOGFILE" 2>&1;
rsync -av "$FILE3" "$NODE3":"$FILE3" >>"$LOGFILE" 2>&1;
echo "Syncing "$FILE4"";
rsync -av "$FILE4" "$NODE2":"$FILE4" >>"$LOGFILE" 2>&1;
rsync -av "$FILE4" "$NODE3":"$FILE4" >>"$LOGFILE" 2>&1;
echo "Syncing "$FILE5"";
rsync -av "$FILE5" "$NODE2":"$FILE5" >>"$LOGFILE" 2>&1;
rsync -av "$FILE5" "$NODE3":"$FILE5" >>"$LOGFILE" 2>&1;
echo "Syncing "$DIR1"";
rsync -av "$DIR1" "$NODE2":"$DIR1" >>"$LOGFILE" 2>&1;
rsync -av "$DIR1" "$NODE3":"$DIR1" >>"$LOGFILE" 2>&1;
exit 0;
2. Install Pacemaker and Corosync
We want to install VMware tools first (skip this line if running on a non VMware platform):
[ALL]# yum install open-vm-tools
The pcs will install pacemaker, corosync and resource-agents as dependencies.
[ALL]# yum install -y pcs
Optionally, install policycoreutils-python for SELinux management:
[ALL]# yum install -y policycoreutils-python
Set up a password for the pcs administration account named hacluster:
[ALL]# echo "passwd" | passwd hacluster --stdin
Start and enable the service:
[ALL]# systemctl start pcsd.service
[ALL]# systemctl enable pcsd.service
Configure Corosync
Authenticate as the hacluster user. Note that authorisation tokens are stored in the file /var/lib/pcsd/tokens.
[pcmk01]# pcs cluster auth pcmk01-cr pcmk02-cr pcmk03-cr -u hacluster -p passwd
pcmk01-cr: Authorized
pcmk02-cr: Authorized
pcmk03-cr: Authorized
Generate and synchronise the Corosync configuration:
[pcmk01]# pcs cluster setup --name gfs_cluster pcmk01-cr pcmk02-cr pcmk03-cr
Start the cluster on all nodes:
[pcmk01]# pcs cluster start --all
Enable cluster services to start on boot:
[ALL]# pcs cluster enable --all
Our Pacemaker cluster is now up and running, but with no resources configured yet.
Cluster should have quorum.
[pcmk01]# corosync-quorumtool -s
Quorum information
------------------
Date:             Sat Feb 6 15:41:52 2016
Quorum provider:  corosync_votequorum
Nodes:            3
Node ID:          1
Ring ID:          996
Quorate:          Yes

Votequorum information
----------------------
Expected votes:   3
Highest expected: 3
Total votes:      3
Quorum:           2
Flags:            Quorate

Membership information
----------------------
    Nodeid      Votes Name
         1          1 pcmk01-cr (local)
         2          1 pcmk02-cr
         3          1 pcmk03-cr
Cluster manager web UI can be accessed on https://pcmk01:2224/.
3. iSCSI Client Installation and Configuration
Configure Device-Mapper Multipath and iSCSI Initiator
[ALL]# yum install device-mapper-multipath iscsi-initiator-utils
The default settings for DM Multipath are compiled in to the system and do not need to be explicitly set in the /etc/multipath.conf file.
However, the default value of path_grouping_policy is set to failover, so depending on setup, we may need to edit the /etc/multipath.conf file and change it to acoordingly.
As we usually have an sda disk already in use on the servers, we’re blacklisting it.
[ALL]# cat << EOL > /etc/multipath.conf
defaults {
        user_friendly_names yes
        find_multipaths yes
}
blacklist {
        devnode "sda"
        devnode "^(ram|raw|loop|fd|md|dm-|sr|scd|st)[0-9]*"
        devnode "^hd[a-z]"
        devnode "^cciss!c[0-9]d[0-9].*"
}
devices {
        device {
                vendor               "NETAPP"
                product              "NewFiler"
                path_grouping_policy multibus
                path_selector        "round-robin 0"
                failback             immediate
        }
}
EOL
Enable and start a multipath service:
[ALL]# systemctl enable multipathd.service
[ALL]# systemctl start multipathd
Configure an iSCSI initiator name:
[ALL]# echo "InitiatorName=iqn.1994-05.com.redhat:$(hostname)" >/etc/iscsi/initiatorname.iscsi
Enable and start an iscsi service:
[ALL]# systemctl enable iscsi.service
[ALL]# systemctl start iscsi
Discover the newly created targets, where 10.11.0.5 is the IP of our NetApp SAN:
[ALL]# iscsiadm -m discovery -t sendtargets -p 10.11.0.5:3260
Set the logon as automatic:
[ALL]# iscsiadm -m node -L automatic
NetApp Data ONTAP SAN: Create a LUN on and iSCSI Server
The commands below are specific to the NetApp Data ONTAP SAN which we have in use, and are therefore not explained in detail due to questionable benefit to the reader coming accross this article (emphasis on Pacemaker + GFS2). These are mostly for our own future reference.
SAN> vol create iSCSI_PCMK_MySQL_Test_Cluster -s none aggr1_fcal 5g
SAN> vol autosize iSCSI_PCMK_MySQL_Test_Cluster -m 10g -i 1g on
SAN> snap sched iSCSI_PCMK_MySQL_Test_Cluster 0 0 0
SAN> snap reserve iSCSI_PCMK_MySQL_Test_Cluster 0
SAN> vfiler add vfiler2 /vol/iSCSI_PCMK_MySQL_Test_Cluster

SAN> igroup create -i -t linux PCMK_MySQL_Test_Cluster iqn.1994-05.com.redhat:pcmk01
SAN> igroup add PCMK_MySQL_Test_Cluster iqn.1994-05.com.redhat:pcmk02
SAN> igroup add PCMK_MySQL_Test_Cluster iqn.1994-05.com.redhat:pcmk03

SAN> igroup show PCMK_MySQL_Test_Cluster
    PCMK_MySQL_Test_Cluster (iSCSI) (ostype: linux):
        iqn.1994-05.com.redhat:pcmk01 (logged in on: IFGRP1-12, IFGRP1-11)
        iqn.1994-05.com.redhat:pcmk02 (logged in on: IFGRP1-12, IFGRP1-11)
        iqn.1994-05.com.redhat:pcmk03 (logged in on: IFGRP1-12, IFGRP1-11)

SAN> lun create -s 5g -t linux /vol/iSCSI_PCMK_MySQL_Test_Cluster/iSCSI_PCMK_MySQL_Test_Cluster.lun
SAN> lun set reservation /vol/iSCSI_PCMK_MySQL_Test_Cluster/iSCSI_PCMK_MySQL_Test_Cluster.lun disable
SAN> lun map -f /vol/iSCSI_PCMK_MySQL_Test_Cluster/iSCSI_PCMK_MySQL_Test_Cluster.lun PCMK_MySQL_Test_Cluster

SAN> lun show -v /vol/iSCSI_PCMK_MySQL_Test_Cluster/iSCSI_PCMK_MySQL_Test_Cluster.lun
/vol/iSCSI_PCMK_MySQL_Test_Cluster/iSCSI_PCMK_MySQL_Test_Cluster.lun    5.0g (5346689024)    (r/w, online, mapped)
                Serial#: 80AQDCKHG1AJ
                Share: none
                Space Reservation: disabled
                Multiprotocol Type: linux
                Maps: PCMK_MySQL_Test_Cluster=0
                Occupied Size:       0 (0)
                Creation Time: Sat Jan 16 19:31:40 GMT 2016
                Cluster Shared Volume Information: 0x0
                Read-Only: disabled
When the LUN is ready, rescan iSCSI sessions to pic up the new device:
[ALL]# iscsiadm -m session --rescan
[pcmk01]# multipath -ll
360a980003830354d66244675306b7343 dm-2 NETAPP  ,LUN
size=5.0G features='4 queue_if_no_path pg_init_retries 50 retain_attached_hw_handle' hwhandler='0' wp=rw
`-+- policy='service-time 0' prio=2 status=active
  |- 5:0:0:0 sdb 8:16 active ready running
  `- 6:0:0:0 sdc 8:32 active ready running
4. Configure STONITH (aka Node Fencing)
Note that the cluster property stonith-enabled may not be deactivated to use the DLM. Clusters with shared data need STONITH to ensure data integrity.
Install a fencing agent suitable for VMware environment:
[ALL]# yum install -y fence-agents-vmware-soap
Populate the file with the current raw XML config from the CIB:
[pcmk01]# pcs cluster cib stonith_cfg
Create a new STONITH resource called my_vcentre-fence:
[pcmk01]# pcs -f stonith_cfg stonith create my_vcentre-fence fence_vmware_soap \
 ipaddr=vcentre ipport=443 ssl_insecure=1 inet4_only=1 \
 login="vcentre-account" passwd="passwd" \
 action=reboot \
 pcmk_host_map="pcmk01-cr:vm-pcmk01;pcmk02-cr:vm-pcmk02;pcmk03-cr:vm-pcmk03" \
 pcmk_host_check=static-list \
 pcmk_host_list="vm-pcmk01,vm-pcmk02,vm-pcmk03" \
 power_wait=3 op monitor interval=90s
Enable STONITH, set its action and timeout, and commit the changes:
[pcmk01]# pcs -f stonith_cfg property set stonith-enabled=true
[pcmk01]# pcs -f stonith_cfg property set stonith-action=reboot
[pcmk01]# pcs -f stonith_cfg property set stonith-timeout=120s
[pcmk01]# pcs cluster cib-push stonith_cfg
Check all currently configured STONITH properties:
[pcmk01]# pcs property list --all|grep stonith
 stonith-action: reboot
 stonith-enabled: true
 stonith-timeout: 120s
 stonith-watchdog-timeout: (null)
We can also check all property defaults:
[pcmk01]# pcs property list --defaults
Show all currently configured STONITH devices:
[pcmk01]# pcs stonith show --full
 Resource: my_vcentre-fence (class=stonith type=fence_vmware_soap)
  Attributes: ipaddr=vcentre ipport=443 ssl_insecure=1 inet4_only=1 login=vcentre-account passwd=passwd action=reboot pcmk_host_map=pcmk01-cr:vm-pcmk01;pcmk02-cr:vm-pcmk02;pcmk03-cr:vm-pcmk03 pcmk_host_check=static-list pcmk_host_list=vm-pcmk01,vm-pcmk02,vm-pcmk03 power_wait=3
  Operations: monitor interval=90s (my_vcentre-fence-monitor-interval-90s)
Test STONITH, reboot the third cluster node, make sure that we use the Corosync interface for this:
[pcmk01]# stonith_admin --reboot pcmk03-cr
If we get timeouts, we can increase the monitoring interval:
[pcmk01]# pcs stonith update my_vcentre-fence op monitor interval=120s
Or do a simple cleanup, sometimes it’s all that’s needed:
[pcmk01]# pcs stonith cleanup
Cleanup tells the cluster to forget the operation history of a stonith device and re-detect its current state. It can be useful to purge knowledge of past failures that have since been resolved.
5. Configure Pacemaker for GFS2
We want to prevent healthy resources from being moved around the cluster. We can specify a different stickiness for every resource, but it is often sufficient to change the default.
[pcmk01]# pcs resource defaults resource-stickiness=200
[pcmk01]# pcs resource defaults
resource-stickiness: 200
Install the GFS2 command-line utilities and the Distributed Lock Manager (DLM) required by cluster filesystems:
[ALL]# yum install gfs2-utils lvm2-cluster
Enable clustered locking for LVM:
[ALL]# lvmconf --enable-cluster
This sets locking_type to 3 on the system and disables lvmetad use as it is not yet supported in clustered environment. Another way of doing this would be to open the /etc/lvm/lvm.conf file and set:
locking_type = 3
The DLM needs to run on all nodes, so we’ll start by creating a resource for it (using the ocf:pacemaker:controld resource script), and clone it. Note that a dlm resource is a required dependency for clvmd and GFS2.
[pcmk01]# pcs cluster cib dlm_cfg
[pcmk01]# pcs -f dlm_cfg resource create dlm ocf:pacemaker:controld \
  op monitor interval=120s on-fail=fence clone interleave=true ordered=true
Set up clvmd as a cluster resource.
[pcmk01]# pcs -f dlm_cfg resource create clvmd ocf:heartbeat:clvm \
  op monitor interval=120s on-fail=fence clone interleave=true ordered=true
Set up clvmd and dlm dependency and start up order. Create the ordering and the colocation constraint so that clvm starts after dlm and that both resources start on the same node.
[pcmk01]# pcs -f dlm_cfg constraint order start dlm-clone then clvmd-clone
[pcmk01]# pcs -f dlm_cfg constraint colocation add clvmd-clone with dlm-clone
Set the no-quorum-policy of the cluster to freeze so that that when quorum is lost, the remaining partition will do nothing until quorum is regained – GFS2 requires quorum to operate.
[pcmk01]# pcs -f dlm_cfg property set no-quorum-policy=freeze
Let us check the configuration:
[pcmk01]# pcs -f dlm_cfg constraint
Location Constraints:
Ordering Constraints:
  start dlm-clone then start clvmd-clone (kind:Mandatory)
Colocation Constraints:
  clvmd-clone with dlm-clone (score:INFINITY)
[pcmk01]# pcs -f dlm_cfg resource show
 Clone Set: dlm-clone [dlm]
     Stopped: [ pcmk01-cr pcmk02-cr pcmk03-cr ]
 Clone Set: clvmd-clone [clvmd]
     Stopped: [ pcmk01-cr pcmk02-cr pcmk03-cr ]
Commit changes:
[pcmk01]# pcs cluster cib-push dlm_cfg
[pcmk01]# pcs resource show
 Clone Set: dlm-clone [dlm]
     Started: [ pcmk01-cr pcmk02-cr pcmk03-cr ]
 Clone Set: clvmd-clone [clvmd]
     Started: [ pcmk01-cr pcmk02-cr pcmk03-cr ]
[pcmk01]# pcs property list no-quorum-policy
Cluster Properties:
 no-quorum-policy: freeze
LVM Configuration
Create LVM Objects
We will create LVM objects from a single cluster node.
[pcmk01]# pvcreate /dev/mapper/360a980003830354d66244675306b7343
[pcmk01]# vgcreate --autobackup=y --clustered=y vg_cluster /dev/mapper/360a980003830354d66244675306b7343
[pcmk01]# lvcreate --size 512M --name lv_storage vg_cluster
There are cases when we might receive the following error:
connect() failed on local socket: No such file or directory
Internal cluster locking initialisation failed.
WARNING: Falling back to local file-based locking.
Volume Groups with the clustered attribute will be inaccessible.
The above indicates that we have cluster locking enabled, but that the cluster LVM daemon (clvmd) is not running. Make sure it’s started via Pacemaker.
Create Clustered Filesystem
GFS2 requires one journal for each node in the cluster that needs to mount the file system. For example, if we have a 16-node cluster but need to mount only the file system from two nodes, we need only two journals. If we need to mount from a third node, we can always add a journal with the gfs2_jadd command. GFS2 allows to add journals on the fly.
The default GFS2 journal size is 128MB. The minimum size is 8MB. Larger journals improve performance, although they use more memory than smaller journals. The default size of 128MB means that if we have a 512MB logical volume and a 3-node cluster, creating a GFS2 filesystem will not work, we’ll get an error saying there isn’t enough free space:
Failed to create resource group index entry: No space left on device
When determining the number of nodes that our system will contain, there is always a trade-off between high availability and performance. With a larger number of nodes, it becomes increasingly difficult to make workloads scale. For that reason, Red Hat does not support using GFS2 for cluster file system deployments greater than 16 nodes. When deciding on the number of journals, one journal is required for each cluster node which is to mount the GFS2 file system.
It is generally recommended to use the default journal size of 128MB. However, since our file system is very small (only 5GB), having a 128MB journal is simply impractical.
It is also recommended that we do not run a file system that is more than 85 percent full, although this figure may vary depending on workload.
In our particular case: 3 nodes x 32MB journals = 96MB + some space for resource groups = around 100MB.
Create a clustered filesystem with three journals, where the journal size is 32MB. Note that the cluster name must match that in cluster.conf as only members of this cluster are permitted to use this filesystem.
Acceptable locking protocols are lock_dlm, lock_gulm or if we are using GFS2 as a local filesystem (one node only), we can specify the lock_nolock protocol.
[pcmk01]# mkfs.gfs2 -j3 -J32 -t gfs_cluster:gfs2_storage -p lock_dlm /dev/vg_cluster/lv_storage
/dev/vg_cluster/lv_mysql01 is a symbolic link to /dev/dm-3
This will destroy any data on /dev/dm-3
Are you sure you want to proceed? [y/n]y
Device:                    /dev/vg_cluster/lv_storage
Block size:                4096
Device size:               0.50 GB (131072 blocks)
Filesystem size:           0.50 GB (131068 blocks)
Journals:                  3
Resource groups:           5
Locking protocol:          "lock_dlm"
Lock table:                "gfs_cluster:gfs2_storage"
UUID:                      00a3fa40-d95c-904a-fd59-9fe3baa2b283
A couple of ways to check for a cluster name:
[pcmk01]# pcs property list cluster-name
Cluster Properties:
 cluster-name: gfs_cluster
# grep name /etc/corosync/corosync.conf
  cluster_name: gfs_cluster
Create a mountpoint:
[ALL]# mkdir -p /cluster/storage
Create Pacemaker Filesystem Resource
It is generally recommended to mount GFS2 file systems with the noatime and nodiratime arguments. This allows GFS2 to spend less time updating disk inodes for every access.
[pcmk01]# pcs resource create gfs2_res01 Filesystem device="/dev/vg_cluster/lv_storage" \
  directory="/cluster/storage" fstype="gfs2" options="noatime,nodiratime,rw" \
  op monitor interval=90s on-fail=fence clone interleave=true
We need to define a _netdev option when we use LVM on a GFS filesystem over a partition provided via the iSCSI protocol. To do so, we will simply update the filesystem resource:
[pcmk01]# pcs resource update gfs2_res01 options="noatime,nodiratime,rw,_netdev"
File systems mounted with the _netdev flag are mounted when the network has been enabled on the system.
We may optionally want to check a GFS2 file system at boot time by setting the run_fsck parameter of the options argument.
Let’s check for gfs2 mounts:
[pcmk01]# mount|grep gfs2
/dev/mapper/vg_cluster-lv_storage on /cluster/storage type gfs2 (rw,noatime,nodiratime,seclabel,_netdev))
Caveat: Avoid SELinux on GFS2
As per RedHat documentation, SELinux is highly recommended for security reasons in most situations, but it is not supported for use with GFS2. SELinux stores information using extended attributes about every file system object. Reading, writing, and maintaining these extended attributes is possible but slows GFS2 down considerably.
We must turn SELinux off on a GFS2 file system (not on the whole server!) when we mount the file system, using one of the context options as described in the mount man page.
The default security context should be unlabeled:
[pcmk01]# ls -dZ /cluster/storage
drwxr-xr-x. root root system_u:object_r:unlabeled_t:s0 /cluster/storage/
The xattr part for GFS2 should be loaded:
[pcmk01]# dmesg|grep xattr
[    2.671313] SELinux: initialized (dev dm-0, type ext4), uses xattr
[    4.623928] SELinux: initialized (dev sda1, type ext2), uses xattr
[   26.107473] SELinux: initialized (dev dm-3, type gfs2), uses xattr
We are going to change security context to public content, only one security context per filesystem.
Files labeled with the public_content_t type allow them to be read by FTP, Apache, Samba and rsync. Files labeled with the public_content_rw_t allow them to be written (some services, such as Samba, require booleans to be set before they can write!).
Update the filesystem resource:
[pcmk01]# pcs resource update gfs2_res01 options='noatime,nodiratime,rw,_netdev,context="system_u:object_r:public_content_rw_t:s0"'
Mount options and security context should be changed:
[pcmk01]# mount|grep gfs2
/dev/mapper/vg_cluster-lv_storage on /cluster/storage type gfs2 (rw,noatime,nodiratime,context=system_u:object_r:public_content_rw_t:s0,_netdev)
[pcmk01]# ls -dZ /cluster/storage
drwxr-xr-x. root root system_u:object_r:public_content_rw_t:s0 /cluster/storage/
Reboot the system (or fence it from another node!) and check the kernel message buffer, the xattr part should not be loaded:
[pcmk01]# reboot
[pcmk01]# dmesg|grep xattr
[    2.424703] SELinux: initialized (dev dm-0, type ext4), uses xattr
[    3.786307] SELinux: initialized (dev sda1, type ext2), uses xattr
We can always check for other SELinux content available if the current one is not suitable:
# semanage fcontext -l|less
Create Pacemaker Resource Ordering
Now, we need to make sure that the cluster LVM daemon (clvmd) is started before any attempt to mount the GFS2 volume, otherwise our logical device /dev/vg_cluster/lv_storage won’t be found as volume groups with the clustered attribute will be inaccessible. GFS2 must start after clvmd and must run on the same node as clvmd.
[pcmk01]# pcs constraint order start clvmd-clone then gfs2_res01-clone
[pcmk01]# pcs constraint colocation add gfs2_res01-clone with clvmd-clone
[pcmk01]# pcs constraint show
Location Constraints:
Ordering Constraints:
  start dlm-clone then start clvmd-clone (kind:Mandatory)
  start clvmd-clone then start gfs2_res01-clone (kind:Mandatory)
Colocation Constraints:
  clvmd-clone with dlm-clone (score:INFINITY)
  gfs2_res01-clone with clvmd-clone (score:INFINITY)
How to Check GFS2 Filesystem Offline
All nodes must have the GFS2 filesystem unmounted before running fsck.gfs2. Failure to unmount from all nodes in a cluster will likely result in filesystem corruption.
[pcmk01]# pcs resource disable --wait=5 gfs2_res01
[pcmk01]# fsck.gfs2 /dev/vg_cluster/lv_storage
[pcmk01]# pcs resource enable gfs2_res01
How to Grow GFS2 Filesystem Online
The gfs2_grow command is used to expand a GFS2 filesystem after the device upon which the filesystem resides has also been expanded.
Let us expand LVM first:
[pcmk01]# lvextend --size +512M /dev/vg_cluster/lv_storage
We may only run gfs2_grow on a mounted filesystem as an expansion of unmounted filesystems is not supported. We only need to run gfs2_grow on one node in the cluster.
Note that we can run gfs2_grow with the -T flag to get a display of the current state of a mounted GFS2 filesystem.
[pcmk01 ~]# gfs2_grow /dev/vg_cluster/lv_storage
# df -hT /cluster/storage
Filesystem                        Type  Size  Used Avail Use% Mounted on
/dev/mapper/vg_cluster-lv_storage gfs2  1.0G  100M  925M  10% /cluster/storage
How to Add Journals to GFS2
The number of journals can be fetched by gfs2_edit -p jindex. Do not execute this command when the file system is mounted.
[pcmk01]# gfs2_edit -p jindex /dev/vg_cluster/lv_storage|grep journal
   3/3 [fc7745eb] 1/18 (0x1/0x12): File    journal0
   4/4 [8b70757d] 2/8231 (0x2/0x2027): File    journal1
   5/5 [127924c7] 3/16444 (0x3/0x403c): File    journal2
If a GFS2 file system is full, the gfs2_jadd will fail, even if the logical volume containing the file system has been extended and is larger than the file system. This is because in a GFS2 file system, journals are plain files rather than embedded metadata, so simply extending the underlying logical volume will not provide space for the journals.
# gfs2_jadd -j 1 /dev/vg_cluster/lv_storage
Filesystem: /dev/vg_cluster/lv_storage
Old journals: 3
New journals: 4
[pcmk01]# gfs2_edit -p jindex /dev/vg_cluster/lv_storage|grep journal
   3/3 [fc7745eb] 1/18 (0x1/0x12): File    journal0
   4/4 [8b70757d] 2/8231 (0x2/0x2027): File    journal1
   5/5 [127924c7] 3/16444 (0x3/0x403c): File    journal2
   6/6 [657e1451] 4/131340 (0x4/0x2010c): File    journal3
How to Display, print or edit GFS2 or GFS internal structures
The gfs2_edit command is a tool used to examine, edit or display internal data structures of a GFS2 or GFS file system.
References
http://clusterlabs.org/doc/en-US/Pacemaker/1.1-pcs/html-single/Clusters_from_Scratch/index.html
https://access.redhat.com/documentation/en-US/Red_Hat_Enterprise_Linux/7/html-single/Global_File_System_2/index.html
http://download.parallels.com/doc/psbm/v5/rtm/Deploying_Clusters_in_Parallels-Based_Systems/30776.htm
http://selinuxproject.org/page/FileStatements
https://www.redhat.com/archives/linux-cluster/2012-January/msg00099.html
Hello I have create demo like your post. But when i wannt to fence one node its got This Error “Command failed: No route to host”
Have you any idea why am i getting this error. I have done althing like your post.
This is Erro Log in /var/log/message log file.
Jun 17 07:53:45 node1 stonith-ng[3008]: notice: Client stonith_admin.18958.56c576c7 wants to fence (reboot) ‘Node2’ with device ‘(any)’
Jun 17 07:53:45 node1 stonith-ng[3008]: notice: Initiating remote operation reboot for Node2: 897fe5e8-a7ec-4f7b-8d61-bf6367c4b4b6 (0)
Jun 17 07:53:45 node1 stonith-ng[3008]: notice: my_vcentre-fence can fence (reboot) Node2 (aka. ‘vmnode2’): static-list
Jun 17 07:53:45 node1 stonith-ng[3008]: notice: my_vcentre-fence can fence (reboot) Node2 (aka. ‘vmnode2’): static-list
Jun 17 07:53:50 node1 fence_vmware_soap: Failed: Unable to obtain correct plug status or plug is not available
Jun 17 07:53:56 node1 fence_vmware_soap: Failed: Unable to obtain correct plug status or plug is not available
Jun 17 07:53:56 node1 stonith-ng[3008]: error: Operation ‘reboot’ [18966] (call 2 from stonith_admin.18958) for host ‘Node2’ with device ‘my_vcentre-fence’ returned: -201 (Gen eric Pacemaker error)
Jun 17 07:53:56 node1 stonith-ng[3008]: warning: my_vcentre-fence:18966 [ /usr/lib/python2.7/site-packages/urllib3/connectionpool.py:769: InsecureRequestWarning: Unverified HTTP S request is being made. Adding certificate verification is strongly advised. See: https:// urllib3.readthedocs.org/en/latest/security.html ]
Jun 17 07:53:56 node1 stonith-ng[3008]: warning: my_vcentre-fence:18966 [ InsecureRequestWarning) ]
Jun 17 07:53:56 node1 stonith-ng[3008]: warning: my_vcentre-fence:18966 [ Failed: Unable to obtain correct plug status or plug is not available ]
Jun 17 07:53:56 node1 stonith-ng[3008]: warning: my_vcentre-fence:18966 [ ]
Jun 17 07:53:56 node1 stonith-ng[3008]: warning: my_vcentre-fence:18966 [ ]
Jun 17 07:54:19 node1 stonith-ng[3008]: notice: Couldn’t find anyone to fence (reboot) Node2 with any device
Jun 17 07:54:19 node1 stonith-ng[3008]: error: Operation reboot of Node2 by for [email protected]: No route to host
Jun 17 07:54:19 node1 crmd[3012]: notice: Peer Node2 was not terminated (reboot) by for node1: No route to host (ref=897fe5e8-a7ec-4f7b-8d61-bf6367c4b4b6) by client st onith_admin.18958
Your fencing device isn’t configured properly:
Does it fail when calling fence_vmware_soap from the command line? Try it and see if you get a list of nodes available. Ensure the username and password are correct.
I had the same issue, in case anyone else stumbles on to I resolved by populating the pcmk_host_list with the VMware UUID for the nodes as opposed to names.
Hi, I can get the resources created and the LV created but the LV remains inactive on the 2nd node? (2node cluster). I can mount and access the lv on the first node but it will not activate on the second. I have tried “lgchange -ay” to no avail
What happens when you try to activate it on the second node?
The command completes, the lv stays inactive.
Anything in logs? What shared storage do you use?
The exact error on “pcs status”:
Failed Actions:
* gfs2_res01_start_0 on kvm-node2.coobe.local ‘not installed’ (5): call=72, status=complete, exitreason=’Couldn’t find device [/dev/cluster_vm_group/cluster_vm_volume]. Expected /dev/??? to exist’,
last-rc-change=’Tue Oct 18 10:03:19 2016′, queued=0ms, exec=60ms
If I do a “lvs” on node2, the volume and volume group show up, “lvscan” shows the lv as inactive so I’m assuming that’s the cause for the error.
OK, one of the cluster nodes (kvm-node2) is unable to see the shared storage assigned to the OS, so I take it the shared storage devices were not shared correctly between the cluster nodes.
You may be on to something.
fdisk -l | grep Disk on node1:
Disk /dev/mapper/mpatha: 644.2 GB, 644245094400 bytes, 1258291200 sectors
Disk /dev/mapper/rhel-home: 21.5 GB, 21466447872 bytes, 41926656 sectors
Disk /dev/mapper/cluster_vm_group-cluster_vm_volume: 644.2 GB, 644240900096 bytes, 1258283008 sectors
fdisk -l | grep Disk on node2:
Disk /dev/mapper/mpatha: 644.2 GB, 644245094400 bytes, 1258291200 sectors
Disk /dev/mapper/rhel-home: 84.0 GB, 84041269248 bytes, 164143104 sectors
/dev/mapper/mpatha is where I created the physical volume/volume group from.
However:
vgs on node2:
VG #PV #LV #SN Attr VSize VFree
cluster_vm_group 1 1 0 wz–nc 600.00g 0
rhel 1 3 0 wz–n- 136.21g 64.00m
lvs on node2:
LV VG Attr LSize Pool Origin Data% Meta% Move Log Cpy%Sync Convert
cluster_vm_volume cluster_vm_group -wi——- 600.00g
home rhel -wi-ao—- 78.27g
root rhel -wi-ao—- 50.00g
swap rhel -wi-ao—- 7.88g
So from that standpoint it looks like it can “see” the volume?
If your fdisk output is correct, then the node2 second node cannot see the
/dev/mapper/cluster_vm_group-cluster_vm_volume. Why is that? What does “multipath -ll” show on both nodes?Node1:
mpathb (3600143801259b8b40001100000190000) dm-2 HP ,HSV340
size=800G features=’1 queue_if_no_path’ hwhandler=’0′ wp=rw
|-+- policy=’service-time 0′ prio=50 status=active
| |- 1:0:2:2 sdh 8:112 active ready running
| |- 1:0:3:2 sdj 8:144 active ready running
| |- 2:0:2:2 sdp 8:240 active ready running
| `- 2:0:3:2 sdr 65:16 active ready running
`-+- policy=’service-time 0′ prio=10 status=enabled
|- 1:0:0:2 sdd 8:48 active ready running
|- 2:0:1:2 sdn 8:208 active ready running
|- 2:0:0:2 sdl 8:176 active ready running
`- 1:0:1:2 sdf 8:80 active ready running
mpatha (3600143801259b8b400011000000d0000) dm-3 HP ,HSV340
size=600G features=’1 queue_if_no_path’ hwhandler=’0′ wp=rw
|-+- policy=’service-time 0′ prio=50 status=active
| |- 2:0:1:1 sdm 8:192 active ready running
| |- 2:0:0:1 sdk 8:160 active ready running
| |- 1:0:1:1 sde 8:64 active ready running
| `- 1:0:0:1 sdc 8:32 active ready running
`-+- policy=’service-time 0′ prio=10 status=enabled
|- 1:0:3:1 sdi 8:128 active ready running
|- 1:0:2:1 sdg 8:96 active ready running
|- 2:0:2:1 sdo 8:224 active ready running
`- 2:0:3:1 sdq 65:0 active ready running
Node2:
mpathb (3600143801259b8b40001100000190000) dm-2 HP ,HSV340
size=800G features=’1 queue_if_no_path’ hwhandler=’0′ wp=rw
|-+- policy=’service-time 0′ prio=50 status=active
| |- 1:0:2:2 sdh 8:112 active ready running
| |- 1:0:3:2 sdj 8:144 active ready running
| |- 2:0:3:2 sdr 65:16 active ready running
| `- 2:0:2:2 sdp 8:240 active ready running
`-+- policy=’service-time 0′ prio=10 status=enabled
|- 1:0:1:2 sdf 8:80 active ready running
|- 2:0:0:2 sdl 8:176 active ready running
|- 2:0:1:2 sdn 8:208 active ready running
`- 1:0:0:2 sdd 8:48 active ready running
mpatha (3600143801259b8b400011000000d0000) dm-3 HP ,HSV340
size=600G features=’1 queue_if_no_path’ hwhandler=’0′ wp=rw
|-+- policy=’service-time 0′ prio=50 status=active
| |- 1:0:0:1 sdc 8:32 active ready running
| |- 1:0:1:1 sde 8:64 active ready running
| |- 2:0:0:1 sdk 8:160 active ready running
| `- 2:0:1:1 sdm 8:192 active ready running
`-+- policy=’service-time 0′ prio=10 status=enabled
|- 1:0:2:1 sdg 8:96 active ready running
|- 1:0:3:1 sdi 8:128 active ready running
|- 2:0:2:1 sdo 8:224 active ready running
`- 2:0:3:1 sdq 65:0 active ready running
OK, it can see physical devices, that’s cool.
Hi Tomas,
Thank for your guide, i have a question. In this post, iSCSI storage server is required ?. Every guides i saw, they had one iscsi storage server and two or more nodes :(
Pls, respond me as soon as possible !
Thanks and Regard !
Yes, using GFS2 in a cluster requires hardware to allow access to the shared storage (iSCSI in our case).
But your post have not section about iscsi server :(, can you update this guide ? about installation and cofiguration iscsi server ?
Thank you so much !
iSCSI server setup is a separate subject, and beyond the scope of the article really, with the exception of several references to the NetApp SAN that we use for iSCSI storage. It is expected that you have a working iSCSI server already, apologies if this got you confused. I’ve updated the article to make it clear. If you need to create an iSCSI server from scratch, you may want to take a look at this post about setting up and iSCSI target on RHEL 7.
Once again, the post is about creating an active/active Pacemaker cluster on CentOS 7, if you’re setting such cluster up, you need to have some shared storage before you start.
Hi Tomas,
I’m so confused in step: NetApp Data ONTAP SAN: Create a LUN on and iSCSI Server. Can you detail this step ?
Thanks and Regard !
What’s confusing about it in particular? You don’t need that part unless you use NetApp storage.
Hi Tomas,
What is vcentre ?
VMware vCenter is a centralised management application that lets you manage virtual machines and ESXi hosts.
Hi Tomas
Great tutorial. I like sharing information. I made a video tutorial, based on the EX436 exam. I would like to share with everyone. https://www.youtube.com/playlist?list=PLPS3ARhlL6zPE15bz7UPa-kiAs5oQ-FYZ
Hi Bruce, sharing is caring, thanks very much! I’ve taken a look at your video tutorials, and they have a fair amount of useful info, however, quite a few bits (package installation etc) could’ve been fast-forwarded. Most people who take onto RHCA have RHCE level skills.
Hi Tomas
Thanks for the feedback. Will take that into consideration.
No worries, you’re welcome Bruce.
Can any buddy help me from here .
Stack: corosync
Current DC: cloud2.cubexs.net.pk (version 1.1.16-12.el7_4.5-94ff4df) – partition with quorum
Last updated: Fri Dec 8 17:06:57 2017
Last change: Fri Dec 8 16:59:36 2017 by root via cibadmin on cloud1.cubexs.net.pk
2 nodes configured
5 resources configured
Online: [ cloud1.cubexs.net.pk cloud2.cubexs.net.pk ]
Full list of resources:
VirtIP (ocf::heartbeat:IPaddr2): Started cloud1.cubexs.net.pk
Httpd (ocf::heartbeat:apache): Stopped
Master/Slave Set: DrbdDataClone [DrbdData]
Masters: [ cloud1.cubexs.net.pk ]
Slaves: [ cloud2.cubexs.net.pk ]
DrbdFS (ocf::heartbeat:Filesystem): Stopped
Failed Actions:
* DrbdFS_start_0 on cloud1.cubexs.net.pk ‘not configured’ (6): call=286, status=complete, exitreason=’none’,
last-rc-change=’Fri Dec 8 17:05:42 2017′, queued=0ms, exec=340ms
Daemon Status:
corosync: active/disabled
pacemaker: active/disabled
pcsd: active/disabled
Just to clarify, this article is for GFS2, it does not use DRBD. Many things can go wrong while configuring clustering, therefore it’s hard to tell what was the exact problem in your case. It is however evident that the DRDB resource isn’t running, therefore you may want to re-do the configuration and check for any DRBD-related errors.
hi tomas
i have check that drbd is running successfully .i did it manually fail over the drbd services and other services are working fine. but via pacemaker the drbd is not fail over automatically .can you please tell where is the issue.
Hi Tomas , you can give an example of a working environment for an active/active cluster ? You can deploy LAMP on your cluster ?
A good example of an active/active Pacemaker cluster would be two MySQL nodes with master/master replication.