After my classroom exam was cancelled, I decided to take an individual exam.
Red Hat Individual Exam Experience
This was the first time I took an individual exam, and to be honest, having read plethora of reviews online about people having all sorts of problems, I was, to say the least, a bit worried.
There are two places that offer individual Red Hat exams in the UK, one in London, and one in Manchester. Either way it’s a two-hour drive from where I live. Driving in London is a no no, so I booked the exam in Manchester. The place is at the UKFast Campus and it has free on-site parking, amazing.
I didn’t get the personal testing station (the one that they show in the individual exam sessions video), but was provided with a 17″ laptop instead. I was monitored remotely by a Red Hat test proctor.
The whole experience was very positive. I had no issues with the laptop, no networking or performance problems. I already started considering taking all of my RHCA exams there.
EX436 Exam Experience
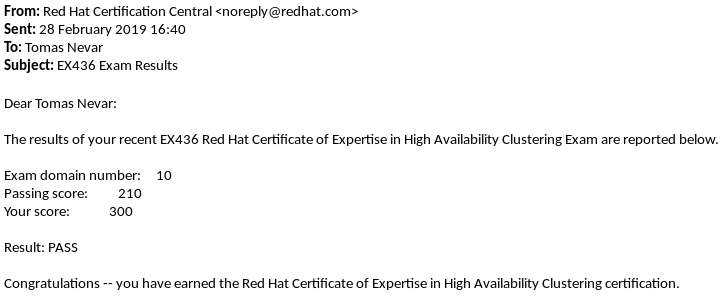
I’ve passed the exam with the score of 300/300.
I finished all the tasks in under 90 minutes, and then spent some time testing everything making sure that there are no issues. I’d say that 3 hours is plenty of time even if you need to troubleshoot something (I did have to troubleshoot a few things).
What I liked about this exam the most was the implementation of a complete solution. You build from the ground up until you have a highly available system.
As with other Red Hat exams that I’ve taken, the key thing for me was to know where to find information on a RHEL system.
How can we get your EX436 GitHub notes ?
Check the RHCA-study-notes repository on my GitHub account.
how can I get the link for your github account?
Hi, you can find it in the About section of the website. Alternatively, it is also available in the website footer.
Congratulations!!!!
Thank you!
Congratulations.
I took the exam past year, I’ve the same experiencie.
Also I used your notes to study.
Thanks
It’s good to know, thank you!
Hi Guys,
I am appearing in EX436 exam next week. I have experience with RHEL cluster administration and also completed the Red Hat recommended training. I am looking for some sample exam questions to have an idea.
Anyone please help me.
There is a comprehensive review lab at the end of the RH436 training course if you have access to RHLS.
Good luck with your exam!
Hi,
Thanks Tomas for your reply. I have access to online course and have practiced comprehensive labs. I have another question regarding SELINUX context. With RHEL 7.1, can I use the below command, if it is asked in exam to mount Apache Document Root with SELINUX context on GFS2.
pcs resource create clusterfs Filesystem device=”/dev/clustervg/ clusterlv” directory=”/var/www/html” fstype=”gfs2″ options=”noatime,context=system_u:object_r:httpd_sys_content_t:s0″ op monitor interval=10s on-fail=fence clone interleave=true
Or if you can suggest me any other way to achieve the same.
Thanks !!!
Although I’ve not verified your syntax, that command looks OK. You will likely want to use
nodiratimewith GFS2 as well.Hi,
Today I have successfully passed my EX436 High Availability Clustering Exam with 300/300 score.
First step towards RHCA …..
Thanks for support and guidance here …..
Congratulations!
what is your github account ?
Check the About section of the website.
Hi Tomas,
Congrats on your results!
I’m really worried only for the fencing mechanism.
Can you hint me if the exam requirements lead you in a specific stonith agent or they gave the freedom to choose.
Usually a cluster requires shared storage and this leads me either to sbd (a.k.a poison pill) as I got lots of experience with that or fence_scsi/fence_multipath – which I haven’t deployed in real clusters.
The exam requirements don’t mention any specific STONITH agent I’m afraid.
Hey Tomas,
I also got it 300/300 with 56min left .
Thanks for your blog.
Great, good job!
Hello Tomas.
What would be your estimation on how much time you spent on labs + studying materials for this exam?
Thank you
Karol
Hi Karol, it’s difficult to estimate because I studied LPIC-3 High Availability before (it covers pacemaker and corosync), and had some clustering knowledge already. I’d say that for EX436, I spent 10 hours of studying and 40 hours of labbing.
Hi Guys,
If configuring a cluster with the auto_tie_breaker quorum option is asked in EX436 exam, the auto_tie_breaker option has to be added only or the wait_for_all is required as well?
From what I understand, the use of last_man_standing requires the use of wait_for_all because it allows multiple partitions to claim quorum at the same time, but the auto_tie_breaker option doesn’t require the wait_for_all.
Your advice would be appreciated.
Hi Leo, thanks for your message. The
auto_tie_breakeroption does not require thewait_for_all.Thanks Tomas for the confirmation.
No worries Leo.
How can we get your EX436 GitHub notes ?
They are available on GitHub, check the RHCA section of this blog.
Hi,
Are offline documentation (webpages) available during exam and which?
Thanks
Yes, Red Hat product documentation is available during the exam.
Hi,
about offline documentation during the exam. I tried to find it like in Ovirt portal – pdf on the main webpage, but there are no docs on the nodea:2224 (( Where can I find it? Or you mean pacemaker-doc package?
Thanks in advance ))
Hi Tomas,
I have appeared for RH436 but i faced problem of not “multipath -ll” was listing any details, though /etc/multipath.conf was properly configured but i found /dev/sda as a common disk which is available on all the nodes.
therefore i created pvcreate, it got successfuly with the following errors.
================================================================
Error:
# pvcreate /dev/sda
connect() failed on local socket: No such file or directory
Internal cluster locking initialization failed
WARNING: Failing back to local file-based locking.
Volume Groups with the clustered attribute will be inaccessible.
Physical volume “/dev/sda” successfully created
# vgcreate -Ay -cy clustervg /dev/sda
connect() failed on local socket: No such file or directory
Internal cluster locking initialization failed
WARNING: Failing back to local file-based locking.
Volume Groups with the clustered attribute will be inaccessible.
Clustered volume group “clustervg” successfully created
# lvcreate -L 1G -n clusterlv clustervg
connect() failed on local socket: No such file or directory
Internal cluster locking initialization failed
WARNING: Failing back to local file-based locking.
Volume Groups with the clustered attribute will be inaccessible.
Skipping clustered volume group clustervg
===================================================================
When i asked the proctor about this error then he simply asked me to check with the support and i am facing the error issue in RH436 LAB provided through RHLS and it is not yet fixed by the Red Hat Support.
Just want to ask you if you ever came across the same type of issue?
Thanks,
Absar Ahammad Shaik.
Hi Absar, I did not have this issue with RHLS labs.
Hi Absar,
This error “connect() failed on local socket: No such file or directory” comes when the disk you are using are not shared among both nodes. Make sure they are shared properly. Go to below directory and check if the wwid of /dev/sda are same on both node
Node1# ls -lrth /dev/disk/by-id/
Node2# ls -lrth /dev/disk/by-id
Hello i want to as a question about the exam
do we need to install iscsi from scratch on the server or its ready to install it only on nodes?
and one more
do we need to install from scratch fence_xvm.key or its ready ?
Thanks
Hi,
Is the information on Git still valid to this day? or is it no longer reliable?
Thank you
Hi, still valid in general, but do check the exam objectives to match RHEL 8 requirements.
Hi
Thanks for sharing everything and congratulations about your success.
I will take the HA 436 Exam, but v8, and i think everything needs to be done with Ansible playbooks . Is this true ? I guess you passed the v7 version and there was no playbook necessity. Can you please comment.
Thanks
regards
Hi, EX436 is not an Ansible exam, therefore you can configure services manually. The exam objectives state the following:
“Install and configure a high availability cluster either manually or using Ansible”
You’re right, my exam was on RHEL7, and there was no option to use Ansible at all.
hi Tomas,
how do you configure log file for each node for different logfile example nodex.log nodey.log nodez.log?
Thanks in advance
Hi Adrian, I don’t really customise filenames per node in my homelab, I define common log file names like
/var/log/corosync.logor/var/log/pacemaker.log.Thanks Tomas..Thanks for all the information. Helps a lot in preparation to exams.
Thank you Adrian.
Is this notes still valid till today
Yes, of course! Fundamentals of Red Hat clustering have not changed. It’s still based on Pacemaker/Corosync with shared GFS2 storage.
Adrian
Can i have your support to discuss about the exam
Hi Tomas,
Am encountering an issue when preparing the storage device in the Ex436 exam. After adding the InitiatorNames in each node, and restarting the iscsid service, I am unable to login into the storage device.
I can see and reach the storage device in discovery mode, however when I try to login, I encounter a error 24: authorization failure, unable to login into all portals on the nodes. Have tried to debug but to no avail, do let me know if you have any tips, thank you.
Hello did you find solution? I has the same problem
have you found out what the problem is ? I had the same
Hello Everyone,
I’m preparing this exam (EX436) on rh8.3. I don’t have much idea of ansible. In one RH lab, have to create a two-node cluster with a quorum device and deploy a secure web server on that cluster. In this Red Hat lab, they are using one playbook for completing STEP 5 ( sharing below also). I used some commands(might be wrong) instead of below playbook, but command didn’t work in my case. Please guide to resolve the issue, I’ll appreciate.
5. As the student user on the workstation machine, run the apache.yml and
haproxy.yml playbooks in the /home/student/labs/cr2/ directory. Those playbooks
deploy an Apache HTTP Server and an HAProxy service on all nodes. You do not have to
change anything in those playbooks.
vi haproxy.yml
– name: Ensure HAProxy is deployed
hosts: cluster_nodes
become: yes
gather_facts: no
tasks:
– name: Ensuring the haproxy package is installed
yum:
name: haproxy
state: present
– name: Ensuring the /etc/pki/haproxy directory exists
file:
path: /etc/pki/haproxy
state: directory
owner: root
group: root
mode: 0700
setype: cert_t
– name: Ensuring the SSL file for HTTPS termination is deployed
copy:
src: files/haproxy.pem
dest: /etc/pki/haproxy/haproxy.pem
owner: root
group: root
mode: 0600
setype: cert_t
– name: Ensuring the HAProxy configuration is deployed
copy:
src: files/haproxy.cfg
dest: /etc/haproxy/haproxy.cfg
owner: root
group: root
mode: 0644
setype: etc_t
– name: Ensuring the http and https firewall services are opened
firewalld:
service: “{{ item }}”
state: enabled
immediate: yes
permanent: yes
loop:
– http
– https
==============
1.Ran below command on both cluster nodes i.e. nodea and nodeb.
yum install haproxy
2.Ran below command on both cluster nodes i.e. nodea and nodeb.
mkdir -p /etc/pki/haproxy
3. Ran below command on Workstation machine.
Deploy the SSL File for HTTPS Termination: Copy the haproxy.pem file to the /etc/pki/haproxy directory with the following command:
scp files/haproxy.pem nodea:/etc/pki/haproxy/haproxy.pem
scp files/haproxy.pem nodeb:/etc/pki/haproxy/haproxy.pem
4. Ran below command on Workstation machine.
Copy the haproxy.cfg configuration file to the /etc/haproxy directory using this command:
# scp files/haproxy.cfg nodea:/etc/haproxy/haproxy.cfg
# scp files/haproxy.cfg nodeb:/etc/haproxy/haproxy.cfg
5. Open Firewall Services for HTTP and HTTPS: Enable the http and https services in the firewall using the following commands on both cluster nodes i.e. nodea and nodeb: –
firewall-cmd –add-service=http –permanent
firewall-cmd –add-service=https –permanent
firewall-cmd –reload
====
!. Ran below commands on both cluster nodes: –
yum install haproxy -y
mkdir -p /etc/pki/haproxy && \
chown root:root /etc/pki/haproxy && \
chmod 0700 /etc/pki/haproxy && \
sudo setfacl –set user::rwx,group::r-x,other::— /etc/pki/haproxy
3. Copy the SSL certificate file:
Assuming that files/haproxy.pem resides locally or in an accessible location, replace it with the actual path:
chown root:root /etc/pki/haproxy/haproxy.pem
chmod 0600 /etc/pki/haproxy/haproxy.pem
setfacl –set user::rwx,group::r-x,other::— /etc/pki/haproxy/haproxy.pem
4. Deploy the HAProxy configuration file:
[ root@workstation ~]# scp local_path/files/haproxy.cfg root@nodea:/etc/haproxy/haproxy.cfg
[ root@workstation ~]# scp local_path/files/haproxy.cfg root@nodeb:/etc/haproxy/haproxy.cfg
5. Ran below commands on both cluster nodes (nodea and nodeb):-
systemctl enable firewalld && systemctl start firewalld
firewall-cmd –zone=public –add-service=http –permanent
firewall-cmd –zone=public –add-service=https –permanent
firewall-cmd –reload
Could please someone share correct commands instead to run above playbook?
Thankyou in advance for your time and guidance.
K Singh
Hi, thanks for your message. What does not work exactly after you run those commands? What is the problem?
Also, if you have access to Red Hat labs, you should also have access to Red Hat training support. You may want to consider raising a support request to get assistance.
Hi
Sorry for late replying.
Could you please share all steps(commands) to configure a two-node cluster and deploy a secure
web server on that cluster (with haproxy) ?
In RHLS lab, it’s a little bit confusing for me.
Thankyou in advance for your time and guidance.
K Singh
Could you please explain as to what problems are you currently facing exactly, including error logs? That would be very helpful in trying to understand the issue.
I’m able to do authorizing nodes, then creating cluster, then configure fencing for both nodes. But I’m facing issue in below playbooks named as apache.yml and haproxy.yml. I want to complete task of both these playbooks by running commands.
cat apache.yml
– name: Ensure the Apache HTTP Server is installed
hosts: cluster_nodes
become: yes
gather_facts: no
tasks:
– name: Ensuring the httpd package is installed
yum:
name: httpd
state: present
– name: Ensuring the required port is open
firewalld:
port: 8008/tcp
permanent: yes
state: enabled
immediate: yes
– name: Ensuring Apache HTTP Server listens on port 8008
linefile:
dest: /etc/httpd/conf/httpd.conf
regexp: “^Listens\\s+80”
line: Listen 8008
– name: Ensuring the initial web content is deployed
copy:
content: “Hello, world!\n”
dest: /var/www/html/index.html
mode: 0644
group: root
owner: root
setype: httpd_sys_content_t
=======================================above playbook Completes here================
vi haproxy.yml
– name: Ensure HAProxy is deployed
hosts: cluster_nodes
become: yes
gather_facts: no
tasks:
– name: Ensuring the haproxy package is installed << 5th task
yum:
name: haproxy
state: present
– name: Ensuring the /etc/pki/haproxy directory exists
file:
path: /etc/pki/haproxy
state: directory
owner: root
group: root
mode: 0700
setype: cert_t
– name: Ensuring the SSL file for HTTPS termination is deployed
copy:
src: files/haproxy.pem
dest: /etc/pki/haproxy/haproxy.pem
owner: root
group: root
mode: 0600
setype: cert_t
– name: Ensuring the HAProxy configuration is deployed
copy:
src: files/haproxy.cfg
dest: /etc/haproxy/haproxy.cfg
owner: root
group: root
mode: 0644
setype: etc_t
– name: Ensuring the http and https firewall services are opened
firewalld:
service: "{{ item }}"
state: enabled
immediate: yes
permanent: yes
loop:
– http
– https
====================== this playbook haproxy.yml completes here============================
All below commands ran on both cluster nodes ( nodea and nodeb) except a few commands are ran on Workstation (those ran on Workstation in fornt of "Workstation" is mentioned)
# yum install httpd -y
# systemctl start httpd
# cp /etc/httpd/conf/httpd.conf /etc/httpd/conf/httpd.conf_backup
3. Edit httpd.conf file with your desired configuration:
# sudo vi /etc/httpd/conf/httpd.conf
Add or modify the following lines at the end of the file:
apache
# Listen on all interfaces for port 8008
Listen 8008
# systemctl restart httpd
# echo "Hello, world1111!" | tee /var/www/html/index.html
# chown root:root /var/www/html/index.html
# chmod 0644 /var/www/html/index.html
# chcon -t httpd_sys_content_t /var/www/html/index.html
# yum install haproxy -y
# chown root:root /etc/pki/haproxy
# chmod 0700 /etc/pki/haproxy
# chcon -t cert_t /etc/pki/haproxy
# scp haproxy.pem root@nodea:/etc/pki/haproxy/haproxy.pem << From Workstation
# scp haproxy.pem root@nodeb:/etc/pki/haproxy/haproxy.pem << From Workstation
# chown root:root /etc/pki/haproxy/haproxy.pem
# chmod 0600 /etc/pki/haproxy/haproxy.pem
# chcon -t cert_t /etc/pki/haproxy/haproxy.pem
# scp haproxy.cfg root@nodea:/etc/haproxy.cfg << From Workstation
# scp haproxy.cfg root@nodeb:/etc/haproxy.cfg << From Workstation
# chown root:root /etc/haproxy/haproxy.cfg
# chmod 0644 /etc/haproxy/haproxy.cfg
# chcon -t etc_t /etc/haproxy/haproxy.cfg
# firewall-cmd –zone=public –add-port=80/tcp –permanent
# firewall-cmd –zone=public –add-port=443/tcp –permanent
# firewall-cmd –reload
I now it will be a time consuming task for you. I'll appreciate if you can share commnads how to configure a two-node cluster and deploy a secure web server on that cluster (with haproxy) ?
Thank you!
Hi, you said “but I’m facing issue in below playbooks named as apache.yml and haproxy.yml.”
What issues are you facing exactly? What is it that does not work for you? What errors do you get? Could you post them here please?
Hello everyone,
In EX436 exam we have to configure iscsi target and initiator from our end, or in exam they have already configured?
We can’t tell you what’s on the exam due to NDA, but if you know how to configure them, then you won’t have issues during the exam.
I mean we have to run targetcli command for LUN mapping?
pvcreate /dev/mapper/mpatha
start a lock manager, lvmlockd did not find one running.
Global lock failed: check global lockspace is started.
I’m facing now this strange issue during configuration of HA-LVM in 2 cluster nodes.
I also tried to reboot the both cluster nodes,
use_lvmlockd = 1 <<—- Used this /etc/lvm/lvm.conf file.
Manually restart the lvmlockd service also.
also able to see "mpatha" device on both 2 cluster nodes using "lsblk".
multipath configuration is fine. "multipath –ll" is showing correct.
But none of the above trick solved the issue in my case.