Setting up a highly available homelab with KVM, Katello and Puppet.
I was working on a project where I needed to design a highly available (HA) infrastructure for a WordPress application, and I used my homelab environment to deliver a proof of solution (POS).
Goals and Requirements
One of the main goals of the homelab is to deliver a POS for a highly available WordPress application.
Other requirements, in no particular order, can be seen below.
- A KVM hypervisor. KVM is ubiquitous these days, and anything else is basically The Dark Side – the force may be strong, but one must resist the temptation.
- All virtual machines use CentOS 7.
- Services that are essential for the environment to function must be highly available. This includes DNS, DHCP, SMTP, NTP and LDAP.
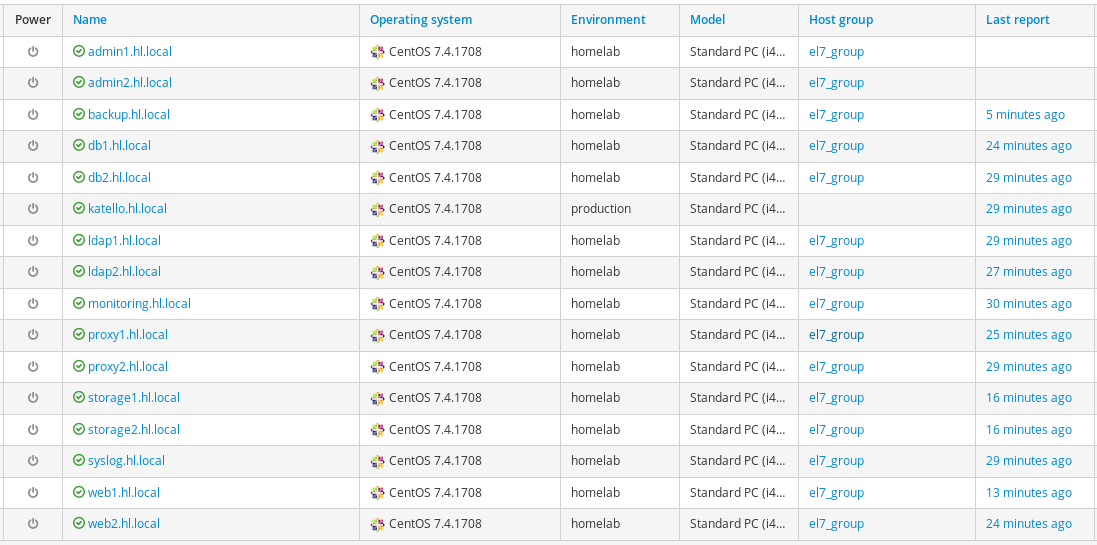
- The environment is automated and managed by Katello and Puppet. This is a very important goal in order to make the environment scalable should I need to.
- All servers have to use LDAP authentication.
- All servers have to be monitored and backed up (backups are extremelly important, however, as long as I take KVM snapshots, setting up a dedicated backup server becomes less of a priority).
- All servers have to send logs to a central syslog server for audit.
- Web servers have to be configured to send application logs to a central syslog server for further processing and reporting.
- There has to be no single point of failure when it comes to the availability of the WordPress application, meaning that we will need at least two load balancers (or proxies), two web servers, two database servers, and two NFS servers for shared storage.
- SELinux must be enforced on all servers.
- Compliance and vulnerability scanning with OpenSCAP.
- There are likely some more requirements which I forgot about while working on this write up…
Hardware
Hardware isn’t really a concern, mainly because I don’t need powerfull piece of equipment in order to run KVM and deliver a POS.
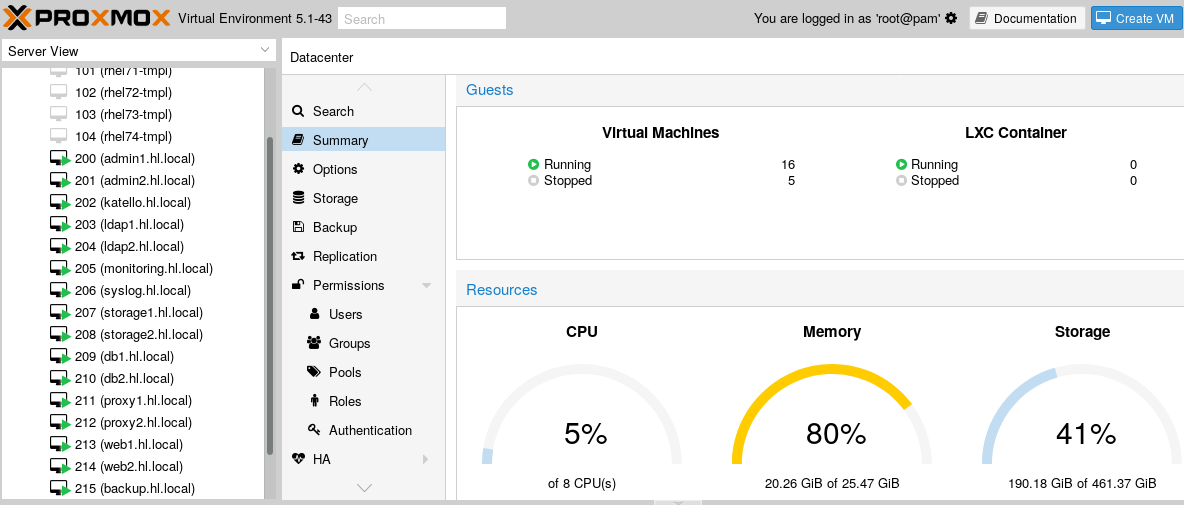
My homelab environment is deployed on a single (and rather old, if we consider nowadays standards) Dell workstation. Hardware specs below.
- 8 CPUs (i7-2720QM).
- 26 GB of RAM.
- 128 GB of SSD storage for Proxmox.
- 256 GB of SSD storage for KVM images.
The Plan
There are two distinct parts to setting up the homelab, the manual one, where we need to install a hypervisor and configure some essential services (e.g. DNS) before we can start automating things, and the automated one, where we start utilising Katello and Puppet to provision the rest of the infrastructure.
As already mentioned under the requirements section, I use CentOS 7 exclusively, SELinux is set to enforcing mode on all servers and firewall rules are hardened in a way so that they allow required traffic only.
Proxmox, Admin Servers and Katello
These are the things that we need to provision manually.
1. Set up a KVM hypervisor (I use Proxmox). There are a couple of things that one should be aware of before sticking with Proxmox. Proxmox does not use libvirt, therefore:
- Pacemaker clusters cannot be fenced by using fence-agents-virsh. There is fence_pve, but you won’t find it in CentOS/RHEL, and you’ll need to compile it yourself.
- Proxmox does not work with foreman-libvirt and cannot be used with Foreman as a “Compute Resources” provider to create guests. If you come from a libvirt enviroment then this can be a bit of a drag, but as long as you can PXE boot it isn’t that big of a problem, at least in a homelab.
2. Create three VMs. Two of them will named admin1 and admin2, and will be configured to provide redundant DNS, DHCP, SMTP and NTP services to the environment. The third server will host Katello/Puppet. See the homelab network diagram below for more info.
The Katello server will provide TFTP services, and the DHCP servers will use the Katello server as the PXE boot machine.
DNS servers will be configured to serve a forward and a reverse zones.
Additionally, we will import errata information from the CentOS-Announce mailing list into the Katello server so that we can see security update advisory information.
Automation: Puppet-managed Servers and Services
Once we have our hypervisor running, the admin1/admin2 servers provisioned and Katello configured, we will go ahead and do the following.
3. Use Katello to PXE boot a pair of Master/Slave LDAP servers. Do not allow anonymous bind, and do not use plain-text LDAP (allow LDAPS only). All Puppet-managed servers will be configured to use LDAP authentication.
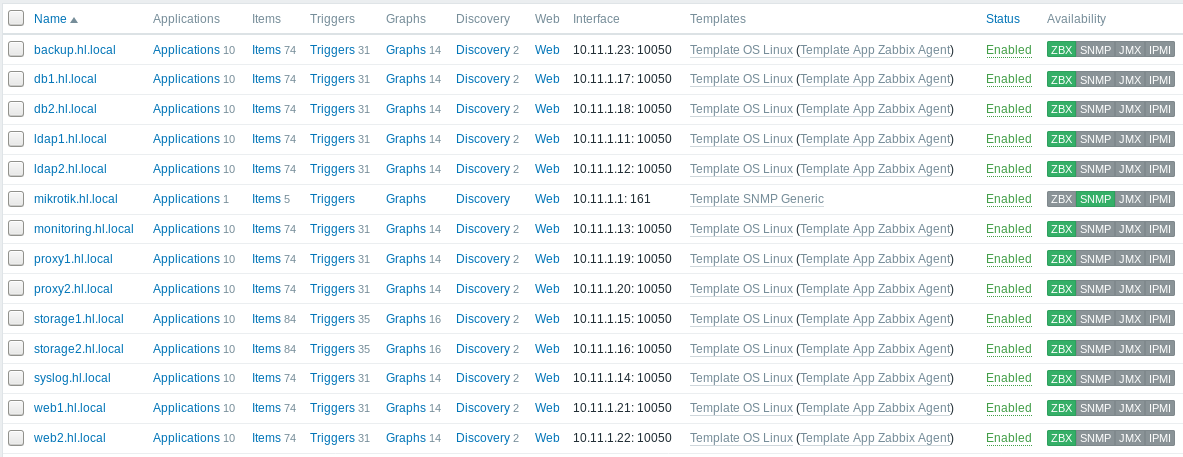
4. Use Katello to PXE boot a Zabbix monitoring server. Use Puppet to configure active Zabbix agent auto-registration and ensure that all servers get the correct monitoring template applied.
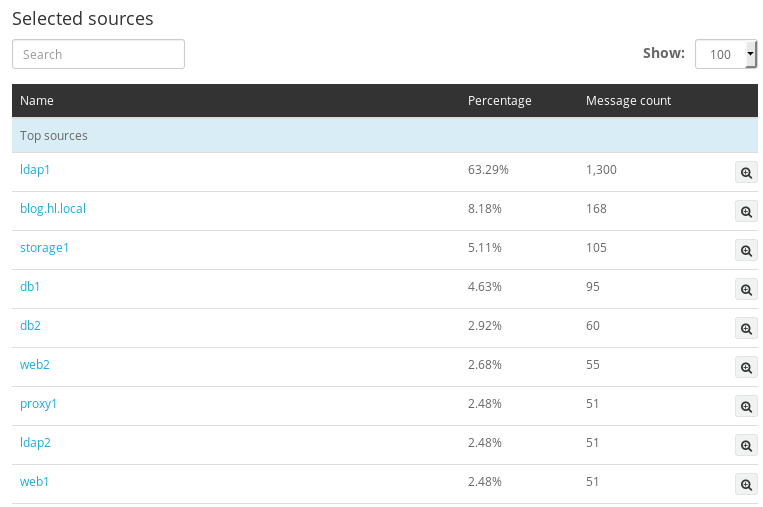
5. Use Katello to PXE boot a Graylog syslog server. Use Puppet to configure all servers to send syslog data to Graylog.
6. Use Katello to PXE boot a pair of MySQL servers and use Puppet to configure Master/Master replication for HA.
7. Use Katello to PXE boot a pair of NFS servers and use Puppet to configure a Pacemaker cluster for HA.
8. Use Katello to PXE boot a pair of Apache servers and deploy WordPress via Puppet. Serve all content over HTTPS and use shared NFS storage for the WordPress uploads folder.
9. Use Katello to PXE boot a pair of HAProxy servers and use Puppet to configure a load-balancing cluster with Keepalived. Configure HAProxy to use TLS.
10. Use Katello to PXE a backup server. See the homelab network diagram below for more info.
Homelab Network Diagram
A simplified network diagram showing services provided by each virtual machine, as well as their IP addresses, can be seen below. It should hopefully make sense if you read all the sections above. 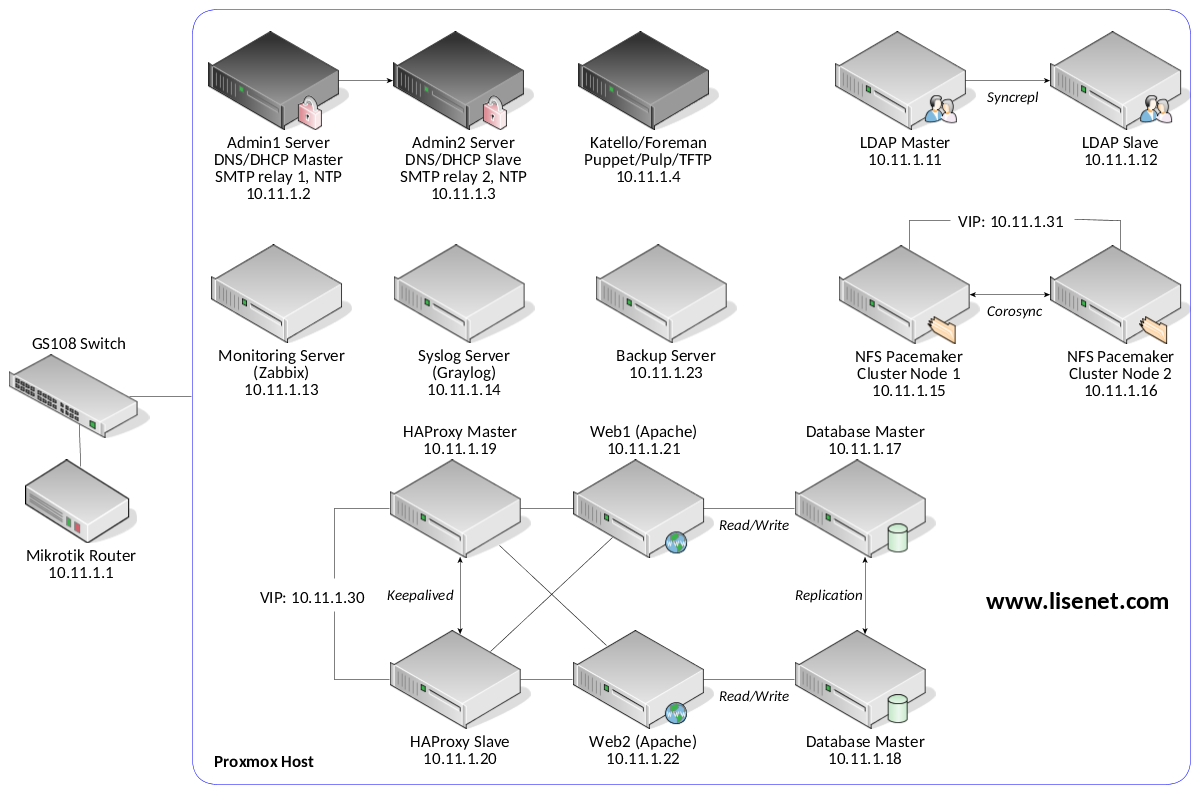 Three servers, which are coloured in black, will be set up manually. The rest of the servers (coloured in grey) will be provisioned by Katello (PXE boot) and managed by Puppet.
We’ll have a pair of LDAP servers to provide redundancy. We’ll also have two Pacemaker nodes in an NFS cluster to export shared storage, it will be used by the web servers (WordPress uploads folder). A pair of HAProxy servers for load balancing and HA, and a pair of MySQL servers with active/active replication.
Homelab Info Table
The VM IDs are used by Proxmox only and can be pretty much anything.
Homelab subnet is 10.11.1.0/24.
MAC address of each VM is configured in a way so that it always start with 00:22:FF:00:00 but the remaining part is tied to the last byte of a VM’s IP address.
For example, a VM with the IP address of 10.11.1.15 would have a MAC address of 00:22:FF:00:00:15. This is important as we’ll be using PXE boot with static DHCP leases.
| VM ID | Hostname/DNS | IP address | RAM (MB) | Notes | PXE boot | Katello agent | Puppet Managed |
| 200 | admin1.hl.local | 10.11.1.2 | 512 | DNS/DHCP master, NTP, SMTP | No | Yes | No |
| 201 | admin2.hl.local | 10.11.1.3 | 512 | DNS/DHCP slave, NTP, SMTP | No | Yes | No |
| 202 | katello.hl.local | 10.11.1.4 | 10240 | Katello/Puppet/TFTP/Pulp | No | Yes | No |
| 203 | ldap1.hl.local | 10.11.1.11 | 768 | LDAP master | Yes | Yes | Yes |
| 204 | ldap2.hl.local | 10.11.1.12 | 768 | LDAP master | Yes | Yes | Yes |
| 205 | monitoring.hl.local | 10.11.1.13 | 1024 | Zabbix server | Yes | Yes | Yes |
| 206 | syslog.hl.local | 10.11.1.14 | 2048 | Graylog server | Yes | Yes | Yes |
| 207 | storage1.hl.local | 10.11.1.15 | 768 | NFS Pacemaker cluster node | Yes | Yes | Yes |
| 208 | storage2.hl.local | 10.11.1.16 | 768 | NFS Pacemaker cluster node | Yes | Yes | Yes |
| 209 | db1.hl.local | 10.11.1.17 | 1024 | MySQL master | Yes | Yes | Yes |
| 210 | db2.hl.local | 10.11.1.18 | 1024 | MySQL master | Yes | Yes | Yes |
| 211 | proxy1.hl.local | 10.11.1.19 | 768 | HAProxy master (with keepalived) | Yes | Yes | Yes |
| 212 | proxy2.hl.local | 10.11.1.20 | 768 | HAProxy slave (with keepalived) | Yes | Yes | Yes |
| 213 | web1.hl.local | 10.11.1.21 | 768 | Apache webserver | Yes | Yes | Yes |
| 214 | web2.hl.local | 10.11.1.22 | 768 | Apache webserver | Yes | Yes | Yes |
| 215 | backup.hl.local | 10.11.1.23 | 768 | Backup server | Yes | Yes | Yes |
In addition to the information provided in the table above, the following resources will be used as well.
| DNS | IP address | Notes |
| mikrotik.hl.local | 10.11.1.1 | Mikrotik router |
| pve.hl.local | 10.11.1.5 | Proxmox KVM hypervisor |
| blog.hl.local | 10.11.1.30 | VIP for the WordPress website used by HAProxy |
| nfsvip.hl.local | 10.11.1.31 | VIP for NFS used by Pacemaker |
Network Diagram for Highly Available WordPress Deployment
Here is a GIF representing the HA setup for WordPress. I could put some effort trying to explain what’s going on here, however, there is a new episode of “Abroad in Japan” out so I have to go and watch it.  If you look at the network diagram, you’ll notice that there isn’t a single point of failure – we can lose a server regardless of the service that it provides and still have a functioning web application.
What’s Next?
Over the upcoming weeks I plan to publish articles covering the creation on the homelab. At the time I write this, I actually use the WordPress application that’s running in the homelab environment, which is finished and operational. See the images below to get a better idea.
Part 1: Install Proxmox/KVM on bare-metal
Part 2: Set up Admin servers with DNS/DHCP/NTP/SMTP. See links below.
>Part 2.1: Configure Bind DNS Servers with Failover and Dynamic Updates on CentOS 7
>Part 2.2: Configure DHCP Failover with Dynamic DNS on CentOS 7
>Part 2.3: Configure Peered NTP Servers on CentOS 7
>Part 2.4: Configure Postfix to Relay Mail to an External SMTP Server on CentOS 7
Part 3: Install Katello on CentOS 7
Part 4: Configure Katello services. See links below.
>Part 4.1: Katello: Create Products, Repositories, Content Views, Lifecycle Environments, Activation Keys
>Part 4.2: Katello: Import CentOS Errata into Pulp
>Part 4.3: Katello: Create a Domain, Subnet, Installation Media, OS, Provisioning Templates, Host Groups, PXE Boot
>Part 4.4: Katello: Working with Puppet Modules and Creating the Main Manifest
>Part 4.5: Katello: Separate Lifecycle for Puppet Modules
>Part 4.6: Katello: Security Compliance Management with OpenSCAP
Part 5: Configure OpenLDAP Master/Slave Replication with Puppet
Part 6: Configure Zabbix Monitoring Server with Puppet
Part 7: Configure Graylog Server with Puppet
Part 8: Configure MySQL Replication with Puppet
Part 9: Configure Active/Passive NFS Server on a Pacemaker Cluster with Puppet
Part 10: Configure Apache Server and Deploy WordPress with Puppet
Part 11: Configure HAProxy and Keepalived with Puppet
Proxmox WebUI
Katello WebUI
Zabbix WebUI
Graylog WebUI
Hey Tomas,
very nice and comprehensive documentation – appreciated!
Keep up your good work. :-)
Best wishes,
Christian.
Thank you Christian!
Probably the best resource i’ve found so far about foreman/katello! Thank you a lot!
You’re welcome, and thank you for feedback.
Thanks for sharing a very laborious document…One of the best resource. Keep it up….
You have done a great job. It’s very generous that you share it. I am learning Katello to accomplish something like that. Your Homelab helps a lot! Thanks so much
Thank you for your feedback!
Hi, I am new and trying to learn Linux. I have almost done the same set up (the wordpress side only HA LB, WEB and DB). In the DB side, I am doing a Galera cluster (3 nodes) since I’m having troubles on making a Master/Master replication setup (2 nodes). Is there a reason why you preferred Katello and Puppet over Ansible? I am also looking on learning automation tools and I need someone who can point me to the right direction. Thank you for this very informative guide.
Thanks for your feedback, I’m glad that your found the guide useful.
I think that Puppet and Ansible serve different use cases really. I’m afraid I cannot tell you which tool is better. Also, keep in mind that this is just my experience.
In short, Puppet is a configuration management tool, that’s all I use it for. Ansible, on the other hand, is a bit of a “mix and match” where you can do provisioning, configuration and deployment.
In my case Foreman does provisioning (I used Spacewalk until I migrated to Katello/Foreman), and Puppet takes care of configuration. With Katello I also get a nice open source front-end for Puppet deployment and reporting.
If I had to give a reason why I like Puppet it would probably be Hiera, Puppet Forge and task scheduling.
When I need to configure something, I always check on Puppet Forge first, because honestly, chances are that someone has already done it. As far as I can tell, Puppet is amazing when it comes to the module choice. A lot of them are tested (if you read this statement 5 years ago you would probably disagree), some are even managed by PuppetLabs (e.g. Apache, Tomcat).
In terms of task scheduling, Puppet agent reverts all manual changes if they differ from what I declared in a manifest. This is exactly what I need from a configuration management tool.
One other thing about Puppet, which was useful to me some years ago, but is less important nowadays mainly because I don’t do it anymore, is configuration of Windows servers.
There is plethora of articles published about Puppet vs Ansible vs Chef vs Salt. Just pick whatever is used at your workplace, or whatever your friends are using, and go for it.
Can I replicate this setup with only 8GB memory?
No. Katello requires 8GB of RAM.
This tutorial is pretty awesome, great work!
I’m pretty new to all of this and I’m trying to teach myself but I seem stuck on the IP Addresses. How did you do that? I’ve tried setting the static IP address during the CentOd install and by editing the ifcfg. Every time I try to ping I get nothing. Any thoughts?
Thanks! I don’t edit anything manually, I use PXE boot with static DHCP leases. You can configure your DHCP server to issue IPs based on MAC addresses.
Hi,
Thank you very much. It’s a very helpful and interessting articles.
Thanks for your sharing and your efforts.
You’re welcome.
Hi,
That may be a stupid question but do you have an idea on what would the minimum specs required be for this project ?
Thanks for the articles
The specs that I use are listed under the “Hardware” section, please take a look. The amount of RAM is what you will need the most, the rest is less important. You can cut disk size in half if you create smaller VMs.
Tomas,
What tool(s) did you use to create the haproxy animation above?
Thanks for all the work you have done. I am looking forward to reading more about your RHCA journey.
I used a combination of yEd and ImageMagick.
OK, I’ve used this documentation using several machines running CentOS 6 and all is well (no SpaceWalk install). I am preparing to move to CentOS 7 and then to CentOS 8 when it’s available.
What I want to know (I searched for a update to the documentation without success) can I just substitute CentOS 7 for CentOS 6?
My differences is that on my primary machine running CentOS 7.1810 I have bind 9 and 389-DS. I also have a 4 TB file system used to store all of the virtual machine disk images from 4 other machines. I run both KVM and VirtualBox (VirtualBox will run my updated OS/2 Warp 4 where KVM will not).
I guess my questions are not so simple.
TIA
Gene
Most things will work, but you’ll need to create new Katello products/repositories for CentOS 7, you will also need to set up CentOS 7 DVD media for provisioning.
Hi, Tomas!
Can I use macbook pro 16GB ram and virtual box for this Homelab Project?
You have the best resource for lerning linux like a pro!
16GB of RAM will not be enough to run everything at the same time, but you can still deploy it. Refer to the Homelab Info Table for RAM required by each VM.
Wow Tomas, though this post is from year 2017, till date, I do not see any comprehensive post on Katello roll out than this one. Excellent job in documenting everything. Do you have any video training to which I could enroll? I am working on setting up a distributed Katello based system management environment which can handle package management, configuration management and system build through PXE. I hope, the documentation would be enough, but, if you really have any training in this one, I would be more than happy to enroll.
Hi, thanks very much for your feedback, much appreciated. The only comprehensive video training that I’m aware of is Red Hat’s video course for Satellite. I don’t create any video training material myself I’m afraid, it’s too time consuming, and I don’t see that much value compared to well written study guides or write-ups.